| Want to print? Use this version Back issues are in the Archive Go back to the main site Download a zip version |
REM 'Letter from the Editor |

By ZKman
7 is the luckiest number of all! ^_^ |
S'up's, todos? It's already time for Issue 7, a mere 28 days since the last issue (wow!..heheh). So, I know you're dyin' to know what's new...firstly, we're doin' a Zip version now in addition to the normal printable issue! You guys begged for it and we brought it. The link to the demo version is in the Table of Contents. Also new this month is a feature called the Gallery. Here we bring you an exclusive screen or two from a hot new game. This month one of the titles featured is "Eternal Frost", a new and top-secret project by DarkDread himself! Guess what you guys get next month, too? How about a full preview of this hot ticket! |
Zips, galleries, and things | Speakin' of the Future, we've talked with some of the leaders in qb development That's not all though! We've also got the start of a new Composing series by 19day. No need to steal midi's for your game now that you'll know how to make your own, eh? Petter continues his award-winning (ok..so not really...but it SHOULD be award winning!) series on Assembler. MA SNART whips up the latest batch of 3d fun; as ya know, 3d is the future, so no whining about how you hate math! ^_^. Finally, Angelo and Petter rule, because this month, myself and them bring you the coolest preview of 1999's coolest and, up this point, most secret game! What's that, asks the guy whose been under a whole for the last year? Why, it's "Project RT"! On top of this, we get screens straight from Enhanced, and an interview about qbasic's future by Terminator_Z! Finally, some major apologies are in order. First of all, the code from Petter's assembly article last month wasn't quite right. This was my fault, not his. I put up an early version of the article rather than the correct one, so if you're interested in getting the correct version (in a .txt file), you can grab it here or you can grab it down at with the new assembly part. Also, we mentioned that last issue (in the Index) that this was the second part of the assembly series. It was in fact the third (making this issue the fourth...wow!). So, dig in and enjoy. Feast and rejoice. Blibber and blabber. Roast a pig in effigy. Or just read the issue... See ya' next month!
|

Compiled by ZKman
|
What da ya MEAN "not for sale"?
You can contact Steve at this address | quickbasic.com, Learn to Program QBASIC, the Qbasic Gazette, and more! |
|
Interplay puts out a BASIC compiler!
Sounds scrumdiddly-umptios, doesn't it? Unfortunately, it isn't. For one thing, many qb codewords aren't supported in LTPB. Also, the program can't even compile to .exe! It has a thing called a "runner" which will let it run games from the Windows desktop, like a Klik n Play file. However, at a street price of around $30, this is a good way for newbs to learn the basic concepts behind qbasic. Go to the LTPB site for more information, in addition to hearing .wav's from bigshots like Fallout and Sim City's lead coders talking about why BASIC is good! Very cool!
Qbasic Gazette launches
Sign up for this new publication at Neozones today!
IF DarkDread <> RavenNight THEN "We're Wrong"
Qlympics Voting Begins!
uNESs Nintendo Emulator!
New library updates
Exodus goin' to quickbasic.com
Qbasic.com owner returns
Gif89a Player in development!
If ya thought an NES emu was good...
Nekrophidius' Carnage
Jaws-V is the MAN!
Oops! Firstly, I put up an early and incorrect version of Petter's asm series. Look to this month's episode for the correct version. Also, in the Table of Contents, it said this was Part 2 of the series, when in fact it was part 3. Also, this issue is coming out 13 FEBRUARY, not January, as the Next Issue section said last month and WAY too many people told me about. ^_^ |
Dark Ages 2 Engine Demo, Puz, Eternal Frost and more! |
Latest Game updates:
|
SonicBlue has been putting lotsa work recently into Space-a-Roo 2. This game features great graphics, and is a top-down 360 degree scrolling space shooter! On top of that, it features pixel-perfect collision detection, rather than easier methods such as Manhattan and circle collision. Puz, an addictive finished (read: complete!) puzzler by The Brain came out recently, and it rules! Although it's not a graphical masterpiece, it gets the job done in that department, featuring a cool fade-in when you rotate the numbers. It also has 3 mood-setting background midi's. The gameplay is high point though, with the objective being to get a collection of numbers into the right order and facing the right direction. Check this month's survey to see just how popular this game is, and possibly expect at least a mini-review in next month's issue! A C+C style game in development that's lookin' pretty cool is called "Shell Shock". The graphics aren't the most amazing, but they do the job, the start of an attack program is already in the demos, and there are plans for ore mining, infantry, etc. Qbasic history does not bode well for C+C clones, though, as (to my knowledge), both Low Radiation and Woodlands have both been cancelled. ChUcK and the guys over at Dark Elf Productions, one of qb's largest programming groups, currently housing the Fox team and others in addition to the groups main project, Medieval Muddle 3. Not much is known about the gameplay at this time, although it looks somewhat RPGish, but the graphical quality is great; right up there with Sypharage and Eldim... This month in the shorts section: Eldim has begun prelim engine work on Bubble Fighters, his artistical-style driven fighting game...A demo of Dudes with Attitude has been released by Pickle Productions. This game looks similar to Wetspot 2 in screen layout, but plays in a novel and interesting way: The object is to "bump" your character off walls and collect crystals, but not bump into the enemies. The WII connection is not surprising, considering Pickle's head man, Wafn, was the creator of many of the more popular Wetspot II worlds. Pick it up at Wafn's World... No need to even print any Project rt news here: You can read all about it in the Project RT full preview in the articles section!...Darkdread has re-emerged, and his new title, Eternal Frost, should possibly have a full beta out by next month's issue! I've played an alpha copy, and it's great: Legend of Lith 2 style engine, but much better and more innovative. Look for a full preview next month, and check the screenshot in the gallery!...Speaking of re-emerging, what's up with Pasco's slew of titles? 3 of the most interesting looking qb titles in Soccer, Groov 2, and "Vertical Scroller" have had nothing new come out the stables in recent months! Come on, Pasco! We want those games! ^_^...Lbt1st is working on a "1.1" version of SFB2. Not merely a patch, this will improve the AI, fix up some particle effects, and possibly include new levels! That's all the latest news for this month. Remember, if you have any news or rumours, send them along to Qbasic: The Magazine |
![]()

By ZKman

|
Here's what you had to say about last month. Be sure and send us more letters soon! hehe. The new issue should be coming 13 FEBRUARY, not January, as printed in the "Next Issue" section. Fabulous issue, thanks for taking the time to put it out. MagnaUnum AAAARRRGGGGGHHHH! ok! I know now that I put up the wrong month in the Last issue section. The oodles of email I recieved will help me from makin' the same mistake twice ^_^. |
![]()
|
First off, the format is looking better; No more 44 billion frames cluttering up my screen and making my monitor fall on the floor. Good. But now you've got this crazy layout of the magazine itself. Bad. It looks... Drunk. It's really hard to differentiate between the sections, cause everything's just swimming left and right randomly... No. Bad. I don't like it. Second, some more information wrong: There's just this big freaky cloud: "Lianne...in the Dark Crown: ...Many hours of gameplay...". 2 things: It's Lianne in... The Dark Crown. Put your ...'s in the right place! Second off, in what strange world did it have many hours of gameplay? Was there a later demo I never saw? The only one I've seen just had one overworld map where you killed bunnies then fought a tree and some guy... That didn't take hours, unless you fell asleep or something. What is wrong with you? Things I agree with...Wrath of Sona being crappily dappily: Well, I can't say... The thing's too frickin huge to download! His server quits on me every frickin time I try! I mean, 13 megs, for a QBASIC game??? That's not big; That's just plain ineffecient. I mean, what is wrong with him? 6 megs is music, apparently... Okay, then, that's fine, you can choose not to DL that part (you can, you really can)... But that's still 7 MEGABYTES of stuff... I mean, is he using 320x200 JSprite graphics or what? I don't know; I don't want to know... After failing 3 times at downloading it, I'm never GONNA know. That nazi! DarkDread != RavenNight... I agree with that too, but what's with the C inequality operator? <>, damn you, if it's gonna be a QBasic magazine! I got nothing against C, mind you, it's a great language and I enjoy using it almost as much as BASIC... But when you have a magazine called QBasic: The Magazine, you use QBasic's inequality operators, damnit! Oh, and the trends were pretty on the mark, though I think some were pretty obvious (ie, libs... They already dominate, and continue to grow...)... Of course, that doesn't mean I LIKE where the community is headed. I fear the game progger's will soon be drowning in libs. It'll be glorious for people who like lib-progging, mind you, they get to do all the fun stuff. But for any reasonable person (or, as you mentioned, PEOPLE) who wants to get something done that people will actually LOOK at, they're gonna have to go all-out using every damned lib available. QB Progging will turn into little more than putting together bits and pieces... Not by inadequacy, but by neccessity. And that's kind of sad, in my opinion. QB is losing it's low-quality romance: I'll miss it. Oh well. So it goes. Oh yeah, and what's with the lack of mention of Last of the Legends(LotL)? It's one of the most damned promising QB games out there... Are you looking over it just because of the poor graphics or what? I mean, yeah, there are games out there with SVGA and umpteen other crappy effects, but do they have working, playable battle engines? A complex, versatile scripting language? None that I've seen. LotL certainly isn't the best QB RPG out there - Not yet, at least - But, damnit, it's worth a mention (especially when you're STILL talking about the long-dead Eldim, which was really little more than a glorified tile engine) (Don't worry, I asked Enigma if I could say that. He said "If you...want...". I'll take that as a yes!)... I think that's all I have to say. Woo. Oh, and I bet you're wondering why there's a midget in my hat... Skywise whew! hehe, that's one long letter! Anyways, lots of stuff to comment on. Firstly, about the new layout. We've heard many compliments on it (see Seav's letter), so it's gonna stay "drunk"! I don't understand how it's hard to follow, as each article is either left or right: I don't switch in the middle! On SFB2, I've fixed where it said that it was one of only 2 fighters! That section was written months ago, and I was probably half-asleep when I wrote it ^_^. About your comments on Lianne's playing time, it took me a couple hours! heh, but I suck at RPG's, so... Wrath of Sona is either ya like it or ya don't, so I won't get in that discussion again ^_^. As you can see, we're also using qb's inequality operators now ^_^. Yeah! Qb! The trends probably should be obvious...I'm not Nostradamus over here! But your comments on the libs being a bad thing: I don't use any libs, but I probably will in the future without remorse. Romero and Carmack use libs in their games! If it improves the quality of qb games, I'm for it. What I don't like is newbies starting out with dqb the week they start qb. That's probably not the best way to learn to code ^_^. Finally, you asked why we don't cover more on LotL. I try to get in lots of projects under Upcoming Games, but only about 10 games a month out of hundreds in dev means I can't mention everything every month! I've only mention my own game once in 7 issues! |
![]()
|
I felt I had to respond to some things... Yes, you should make an email version [of qb:tm]. Why is everyone looking forward to Project RT? It's just an engine for any type of 3d game at the moment - the reason Angelo and Petter are keeping it secret is that they dont' know what game they're going to turn it into. Steve hmm...we were considering (and have added) a .zip version of qb:tm. But there was never talk of an email version! Y'see, our issues weigh 50 to 100k, but free email lists have a max of about 10k, so... About Project RT: Think ya missed some info there! To see what the fuss it about, read the preview down in the articles section! Yeah! Project RT! |
![]()
|
Hey, zkman I really like the new layout. It looks like it took a lot of effort to make it presentable. And it's easier to read the articles! Keep up the good work! BTW, Maybe you meant that the next issue will be presented on *February* 13. Not January. Also, would you consider dividing each issue into pages? Hmm.... I think a zip version would bee a good idea. Something like VSNews of VirtuaSoft. About the labyrinth: I'm planning to release another demo by early February. This time it will have some resemblance of gameplay. SEAV Thanks! I like the new layout much better too...you don't even have to move your head to read the articles anymore! ^_^. AAARRRGGGGHHHH! Yes! We get the picture! February! ^_^. On dividing into pages, I've thought of that (or of doing a .pdf version), but have decided not to, primarily cuz it's a lot of work ^_^. Maybe sometime in the future, though. I hadn't seen the new demo posted as I was formatting this issue, but go see for yourself at Seav Softwares if the new Labyrinth is up. |
![]()
|
Where can I get hold of the previous assembler tutorials by Petter Holmberg?? Thanks for your help! Tom Sor Oh! For readers who didn't know of it, back issues are stored in the Issue Archive. You can also read old news there. In the case of Petter's articles, they were in Issue 4, 5, 6, and this one. Check the Index for a complete listing of all articles, what issue they appeared in, and printable versions of each issue! |
![]()
|
qbasic: the magazine reserves the right to edit any letter recieved for purposes of clarity and space. But you already knew that.
|
 Here's the results of the Issue 7 survey from Qbasic: The Magazine! We need more people to Vote! So do it!
 Favourite Game     |  Last Month  | Change
 1. Wetspot 2              1           <>
 2. Dark Ages (t)          2           <>
 2. Mono. Shooter (t)      --          --
 4. Puz                    --          --
 5. SFB2 (t)               3(t)        D2
 5. Groov Buggies (t)      --          --

 Comments: Monospace Shooter jumps up to a
   tie with perennial number two Dark Ages!
   Puz performs well, and SFB2 slips a bit.

 Favourite Utility  |  Last Month  | Change
 1. DirectQB               1           <>
 2. QMIDI                  2(t)        <>
 3. SpriteShop (t)         --          --
 3. PP256 (t)              2(t)        D1
 5. Dash                   2(t)        D3

 Comments: Dash takes a huge hit this month
  in the polls! QMIDI and dqb both do very
  well, and 2 tile editors make the list.

 Best Upcoming      |  Last Month  | Change
 1. Dark Ages 2 (t)        1           <>
 1. "Project RT" (t)       2           U1
 3. MOTG Project           --          --
 4. LotL (t)               --          --
 4. Vampira (t)            --          --
 4. Adv. in Rulon (t)      --          --
 4. dqb version 1.5 (t)    --          --

 Comments: DA2 and Project RT controlled
   the voting again, with Project RT coming
   into a tie at the top with DA2! MOTG did
   fairly well, and a slew of titles rounded
   out the list.
Vote today by emailing your votes for:
|
You need this stuff! |
Must Downloads returns for another showing. This month, a new game was
added! Puz, the puzzler by the brain, has qualied for Must Downloads! Also, a tile
editor called SpriteShop, also by The Brain, came very close. Everyone knows that
there are a god-awful amount of qb games out there, but what's worth downloading?
These, my friend. Here, you'll find a list of the best of the best in QB progs. See
something that should be here? Tell us and we'll check it out. You HAVE to have this
stuff!
|
|
Puz A puzzle game by The Brain where you must flip numbers in rectangular groups until you get them in order. Decievingly addictive!
Absolute Assembly
Dark Ages Groov Buggies Lianne...in the Dark Crown Monospace Shooter Wetspot & Wetspot 2 SFB2 PP256 DirectQB/DashX/Blast! QMIDI4.1 Pb3d |

|
This February, our site of the month in one immense Qbasic RPG Heaven. Modeled after The QuickBasic RPG Page, which is now run by LordQB, takes everything that page has done and does it doubly good. Updates and screenshots for nearly every qbasic game in development today, a complete collection of the greatest qbrpg's of yesterday, and a great tutorial section top it off. Of course, this site is none other than the (relatively) new Sneukeule's RPG Page, whose name is incredibly hard to spell. Cheers to qb:tm's fifth Site of the Month. | RPG's, tuts, and a hard to spell name... |
![]()

By Petter Holmberg
This time: Controlling Program Flow |
(Editor's Note: I put up the wrong version of Petter's Part III assembly series. The code that I posted was incorrect. I apologize. You can grab a correct .txt version of the article right here.) Hello! The fourth part of my assembly tutorial is here! The last part was really huge and covered many ways to manipulate registers and QB variables. I hope you've done some test programs during the last month to test what you've learnt. Now it's time for something new! Until now, we've only seen simple assembly programs that basically only could manipulate numbers in different ways. As interesting this may be, it would be great to know a little more, wouldn't it? |
|
Do you remember what it did? Can you instantly explain how it works? I can't. Due to this problem, I knew that it was necessary to allow comments in Absolute Assembly. In BASIC, the "'" sign, or the older REM instruction can be used for commenting. In the most popular assembler's, like Microsoft's MASM and Borland's TASM, (I'll get back to them in another part of this tutorial series) the semicolon, ";", is used for comments, so I made this an Absolute Assembly standard too. Commenting assembly code is as simple as commenting BASIC code. Let's try:
; Assembly routine that adds two integer variables together:
Wow! What a difference a few comments can make, right? Now the purpose and the basical functions of the routine are clearly explained. The details of each operation can now be understood by examining very few lines of code. This commented version of the addition routine would be correctly handled by Absolute Assembly. It just ignores everything written on a line after a semicolon has been encountered. Now, let's get back to those jumps!
CALL and RET: CALL address Just like with MOV, you would have to calculate the memory offset to the asm instruction that you want to jump to, but with Absolute Assembly all you have to do is to specify a line label. When a CALL is executed, some things happen that you maybe will find interesting: First of all, the CPU pushes the offset address of the asm instruction after CALL on the stack, thus reducing the SP register by two. This is important to know if you're using the stack in the program. Then, the IP register, which always contains the offset address of the current machine language instruction being executed, is changed to the offset address of the assembly instruction you want to jump to. The IP register cannot be changed manually. The only way to modify it is to use JMP, CALL or similar instructions. When you've jumped to a subroutine using CALL and want to get back again, you must use the instruction RET, short for RETurn. RET will pop the address of the instruction after the CALL instruction back from the stack and change IP. The next assembly instruction to be executed is the one after CALL. The syntax for RET is simply: RET number The number can usually be left out, but if you have pushed additional numbers on the stack inside the subroutine, you can let the RET instruction pop them away for you. If you look at the example program used in the description of JMP above, you can see the instruction RETF 6. RETF works just like RET, but with the difference that it returns from a FAR call, i.e. a call that has been made from another segment address in the memory. It's possible to specify a full memory address, containing both segment and offset after CALL, but we won't need to do that in Absolute Assembly programs. However, I strongly suspect that QBASIC executes such a CALL instruction when you use CALL ABSOLUTE. Far calls require that both the segment and offset of the next asm instruction are pushed on the stack, so also the CS register, containing the segment address of the instruction currently being executed, is pushed. That's four bytes instead of two, and that's why you have to use RETF instead of RET. The number 6 after RETF pops away 6 extra bytes from the stack. That's the three integer variables that was passed from the BASIC program.
This program is a simple, useless example of using CALL and RET:
PUSH BP ; 1
Subroutine:
PUSH BP
Conditional jumps: If you want to control the program flow depending on input data, you can use the assembly instruction CMP, which is short for CoMPare. The syntax is: CMP destination, source
|
Earlier parts of Petter Holmberg's assembly series can be found in the Archive. They are in issues 4, 5, and 6. |
The destination and source can be registers, immediate numbers or memory pointers. CMP actually works a little like SUB. It subtracts the source from the destination. The difference is that it doesn't store the result in the destination like the SUB instruction would do. What's the use of it then? Well, something very important actually happens, but you can't see it. Now I have no choice but to present another new feature of assembler to you: The flags. The flags are a very important part of assembly programming, even though it's something you rarely have to worry about. The flags are all located in a register, and that register is simply called the FLAGS register. This register is different from all of the others, because its individual bits all have separate tasks, and they are very important for the execution of a program. Each bit in the FLAGS register is called a flag, and they all have names. I'm not going to present them to you here because you'll never need to use most of them, but the important thing to know is that, almost every assembly instruction modifies some of the flags in different ways. One example is SUB. There's one flag called the Sign Flag, SF, and it will be set to 1 if the result of the subtraction gets negative or 0 if it gets positive. One of the few times you really use of the FLAGS register is when you push or pop it. PUSH FLAGS and POP FLAGS are valid instructions, and they're used when you need to preserve the state of the flags to a later time. So, even though CMP won't store the result of a subtraction, it will modify the flags in the same way that SUB would do. What use can we have of this then? Well, here comes the answer: There are a number of assembly instructions that can be used to perform conditional jumps in the code. Their names all begin with a J, for Jump. Here are the most common ones: Name: Description: ----- ------------ JB Jump if Below JBE Jump if Below or Equal JE Jump if Equal JAE Jump if Above or Equal JA Jump if Above JL Jump if Less (signed) JLE Jump if Less or Equal (signed) JGE Jump if Greater or Equal (signed) JG Jump if Greater (signed) JNB Jump if Not Below JNBE Jump if Not Below or Equal JNE Jump if Not Equal JNAE Jump if Not Above or Equal JNA Jump if Not Above JNL Jump if Not Less (signed) JNLE Jump if Not Less or Equal (signed) JNGE Jump if Not Greater or Equal (signed) JNG Jump if Not Greater (signed)How do these instruction work then? Well, the general syntax for all of them is: Jxxx linelabel The linelabel thing works just like it does with JMP. The idea is that you should use CMP to compare two operators, and then use one of the conditional jump instructions to go where you want to go depending on the state of the flags that a CMP between the two operators changed. Let's try an example! Suppose you have two numbers in AX and BX. If the number in AX is greater than the one in BX, CX should be set to 1. If not, CX should be left unchanged. Then you could use this code snippet to test it:
.
As you can see, I've put a space before the MOV CX, 1 instruction. I usually do this when writing conditional jump code in asm, just to make it look more like in QBASIC where you often do this between IF and END IF. This is just one of my tricks to make asm code more readable so you don't have to care about it. There's another thing you may be wondering about. In the list of jump instructions above, some of the descriptions have the comment "(signed)" in them. As I mentioned briefly in the previous tutorial, a signed number is the same as a negative number. I'll wait with the explanation of how negative numbers are stored, but it's important that you know when to use what jump instruction. If you want to compare two numbers where one or both of them are negative, you must use a conditional jump instructions that can handle signed numbers. So instead of using JA (Jump if Above), you use JG (Jump if Greater) and so forth. The JE and JNE instructions works with all types of numbers. I promise to explain the nature of signed and unsigned numbers later, and then you'll understand why you need so many different jump instructions. Let's try another example just for the sake of clarity: Consider the following code snippet:
.
There's another assembly instruction that can be used for conditional jumps: TEST. The syntax for TEST is: TEST destination, source TEST is used exactly like CMP and for the same purpose. The difference is that CMP performs a subtraction between the two operands, but TEST performs an AND between them. This can be useful if your conditional jumps depends on the bit settings of the operands instead of the value of the whole operand.
Loops: You already know how to perform DO/LOOP type of loops in assembly. You can use JMP together with conditional jumps, like this:
.
Although this is an acceptable way of performing loops in asm, there is a special loop instruction that does the job even better. Let's take a look at it! The special loop instructions I'm talking about are made for the FOR/NEXT type of loops, i.e. loops that you want to run a certain number of times. The CX register plays an important role here. It's the register used to store the number of times a loop should be executed. The instruction used to perform loops is... LOOP! The general syntax is: LOOP Label The Label operator works the same as with other jump instructions. Here's an example of using LOOP:
.
Limits of jumps:
Memory transfers fast and easy:
LODSx As you can see, there are no operands or anything. The "x" should be replaced with either a B for Byte or a W for Word. The first instruction, LODS, works like this: If you use LODSB, a byte from the address pointed out by DS:SI will be loaded into AL, and SI will be increased by one. (Actually it may be decreased instead if the Direction Flag, DF, is set.) LODSW works in the same way except that a whole word (two bytes) will be loaded into the entire AX register and SI will be increased (or decreased) by two. STOS is the opposite of LODS: It copies the value of AL/AX to the address pointed out by ES:DI, and increases/decreases DI by one or two depending on if you use STOSB or STOSW. MOVS is a combination of LODS and STOS. A byte or a word is loaded from DS:SI, but it doesn't go to a register. Instead it is copied to ES:DI and both SI and DI are incremented. MOVSB/MOVSW can therefore be used to transfer bytes from one position in the memory to another without touching the reguisters, something you cannot do with the standard MOV. We're going to use MOVS in the example routine I'm now going to present to you.
An example program: What we're going to do is an assembly version of the popular QBASIC instruction PUT. I'm not talking about the file handling version, but the graphics instruction used to put a sprite on the screen. We're only going to use SCREEN 13 for this example, since this screen mode is really easy to use. The whole screen is built up by a 320 * 200 pixel bitmap with 256 possible colors. Each pixel occupies one byte in the VGA memory, and that memory starts at the address A000:0000h. The first byte contains the index of the pixel at coordinates 0,0, the second one of the pixel at 0,1, the 320th one of the pixel at 1,0 and so forth. The sprite is stored in a QBASIC array, where the first word specifies the width of the sprite times 8. The second word specifies the height of the sprite, and then the pixel indexes comes as bytes stored in the same way as the screen 13 bitmap. It would be nice with a routine that was a little better than PUT. Of course it will be faster than PUT, but let's add another feature. Many times you wish that you could draw sprites with an "invisible" color. This means that one of the colors in the sprite won't be drawn on the screen. With this feature, your sprites can have irregular edges and "holes" in them because a certain color will be skipped when the sprite is drawn on the screen. We'll use color 0 as the "invisible" color. Before we start writing the asm code, we'll make a demo program in QBASIC to test it with:
' Demonstration of using assembler in QBASIC to put a sprite in SCREEN 13
SELECT CASE key$
That's it! Let's save this code in the file PUTDEMO.BAS. Now we need to figure out what input values the asm routine needs: First of all we need to pass to the assembly routine the x and y coordinates of the screen where we want the sprite to be drawn. The asm routine also need to know where in the memory to find the sprite. The sprite should be stored in an array, and all arrays start with the offset address 0 in the memory, so we just need to pass the offset address. The asm routine also need to know the dimensions of the sprite, but that's stored in the sprite data so we can obtain these values inside the assembly routine itself. So, let's make the call to it look something like this: CALL ABSOLUTE(BYVAL x%, BYVAL y%, BYVAL VARSEG(testsprite%(0)), SADD(asmput$)) Now we can start typing in the asm code in our favourite text editor. Let's take it step by step! First we want to allow the reading of QBASIC variables:
; A PUT routine with clipping:
PUSH DS ; Push DS and BP and move SP into BP.
Now we need to point DS:SI to the start of the sprite in the memory: This requires that we get the segment address of it from QBASIC. Where in the stack can we find it? Well, first we remember from the last part of this tutorial series that QBASIC first pushes the variables we passed to the routine in left to right order and then pushes four extra bytes on the stack, so the computer knows how to get back to the BASIC program. Then we push DS and BP on the stack ourselves. Since the stack grows downwards, this means that the last variable would be found at BP+2+2+4=BP+8, the middle one at BP+2+2+4+2=BP+10 and the first one at BP+2+2+4+2+2=BP+12. Since DEBUG treats all numbers as hexadecimal, we will have to define the stack offsets of the variables in the following ways:
x% = BP+0C
Calclulating stack offsets like this may seem a little tricky, but you'll get the hang of it after a while. Now, let's load the address of the sprite into DS:SI!
MOV BX, [BP+08] ; Get the segment address of the sprite.
Now we know where to begin fetching the data. But where should we put it? In order to determine the correct position on the screen, we need to know the pixel co-ordinates of the upper left corner of the sprite. These numbers should've been passed to the routine and pushed on the stack. It's just to go and get them:
MOV DX, [BP+0C] ; DX = X coordinate.
And why do I load the y co-ordinate into two registers, you ask? Since the screen pixels are stored in the memory from left to right, row by row from the top to the bottom, the correct memory position to begin moving data to depending on the coordinates x and y is: A000h:y * 320 + x. As you can see, the offset calculation includes a multiplication. Even though this only needs to be calculated once per call to the routine, making the use of MUL despite its slowness acceptable, we're going to use another method which is much more interesting. Remember from the last part of this tutorial that you could use shift instructions for multiplications and divisions if the number to multiply or divide by was in the series of numbers defined as 2^x, like 2, 4, 8, 16, 32, 64, 128, 256 and so on. 320 isn't one of these numbers, but it can be expressed as the sum of two of them: 320 = 256 + 64. This suggests that if we multiply the y coordinate first with 256 and then with 64 and add the results together, it will be the same as if we multiplied it with 320 in the first place. And that is certainly true! So with two shifts and one addition, we can perform a multiplication with 320 really fast:
MOV CL, 8 ; Multiply y with 256.
Now we have y * 320 stored in AX and x stored in DX. Now we only need to add them together to get the correct memory offset for the sprite. The segment address should be set to A000h, and then we have the correct destination memory address in ES:DI:
MOV BX, A000 ; ES = A000h.
All right. Now we have DS:SI pointing at the start of the sprite data and ES:DI pointing at the screen memory position where the data should be written. Now it would be nice to know the width and height of the sprite. This is stored in the beginning of the sprite data. First comes the width of the sprite. We load the first two bytes of the sprite data into AX, using LODSW. The number we get is eight times bigger than the actual width. Therefore we need to do a division by 8 to get it right. Luckilly, this division can be handled with a shift instruction. Then we move the value to BX, where it will be stored:
LODSW ; Get width info from sprite data.
LODSW ; Store the height in AH MOV AH, AL Finally, we need to know what 320 - the sprite width is, because this number will be used in the drawing loop. This is simple to do. We can use DX to store this number, and the sprite width is already in BX. So all we need to do is this:
MOV DX, 140 ; DX = 320 - Sprite width
Let's take a look at the registers and see how many we have left:
DS = Source segment
Phew! We made it without having to use the stack to stuff away data. All of the basic registers are used. If we would have had to load more information, using the stack would have been inevitable. OK! Now it's time for the main loop. Actually it has to be two loops inside each other. I'll show it first and explain it later:
Yloop: CMP AH, 0 ; Stop drawing if y is zero.
POP BP ; Return to QBASIC.
Now paste together the pieces of code we've collected and save it in a file called ASMPUT.ASM. Then run Absolute Assembly. Make ASMPUT.ASM your assembly source file, PUTDEMO.BAS your QBASIC destination file, make sure it appends the code to PUTDEMO.BAS instead of erasing its original contents and skip the adding of call absolute code. We can do that ourselves. Now start QBASIC and make sure the asm code was added to the program. Take the added code and move it up to the beginning of the demo program, replacing the line saying: ' (Here we're going to put stuff later on.) Then, you look up the five places saying: ' (Here we're going to make a call to the asm PUT routine later.) and replace them with the following lines:
DEF SEG = VARSEG(asmput$)
There are some limits to this sprite drawing routine though: It won't work in any other screen mode than SCREEN 13, because the screen memory works differently for the other modes, and the routine lacks border checking, i.e. If you put the sprite on a position where parts of it is "outside" the screen borders, it will not be drawn correctly. If you feel like it, you can try writing a sprite routine that "clips" the sprite correctly at the screen edges. But anyway, it draws sprites in a way that the standard PUT cannot do, and it's much faster too! Neat, huh? :-) Oh no! I've done it again! These tutorial parts are growing for each new month :-) Last time I promised to cover a bit more than I actually did in this part, but the things that you've just read are enough for now. Now go and experiment with assembly flow control on your own and see if you can come up with something cool! We've come a long way now, but basically we still only know how to do clever calculations and memory transfers in asm. This can be used for much, but there's still more to learn. The next time I will introduce some ways to communicate with the different parts of your computer in assembler. This is the part of programming that is usually refered to as... I/O! Happy hacking everyone!
|
![]()

By Zkman
Hey, everybody! Check out our new section, the gallery! Here, we'll do an exclusive game from some big name game every month. This month, we have the first screen straight from DarkDread's Eternal Frost. Check it out!
|
![]()

By MA SNART
This time: translation and rotation across 2d planes... |
Introduction to Translation and Rotation...
|
|
First off I will need to describe what it is I'm trying to do here: Do you remember the old arcade game 'asteroids'?. Well, guess what? That is exactly what I hope you could make after reading this article! Well, not exactly; as I'm only going to get you going with how the 'player's ship' works. You'll have to work out the rest. So the code that follows [once you type it into the IDE] will display a small ship that you can rotate and move around, just like the 'Asteroids' ship :). Please NOTE that I wrote the code without testing [so it may not work :( ] and it isn't optimized and is very un-structured...Sorry! Because this is only [for the time being] going to be 2D, we will only need to concentrate on 2 dimentions: The X and Y [just like regular sprite graphics :)]. What this also means is that all of our rotations will be along the Z-axis: there isn't going to be a test on this, but keep this in mind for later articles. Our points are in the X and Y plains and we are rotating along the Z-axis.
The beginning
DEFINT A-Z
First of we are defining all variables beginning A-Z as integers [helps speed things up!]. We are then going to enter into SCREEN 7 mode [moan all you want...I can't hear ya] and the extra 0,1,0 stuff tells QB that we are using the default setting [the first 0] and the active page is number 1 [this is where all the drawing will happen] and finally that the visible page is number 0 [this is what you will see on the screen]. I hope none of that was very new to you :) The last line will put the display into a 'window', or what you can see, on screen, is what is visible within the range of numbers passed. Basically what this does is re-number the screen. If you were to PSET a pixel at 0,0 it would now show up at the center of the screen; likewise, if you PSET to -100,-100, it would show up in the upper-left corner [as if you had PSET at 0,0]. This is very handy in that it turns the screen into a cartesian graphing system: From the screen center -Y travels up, +Y down, -X travels left and +X right. This is the same type of system used in real 3D graphics [It also has the side benefit of negating the need to 'transform' World space to Camera space...more on this later]. Now enter this into QB:
TYPE pntdat
TYPE lndat
These are going to be our custom variable classes... Next stuff:
Now we're getting to the meat of the proggy. 'lns' [LINES] stores the model of the ship, and 'player' stores our only active ENTITY... Now enter:
READ LNS(i).v1.x
NEXT i
What this will do is enter our space ship into the space provided by the 'lns' array. The ship model, of course, exists in the DATA statements [all values are in relation to Object space's reference point [or 0,0]].
The main-loop:
DO
LINE (-100,-100)-(100,100),0,BF
First we set-up our DO/LOOP routine. Then we draw a black box to erase the screen [remember that the top-left corner of the screen is at -100,-100 and the bottom right is at 100,100] Now comes the fun part....
co! = COS( player.ang * 3.141593 / 180)
What we do here is get the SINE and COSINE of the angle indicating the direction that the player is facing. In order to do that we must convert the integer angle measurement into radians [ you do that by multiplying by PI then dividing by 180 :) ]. Here we go again...
FOR i = 1 TO 4
rx1 = lns(i).v1.x * co! + lns(i).v1.y * si!
rx2 = lns(i).v2.x * co! + lns(i).v2.y * si!
There you have it: the rotation. Each end-point of the line [indicated by v1 and v2] is rotated around the reference point of Object space [again at 0,0]. This formula is actually the same as a z-axis rotation in a true 3D system. The formula explained: rotated_x = ( original_x * cosine_of_angle ) + ( original_y * sine_of_angle ) rotated_y = ( original_y * cosine_of_angle ) - ( original_x * sine_of_angle ) The reasoning behind how it works isn't a subject for this article, but at this point in time, rotated_x and y are STILL in Object space. If it was transferred to World space it would always be located at the World space reference point [0,0]. So what we will do is add the VECTOR indicated by the player's location to each end-point: type away:
fx1 = rx1 + player.loc.x
fx2 = rx2 + player.loc.x
Now at this point the line has been 'transformed' to World space, but because the Camera doesn't move and the World space has already been transformed by the WINDOW statement earlier, we can draw the line now. So type:
LINE (fx1,fy1)-(fx2,fy2),lns(i).col
NEXT i
Alright!...there you go...one Object transformed to World space!... Now type in:
SELECT CASE INKEY$
CASE CHR$(27)
CASE CHR$(0)+CHR$(75)
IF player.ang < 0 THEN player.ang = player.ang + 360
CASE CHR$(0)+CHR$(75)
IF player.ang > 360 THEN player.ang = player.ang - 360
CASE " "
vx! = (-.3) * si!
player.vect.x = player.vect.x + vx!
END SELECT
Okay that's our 'get key press' routine. The 'ESC' key will quit the demo, the left arrow will cause the angle to decrease, the right will increase the angle, and 'SPACE BAR' will make the ship thrust forward [I will explain this formula at a later time]. Now type:
player.loc.x = player.loc.x + player.vect.x
IF player.loc.x > 100 then player.loc.x = player.loc.x - 201
IF player.loc.y > 100 then player.loc.y = player.loc.y - 201
This will enable the ship to have 'zero gravity' effects. If you constantly add the ENTITIES vector back into it's location, then the next bit of code will 'wrap' the ship around to the other side of the World space. Finish the proggy with:
PCOPY 1,0
LOOP UNTIL quit = 1
END
Okay that SHOULD give you a little white ship to move around on the screen [and hopefully a bit of knowledge of translation and rotation]. Just so you can remember: To 'transform' from Object to World space, you rotate THEN transform [try switching the rotate and translate order to see what happens :) ]. This is NOT a rule written in stone however, BUT for this series of articles, keep it in mind! Next time I'll add multiple ENTITIES to the mix and transform the World to Camera space as well...see ya! |
![]()

By Zkman
|
A | Welcome back! You all remember that Darkdread was the first electee to the hallowed halls of the Qbasic: the Magazine Hall of Fame back in Issue 4. It's come time to select another entrant. After much deliberation, one worthy candidate has come through. This man has been around the qb scene for a few years now, and has stunned us all ever since his first game, Wetspot, hit the scene. Although earlier projects such as EDraw, a fairly popular Sprite Editor, has come before it, Wetspot's great gameplay and great graphics made it a must download. After you beat the 21st level, you would get a message: "Coming Soon: The Full Version". After much anticipation, in March of 1998, Wetspot II was released and immediately heralded. Since then, Angelo Mottola has put out directqb, Worlds of Wetspot, SoundLab, and FMTracker; surely making him the most proficient qbasic coder ever. For his achievements, Angelo Mottola of Enhanced Creations is awarded the second entry into the Qbasic: the Magazine Hall of Fame. Congratulations! |
M |
![]()

By Zkman
Interview by Terminator_Z
Thanks to Angelo and Petter
| Hey! This month, Angelo Mottola, Petter Holmberg, Terminator_Z and myself (zkman) are very proud to present a full preview on the game currently referred to as "project rt"! The buzz over this game has been in high order over the last few months, ever since the first news on Enhanced Creations making a new game came out (in fact, such a great buzz that "Project rt" tied Dark Ages 2 for best upcoming project in this month's survey!), but any info has remained a secret...until now. | The Shots, the Interview, and more! |
|
To help blow out this incredible engine/game, Terminator_Z (programmer on FoX and member of Dark Elf) interviewed Angelo on his past, present, and future. The guys at Enhanced were also generous enough to send us some early shots of the amazing engine that will make Project rt a reality, and they also sent over some information on the project. So, here you have it: the earliest news on 1999's biggest game...
"Project rt" no more...
What you've been waitin' for The engine in it's basic form has the ability to support 256 objects at a max size of 64x64 for each, but Angelo tells us that by smartly using the map handler, this maximum could be avoided without much of a hassle. There's native support in the map engine to handle textures for the walls, the ceiling, and the floor, of course. So, how do Angelo and Petter attain this high speed while still keeping room in memory for this large amount of data? By using a few techniques not even before attempted with qbasic.
|
Here y'are! The first rt screen! |
|
|
XMS, drivers, and Windows All programs using dqb (and, by using dqb, have the EMM386 EMS driver open) are slowed down by this basic fact. How to get around it? Attempt the fairly difficult task of storing all your data in the very quick and very large part of memory called XMS. More complicated to access than EMS, (sort of the difference between writing a .gif loader and writing a .jpg loader), XMS does have many pluses, mainly that it is fast. Take a guess where the rt engine puts it's textures (and all of the objects, which are treated as textures)? The rt engine features a fully functional 2d scaler, which appopriately makes all the textures object grow and shrink as they come closer and further. Unlike in Legend of Lith, which uses multiple tile sets for each distance, a Raytracer (the graphical technique responsible for Doom and Wolfenstein 3d) uses one copy of each object, and just changes the object's size. This creates a very convincing world where you can fully rotate the camera just like a polygonally created world. The way that the Project rt engine does it's graphical drawing, it also has the side effect of creating a zero flicker world.
|
Imagine THIS at 60fps! |
|
|
But what is the GAME about??? Unfortunately, the exact subject of the game is still being worked out, although a 3d rpg (a la Ultima Underworld) is the highest possibility right now. Angelo and Petter are certain that the game will not be a conventional DOOM style shooter. They believe qb has the capacity for innovative games, not clones. Although an RPG is definitely up there on the list, this may not end up as the final game. Y'see, it would require tons of sprites, and, as Angelo puts it, "we're coders, not artists!". The issue of how much time it will take for an rpg to be completed is not an issue, though. They "know it will take a lot of time for [project rt] to be completed, and we accept this fact. We don't care about the time." As always, we'll continue to bring you the latest on the backstory/genre of Project rt as it becomes available. For now, check out this interview by Terminator_Z, as it provides many clues as to the future of Enhanced, and Angelo's thoughts on qb in general. Enjoy! Q: Tell us briefly about yourself... A: Well, my name is Angelo Mottola (a lot of people spells it wrongly; this is my right name!) and I'm 21. I study electronical engineering at my university, and I live in Rome, Italy. Q: When and where did you get your start in the QB Community? What got you interested? A: Before having an internet connection, my knowledge in programming (QB as well as other languages) was very limited; when I got it, I understood the huge amount of informations that can be found over the web, and my experience grew quickly a lot... I've been online for about 3 years, and I know famous sites as Neozones and qbasic.com since the first time I got the connection; one of my first searches was on "qbasic", and I got and followed the qbasic.com link, that brought me inside the QB community. At first, I found that QB was not used to all its potential, so I promised myself to prove that it can do more, and this still remains my main goal, what brings me to keep coding... Q: What do you think is your best piece of work? A: I like all my works. As my experience grew, I coded more and more complex programs; needless to say, the last two ones (WetSpot 2 and DirectQB) are the most advanced, thus they cannot be compared to the others, like WetSpot 1, since it was coded in 1995-96! The same W2 itself cannot be even compared to DQB on the technical point of view: the first uses many routines done by others, to play sounds, to handle the graphics, etc., while DQB is entirely coded in assembly by myself... Do I need to say more? Just that W2 was a lot funnier to make than DQB! Q: Obviously, MSDOS based programs won't be around forever, yet, there will always be people wanting to push the limits of QB, their technical and artistic skills. What do you think will be the outlet for these people in the future? Do you intend to move on to another platform? A: I still think QB can do more. With the boost of assembly, I believe we'll see many cool programs in the future, made in QB to work under DOS. Remember that DOS programs will always be faster than Windows based ones; in addition, I like to have the total control over the machine, and this in Windows is not possible. I know nowadays "real programmers" do not code under DOS, and I'll probably learn more and more how to program under Win95/98. I already know a bit of Visual C and Visual Basic, but I still need years to handle these languages as I handle QB now. But, again, I think Windows based programming is not as fun as QB programming, and I also have a lot of projects in mind that I want to complete, before I can move to another platform... Q: What are your views on the use of libraries? Should people use them even if they don't understand the principles behind them? A: What a hard topic! Let me say just one thing: libraries are a natural step towards the future. Wait! I mean that without them, everyone should spend years to learn how to code the same routines someone already made; in addition, think about Windows programming: in VC or VB, you always call library functions someone else did for you. You don't have to know how to handle the TCP/IP, as winsock does it for you; you don't have to worry about how to code a MIDI player, as there are functions that automatically play MID files for you, and this doesn't mean you must know the MIDI specifications!!! Everyone should worry about the principles of programming (the same for all the languages), the concepts behind parallax scrolling and these kind of things, before worring about how to code a screen scroller in assembly (as a stupid example). I think that if someone understands the concepts of a parallax scroller, there're no problems if he/she uses a library to achieve a cool effect, even if he/she doesn't know how to code the scrolling routine. BTW, if this guy doesn't have good programming skills, his work will never be really cool, with or without the library, so why bothering? Q: What are your ambissions for the future? A: Coding something in 3d. As you'll see in the "Project RT" preview, I'm already moving towards this direction, and I hope to achieve soon good results. Q: Would you ever consider a career in programming? If so, what field would it be in, application or entertainment? A: As I'm studying electronical engineering, of course I'll work with computers. I'll learn how to build them, AND how to code them; I know the next years I'll study how networks work, and I can't wait! Anyway it's still too early to say something on this topic, but basically I think I'll go where I find a good job... Q: What upcoming QB productions are you most looking forward to? A: There are a lot of interesting projects in the air: Dark Ages II seems to be something really special, as well as Xeno and Bubble Fighter, as noone ever tryed something like them in QB. The Labyrinth is also promising, like Dude With Attitudes (I've tryed the demo), Peanut Patrol, MazeRPG, and a some others I can't remember now... Also our own game using the RT engine looks really promising, and I can't wait to complete it together with Petter. Q: Tell us about "Project RT", what is it, who's idea was it and when should we expect to see it complete? A: The original idea is by Petter. More infos about it are on the preview! Q: Smile for the camera. Any final words? A: ^_^ It looks like the 1999 will be the year of QB... There are so many cool projects that will be hopefully completed soon, and the overall impression is that we'll see less and less those horrible little games using INPUT! Power to QB! | "It looks like 1999 will be the year of Qb" |
![]()

By 19Day
Be Mozart, thanks to 19day |
Some muddled history: Okay. First things first, what is MIDI. Well, in the 80's, it was Musical Instrument Digital Interface. What it allowed people to do is to record music into their computer by plugging their synth into the MIDI port (or whatever MIDI complient instrument they had) and play a peice of music to the computer, that would store the keypresses, velocities, tempo's and all that stuff. But rather than store the actual sound like in the WAV format, it just stores that data, which is very small in comparison to WAV's or MOD's (more on those later) because that's all there is, a bunch of numbers in a file. How does one play it? Well, back then, because it was for musicians, it played out the instrument they had recorded it with. |
Download WinJammer! |
Now, a year or two later, some guys who were making games (I dunno, some company probably started it) decided, hey, these MIDI things are really small, and they store all the information needed to play the music except for the sounds, so if we make a interpreter for the sounds, then we can get really small music, that sounds good. I'm not sure whether the first one was in a sound card, or whether it was some software interpreter, regardless, MIDI was being used for that. And people began to forget the true meaning of MIDI, and use it like it was supposed to be used, but who cares, you can use it in your games.
Sizable choices:
Now, the only real problem with MIDI's, is that they can sound very different depending on what kind of sound card they are being played on. Although the rest of the music is the same, playing "old MacDonald" that at one point sounded like a penny whistle on one computer, can sound like "old MacDonald" played on some sort of Spanish Bagpipe. Others will argue that the quality of music is not as good too, but really that's a matter of preference, I think the quality is reasonable on my soundcard set to the standard MIDI port, but when I kick in my WaveTable software based MIDI's, MOD quality, here we come. Now, on my computer, I can make a MIDI that sounds like a MOD, and they can be the same with one exception, the MIDI is 1k and the MOD is 100k, if you want to have system independent music with constant quality and huge downloads, use MOD, if you want system dependant (to a point) reasonable quality and very small downloads, use MIDI. Conversely, the tools we use to play these in QB are also a consideration. While QMIDI (the tool to play MIDI's in QB) can crash your computer more easily than work if you do it wrong, BWSB (tool for playing MOD's in QB) uses EMS that conflict with other EMS using libs, and can be hard to understand.
Choosing the sequencer:
I use WinJammer, the reason I don't use CakeWalk is that one night I decided to Download it, and it took forever, cause their server was slow, and when I installed it, it crashed Windows and cause a Illegal Operation in Explorer whenever I booted up, so it went bye bye and I stuck with WinJammer. WinJammer's shareware version is identical to that which you would have for registering it, but when it's unregistered, all the NAME fields in the midi change to WINJAMMER DEMO, which, if you used that area to remember which staff was your drum and which was the melody, you'd be pissed, but you can type that stuff in the INSTRUMENT field, which does not get overwritten.
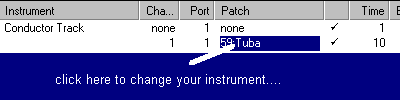
Basics of MIDI:
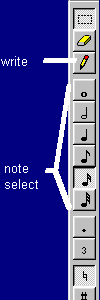
An instrument is known as a patch. There are quite a few in the GENERAL MIDI set and lots more in the other sets (soundcard dependant), but I always stick with the General set to make sure that everyone will at least hear SOMETHING akin to what I wrote. The NAME is something you have to provide to a track to even let you mess around with patches and stuff, so make a new track by clicking the empty field in the NAME column and typing in a name. Now, you have to assign the track a channel, basically, each track has it's own channel (10 is a special one, so don't use it yet) and that's how the soundcard understands what patch to use with which set of notes. So make that track's channel 1 or something, don't mess with PORT, and the last one, PATCH, is the instrument selector. There are a few ways you can look at your music. You can look at it as events, as notes on a scale and as notes on a traditional musical staff. The only ones I find useful are the event and scale views. Now, if you wanted to make a simple (REALLY SIMPLE) song, then you should just pick a nice patch to start with, say, recorder (it's pretty whiny, so I wouldn't stick with it a lot). Now, after setting up the track, click on the button that looks like a bit of a synth keyboard, and a new window will come up. This is where you start composing.
By default, WinJammer sets up things 4/4 and, and in the MIDI, each new segment, marked
with a number, is separated into the 4 beats, and each beat is separated into 120 sub-bits
(I don't know what they're called) You have quite a few notes available to you, whole, half, quarter, all the way to thirty-second note, now click on the pencil icon (meaning WRITE) and click on the quarter note, and in the first quarter position, under the first segment, (that is, the first possible note on the sheet) move the cursor up and down and look at the bottom of the window (not the background window, the keyboarding window) and you'll see that it tells you the note positions, like A and D and such, so in the first quarter, put a note at A 4, then in the next quarter, a note at B 4, and another at D 5, and another at C 5. Now, that should fill up that entire segment, so, with all the defaults in place, you can play your midi (you may have to set up WinJammer to your card, but it tells you how to do that) Well, it sounds sorta nice, doesn't it, but very short, and not very interesting. So let's lengthen it. You can't COPY and PASTE notes like you might expect (why, I don't know) but there is a command called replicate, under the track menu. What you have to provide is a starting place for the COPY, ending place for the COPY, starting point for the paste and number of copies, in this case, the numbers are:
1.1:000 starts at first possible place
Play, well, it's longer, but kinda silly and monotonous, so lets make it a bit nicer, shall we. Just from listening to it, you might expect the 2nd segment to sound higher or lower, well, just different; I pick higher, so lets move a few notes around. In segment 2, move the first note (click and drag) to G4, next note E 5, A 4 and F 5. The last segment should sound different too, lets say this was our entire song, well, usually songs have a feeling of closure about them, usually they do that by ending low. So in segment 4, move note 1 to A 4, 2 to F 4, 3 to D 4, last to F 4. play? Well, sounds better, sort of haunting, needs a background... Something equally haunting. Make a new track, making channel 2 and the patch, make it String Ensemble 2. Now, click on the keyboard button (or on the window if you didn't close it) and chose the Whole Note, and the pencil again, and now, in the first segment, make 2 notes, one in F 4 and one in D 4, they should be parallel and be the same lengths. Segment 2 has notes B 3 and G 3, segment 3 has F 4 and D 4 and segment 4 had B 3 and G 3. Now, play... Hmmm, spookier, but, here, try this, in that second track (string ensemble 2) take out all the lower notes, the D4's and the G3's, and play it. One of the problems with midi is that too many notes can quickly make a song sound like gibberish, and make it sound like the notes are fighting to be heard. So we took out those overlapping notes, well, it sounds less full, but is a little clearer. This is where preference comes in, where does body become less important that sound, some patches interact better than others, and some just sound horrible together. Experiment. And see how it goes...
The Right and Wrong Time for Midi Making:
When you least suspect it, or when you're feeling cheery or sad, or when you don't feel like doing anything, try to sequence. If you're not paying attention, sometimes really nice things come out. When I finally heard that fateful day that Milo had passed away, I was annoyed, angry and generally upset, so I decided to make a Midi that very minute (well, it took longer than that) and, well, it wasn't a sad midi, it was pretty angry, which reflected my dominant feelings at the time. Although it isn't my best, it did have a good beat and I might work on it again, but that's where the secret lies...
Random pieces:
Now, you wouldn't believe how many of the latter I got just by placing random notes down, listening, trying to make it less harsh and then playing it for someone. (This is what happened for my SBH4.MID, that Tofu listened to) Tofu was able to pick out this one little bit that he thought sounded nice, so I redid my whole midi around that bit, added in supporting bits and, Voila, a nice sounding midi (well, nice enough for me). So never underestimate what you can do with some random emotion and a shaky mouse-hand. In the next installment, I will discuss some other musical styles and patch combos that work nicely, how to use QMIDI and how to use other events.
|
![]()

|
Hey! Thanks for checkin' out the newest issue! Next month's ish, due out on March 13 (see, I remembered the month this time ^_^), will be nice and funktified, featuring a full preview of DarkDread's Eternal Frost, more 3d, assembly and midi action, as well as some super-special stuff that we're not tellin' right now! ^_^. Also, don't forget to register your QB company with the Visionaries Exchange. Till next time... END | What's up in March? |