FreeBASIC 3D Game Programming via Software Rendering: Part 2
By David Gutierrez a.k.a. Prime Productions
Founder of UGH Soft. (Useless Game Horizons)
Chapter 2: 2D and 3D Rotations
Introduction:
This is the second installment of a 3D software rendering series I am writing for the Back 2 BASIC e-zine. You will need the FreeBASIC compiler to compile the source code I will be presenting here. This series is from the ground up, so it will start with the very basics. How far I will go depends on time and feedback. This series is meant to fill the gap for 3D tutorials for FreeBASIC. I do not claim to be the best 3D programmer, so some of the techniques I use may seem strange, so I encourage you to keep exploring, and to read other tutorials.
It Would Be Helpful If:
I assume you've done some 2D programming, hopefully you know how to do 2D rotations and preload SIN and COS tables. You don't need to know any more than that as I will explain the rest. But even if you plain don't understand trig, I'll show you a way to memorize without understanding. I don't really think this is the best way, especially when it comes to optimizing, but, do what you must.
2D Rotations:
First of all, I will begin by telling you that FreeBASIC by default only accepts radians. If you've ever owned a scientific calculator, or have ever studied math before, you'll remember that there are three measurements of angles. Degrees, Radians, and Gradians. We normally use degrees because it is easier to visualize. So how do we convert between radians and degrees? It turns out the answer is simple:
Radians = Degrees * PI / 180
This means that you get the degree by substitution for Degrees the Angle, then multiply by PI, or 3.1415926535897932384626433832795. Okay, so you don't need to be that exact. Then divide by 180. We'll keep this in mind for later.
RotX = X * COS(Angle) - Y * SIN(Angle)
RotY = Y * COS(Angle) + X * SIN(Angle)
3D Rotations:
I'll begin by saying that rotation on the Z-axis takes place on the XY plane, rotation on the X-axis takes place on the YZ plane, and rotation on the Y-axis take place on the XZ plane. To illustrate, I will provide and example of rotation on the Y-axis:
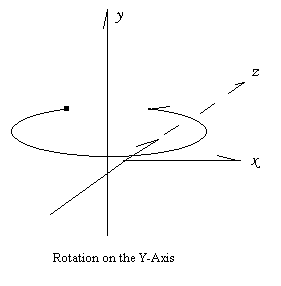
As you can see, all movement of rotation on the Y-axis takes place on the X and Z axis. In other words: When rotating in 3D, movement is on all planes except the axis you are rotating. Let's look at the equations for rotation on the Y-axis:
NewZ = Z * COS(YAngle) - X * SIN(YAngle)
NewX = X * COS(YAngle) + Z * SIN(YAngle)
Starting with the first equation, remember rotation for Y is on the XZ plane. Remember, the 2D rotations? These are the same, because for each axis, we only rotate in 2 dimensions. The angle to use, is of course, the Y angle.
Given this, I am sure you could get all of them. They are as follows:
Rotation on the X-axis:
NewY = Y * COS(XAngle) - Z * SIN(XAngle)
NewZ = Z * COS(XAngle) + Y * SIN(XAngle)
Y = NewY
Z = NewZ
Rotation on the Y-axis:
NewZ = Z * COS(YAngle) - X * SIN(YAngle)
NewX = X * COS(YAngle) + Z * SIN(YAngle)
X = NewX
Rotation on the Z-axis:
NewX = X * COS(ZAngle) - Y * SIN(ZAngle)
NewY = Y * COS(ZAngle) + X * SIN(ZAngle)
RotX = NewX
RotY = NewY
RotZ = NewZ
Notice I had to save some of the X, Y, Z values, because the new value from the previous rotation is need for the next rotation. This leads to the conclusion that the previous stated equations only work in X, Y, Z order. This is important. We could actually optimize these rotations, but I'll leave that for another time. Remember, if you didn't understand this, it shouldn't stop you from programming in 3D. Simply memorize the formulas, or write them down somewhere. Every time you use them, try to make senses of them and eventually you will. Now I'm sure you want an example. Remember last issue I left you to create a 3D cube? We're going to take that cube and rotate it!
Putting It All Into Action:
Here is the code for the 3D cube in case you weren't able to do it last time:
DECLARE SUB PSET3D(X AS INTEGER, Y AS INTEGER, Z AS INTEGER, Clr AS INTEGER)
CONST XCENTER = 320
CONST YCENTER = 240
CONST ZCENTER = 256
CONST FOV = 256
SUB PSET3D(X AS INTEGER, Y AS INTEGER, Z AS INTEGER, Clr AS INTEGER)
PSET (FOV * X / (Z + ZCENTER) + XCENTER, FOV * Y / (Z + ZCENTER) + YCENTER), Clr 'Divide both axises by Z and move to center.
END SUB
SCREENRES 640, 480, 16
DIM XCoord AS INTEGER
DIM YCoord AS INTEGER
DIM ZCoord AS INTEGER
FOR XCoord = 1 TO 100 STEP 10
FOR ZCoord = 1 TO 100 STEP 10
FOR YCoord = 1 TO 100 STEP 10
PSET3D XCoord, YCoord, ZCoord, RGB(255, 255, 255) 'A white point
NEXT
NEXT
NEXT
SLEEP 'A little delay.
But it is off-center. This is because we are starting from the center, and drawing down from there. We need to start at the center minus half of the width of the cube. Since the cube is 100px wide, coordinate -50 is our starting point:
DECLARE SUB PSET3D(X AS INTEGER, Y AS INTEGER, Z AS INTEGER, Clr AS INTEGER)
CONST XCENTER = 320
CONST YCENTER = 240
CONST ZCENTER = 256
CONST FOV = 256
SUB PSET3D(X AS INTEGER, Y AS INTEGER, Z AS INTEGER, Clr AS INTEGER)
PSET (FOV * X / (Z + ZCENTER) + XCENTER, FOV * Y / (Z + ZCENTER) + YCENTER), Clr 'Divide both axises by Z and move to center.
END SUB
SCREENRES 640, 480, 16
DIM XCoord AS INTEGER
DIM YCoord AS INTEGER
DIM ZCoord AS INTEGER
FOR XCoord = -50 TO 50 STEP 10
FOR ZCoord = -50 TO 50 STEP 10
FOR YCoord = -50 TO 50 STEP 10
PSET3D XCoord, YCoord, ZCoord, RGB(255, 255, 255) 'A white point
NEXT
NEXT
NEXT
SLEEP 'A little delay.
Now run it, and it is centered. Now let's make our PSET3D routine have some extra arguments for rotation:
DECLARE SUB PSET3D(X AS INTEGER, Y AS INTEGER, Z AS INTEGER, XAngle AS INTEGER, YAngle AS INTEGER, ZAngle AS INTEGER, Clr AS INTEGER)
CONST XCENTER = 320
CONST YCENTER = 240
CONST ZCENTER = 256
CONST FOV = 256
SUB PSET3D(X AS INTEGER, Y AS INTEGER, Z AS INTEGER, XAngle AS INTEGER, YAngle AS INTEGER, ZAngle AS INTEGER, Clr AS INTEGER)

'We'll insert our rotation code here:
DIM AS INTEGER NewX, NewY, NewZ, RotX, RotY, RotZ
'Rotation on the X-axis:
NewY = Y * COS(XAngle) - Z * SIN(XAngle)
NewZ = Z * COS(XAngle) + Y * SIN(XAngle)
Y = NewY
Z = NewZ
'Rotation on the Y-axis:
NewZ = Z * COS(YAngle) - X * SIN(YAngle)
NewX = X * COS(YAngle) + Z * SIN(YAngle)
X = NewX
'Rotation on the Z-axis:
NewX = X * COS(ZAngle) - Y * SIN(ZAngle)
NewY = Y * COS(ZAngle) + X * SIN(ZAngle)
RotX = NewX
RotY = NewY
RotZ = NewZ

'And we'll change the PSET3D routine to use the rotated coords:
PSET (FOV * RotX / (RotZ + ZCENTER) + XCENTER, FOV * RotY / (RotZ + ZCENTER) + YCENTER), Clr 'Divide both axises by Z and move to center.
END SUB
SCREENRES 640, 480, 16
DIM XCoord AS INTEGER
DIM YCoord AS INTEGER
DIM ZCoord AS INTEGER
DIM YA AS INTEGER 'The Y Angle of rotation
DO
SCREENLOCK
CLS
YA = (YA + 1) MOD 360 'Keep it in bounds
FOR XCoord = -50 TO 50 STEP 10
FOR ZCoord = -50 TO 50 STEP 10
FOR YCoord = -50 TO 50 STEP 10
PSET3D XCoord, YCoord, ZCoord, 0, YA, 0, RGB(255, 255, 255) 'A white point
NEXT
NEXT
NEXT
SCREENUNLOCK
LOOP UNTIL MULTIKEY(1)
Run it, and, Hooray! A rotating cube. That's just cool! I ... wait a minute. It is rotating at weird jumps. What's the problem. We're in RADIANS, remember? We need to use the afore stated equation to correct that. While we're at it, we are going to pre-load the sine/cosine tables to make it faster.
DECLARE SUB PSET3D(X AS INTEGER, Y AS INTEGER, Z AS INTEGER, XAngle AS INTEGER, YAngle AS INTEGER, ZAngle AS INTEGER, Clr AS INTEGER)
CONST XCENTER = 320
CONST YCENTER = 240
CONST ZCENTER = 256
CONST FOV = 256
CONST PI = 3.141592654#
DIM SHARED SINTable(359) AS SINGLE '0 - 359 = 360 Degrees
DIM SHARED COSTable(359) AS SINGLE
DIM a AS INTEGER
FOR a = 0 TO 359
SINTable(a) = SIN(a * PI / 180)
COSTable(a) = COS(a * PI / 180)
NEXT

SUB PSET3D(X AS INTEGER, Y AS INTEGER, Z AS INTEGER, XAngle AS INTEGER, YAngle AS INTEGER, ZAngle AS INTEGER, Clr AS INTEGER)
'We'll insert our rotation code here:
DIM AS INTEGER NewX, NewY, NewZ, RotX, RotY, RotZ
'Rotation on the X-axis:
NewY = Y * COSTable(XAngle) - Z * SINTable(XAngle)
NewZ = Z * COSTable(XAngle) + Y * SINTable(XAngle)
Y = NewY
Z = NewZ
'Rotation on the Y-axis:
NewZ = Z * COSTable(YAngle) - X * SINTable(YAngle)
NewX = X * COSTable(YAngle) + Z * SINTable(YAngle)
X = NewX
'Rotation on the Z-axis:
NewX = X * COSTable(ZAngle) - Y * SINTable(ZAngle)
NewY = Y * COSTable(ZAngle) + X * SINTable(ZAngle)
RotX = NewX
RotY = NewY
RotZ = NewZ
'And we'll change the PSET3D routine to use the rotated coords:
PSET (FOV * RotX / (RotZ + ZCENTER) + XCENTER, FOV * RotY / (RotZ + ZCENTER) + YCENTER), Clr 'Divide both axises by Z and move to center.
END SUB
SCREENRES 640, 480, 16
DIM XCoord AS INTEGER
DIM YCoord AS INTEGER
DIM ZCoord AS INTEGER
DIM YA AS INTEGER 'The Y Angle of rotation
DO
SCREENLOCK
CLS
YA = (YA + 1) MOD 360 'Keep it in bounds
FOR XCoord = -50 TO 50 STEP 10
FOR ZCoord = -50 TO 50 STEP 10
FOR YCoord = -50 TO 50 STEP 10
PSET3D XCoord, YCoord, ZCoord, 0, YA, 0, RGB(255, 255, 255) 'A white point
NEXT
NEXT
NEXT
SCREENUNLOCK
LOOP UNTIL MULTIKEY(1)
And Voila! It is rotating perfectly! Now, this is far from the fastest way of rotating. We could simplify the number of multiplications down to 9 instead of 12 in the rotation code. But I'll leave those optimizations for later. First, try and remember what is presented here.
Conclusion:
I hope you've been able to follow this, as these are the fundamental steps to 3D programming. Up and coming for next time, Wireframe!
Until then,
Happy Coding!
-David Gutierrez
Email me at: david.primeproductions.gutierrez AT gmail DOT com with questions or comments.