Retro Tricks II
By angros47
Planar Graphics
In video memory, an image can be stored in two ways: when an image is monochromatic (like in screen 2, screen 11), the best solution is to use a byte to store 8 pixels (every pixel is a bit):
Example: to store a horizontal line made of 24 pixels, we need only 3 bytes:
0 0 0 0 0 1 1 1     1 1 1 1 1 1 1 1   1 0 0 0 0 0 0 0
         7                         255                      128
If we want more color (i.e. 4 colors, like in cga mode SCREEN 1), we have two solutions:
We can use two bits of the same byte:
A pixel can be 00 (color 0), 01 (color 1), 10 (color 2), 11 (color 3)
00 00 00 11     00 00 10 00
       3                      8
This solution is called chunky graphics . In SCREEN 13 (256 colors), it's perfect, since we use one byte per pixel.
Also, we have another solution: we can use one bit per pixel (as in monochromatic video memory), but we can use more than a single map, and “merge” them to get the final image:
0   0   0   0   0   0   1   This is a byte
0   0   0   0   0   1   1   Another byte

00 00 00 00 00 01 11  resulting pixel colors
In this way, we can have even 3,4,5,6 bits for every pixel (with chunky graphics, we need to have a number of bits that is either 2,4,8,16,32).
This graphic is called bitplanar (in fact, every bit of a color has a planar map: a plane for first bit, another plane for second bit...)
In original QB, screen modes 7,8,9,12 use bitplanar graphics: these screen modes have 4 bits (one for red, one for green, one for blue, one for luminosity). So, pixel data are not contiguous: if I want to save only the lower portion of a vga screen, I cannot simply specify a first and last address; I have to save 4 blocs of data (one for every bit)
Why graphics is managed in so a quirky way? Because CGA and MCGA used chunky graphics, while EGA used bitplanar graphic (in fact, originally EGA was not compatible with CGA at all: a program that required CGA could not be used on a EGA): VGA was retro-compatible both with CGA, MCGA (screen 13: it was available on MCGA, too) and EGA, so it supported both modes.
When SuperVGA mode (and VESA) has been introduced, only chunky graphic was used (because the minimum number of colors was 256).
Bit planar graphic was also widely used on Amiga, where 6 bit planes were available (so, 64 colors could be used on the screen)
Advantages
Bit planar graphic avoided any memory waste (in chunky mode, for example, if only 64 colors are actually used, two bit per pixels are not used: on a 640*480 image, it means 614400 bits, 76800 bytes). Filling an area was a very fast task, since a single byte allows to set 8 pixels (and that solution was very good for games that used flat-shading 3D, like some flight simulators)
It was also very easy to use a filling pattern, since a byte could represent a sequence of pixels: this feature was also available in QBasic, with PAINT command.
Since one of the bit planes set brightness, it could be used to make shadow effects.
Printing text on a planar screen mode was also easy, since characters are usually stored in memory in the same way (using only one bit plane, of course): so, a character could just be copied to the video memory (and this applied even to redefined characters).
While top/down scrolling could be done as in chunky mode, side scrolling could be done only by 8 pixels at time (one byte); but, by acting on a register, it was possible to shift the screen by 0 to 7 pixels: so, side scrolling was faster than in chunky mode, since it didn't have to be done at every pixel, but only at every 8 pixels. Using some raster tricks, it was also possible to scroll only part of the screen, getting a nice parallax effect.
Disadvantages
First of all, drawing in planar mode is a pain: in chunky graphic, you only need to find the memory location of a pixel and store the new pixel value, while in planar mode you have to find the memory location, read it, calculate the bit you want to change, do a OR operation, store the new value... and repeat it for every bit plane.
Another problem is color flickering during scrolling: in chunky graphic, during smooth scrolling, if the screen is refreshed while memory transfer is not yet complete, only a part of the screen is scrolled (but this is not a problem, expecially when the screen is scrolled by only one pixel); in planar graphic, since every bit plane need to be scrolled, if the scrolling process is not complete maybe only first bit planes have been moved, so, they won't overlap anymore with the other bit planes, and colors on the screen will be messed up for a millisecond (with a very annoying flickering effect): the only work-around is to use double buffering.
But the most important problem is: scaling or rotating an image is too time-consuming: in chunky graphic, a simple transform matrix does the trick, but in planar graphic, this would require to convert data from every pixel, do the transforming, and convert data again; so, a simple task like scaling a texture becomes very hard.
For this reason, planar graphic has been appreciated for 2d games, but has become obsolete when 3d games (like Doom) that make use of textures come on the scene. This was one of the reasons of the decline of the Amiga.
Today
Modern video cards use chunky graphic, and there is no point in trying to emulate planar graphic (unless you are going to write an emulator, of course). The only “legacy” of planar graphic is in the syntax of the PAINT command (the filling pattern is set using data in planar format).
Anyway, many video cards still supports planar graphics in some VGA/EGA modes, for retro-compatibility; also, DosBox emulates it very well. In QBasic, all 16-colors screen modes (7, 8, 9, 12) are planar.
In FreeBasic for DOS, it's still possible to use planar graphic directly; it allows the use of planar graphic tricks, and makes the program compatible even with older VGA boards; of course, only 16 colors are available, and the max resolution is 640 * 480.
This program works only with DOS version of FreeBasic: under Windows and Linux, direct access to video card is more complex.
	#include "dos/dpmi.bi"
  	#include "dos/go32.bi"
  	#include "dos/sys/farptr.bi"
  	Dim buffer(640 * 480/2 - 1) As UByte
  	sub vga
  		Dim regs As __dpmi_regs
  		' set VGA mode 12h
  		'  640x480*4bpp
  		regs.x.ax = &H12
  		 __dpmi_int(&H10, @regs)
  	end sub
  	sub textmode
  		Dim regs As __dpmi_regs
  		' set standard textmode
  		regs.x.ax = &H03
  		__dpmi_int(&H10, @regs)
  	end sub
  	sub setplane(c as integer)
  		'0: blue  1: green  2:red  3:brightness
 		out &H3c4, 2
  		out &H3c5, 2^c
  	end sub
  	vga
  	Dim i As Integer
         	__dpmi_yield
  	setplane 0
  	For i = 0 to 640*480/2 - 1
  		buffer(i)=i mod 255
  	Next i
  	dosmemput @buffer(0), 320 * 200, &HA0000
          	sleep
 	textmode
Mode 7
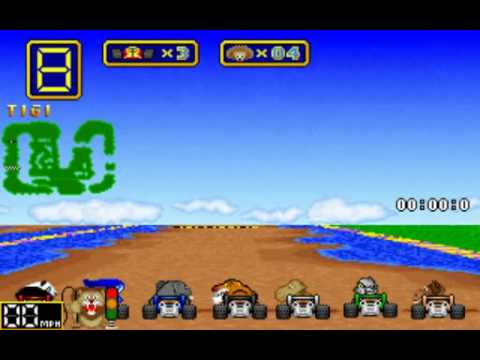
The term Mode 7 originated on the Super NES video game console, on which it describes a simple texture mapping graphics mode that allows a background layer to be rotated and scaled.
The Super NES console has eight modes, numbered from 0 to 7, for displaying background layers, the last one (background mode 7) having a single layer that can be scaled and rotated.
By modifying the scaling and positioning of the layer on a scanline-by-scanline basis, a simple perspective effect can be applied, since part of the texture was smaller, and the scaling effect was gradual.
With this trick, a simple 3D effect can be achieved. Mode 7 was, somehow, an “ancestor” of 3d graphic.
The same trick could be used also on other platforms, but chunky graphic was required (since in planar graphic scaling and rotations were too slow): so, it has been used on the PC in mode 13 (320*200, 256 colors), but not on the Amiga, or on PC in mode 12 (640*480, 16 colors).
Advantages
This trick provide a simple 3d environment, very good for grounds, ceilings and sky. It is perfect for racing games (to draw the track, as in Mario Kart), and for flight simulators (like Pilot Wings or Air Cavalry).
Also, by changing the scale factor during rendering, it was possible to make ups and downs in a road, or even to gain the effect of a curve surface (used in Super Castlevania).
Since the image could be tile-based, it was possible to draw an huge environment using a very small amount of memory: also, color cycling could be used, to get animated effects.
Sprites could be used, over mode 7, and, by scaling them, it was possible to simulate perspective, making them part of the 3d world.
Also, it was possible to use raster tricks to split the screen, and make a 2d background at the horizon (a clouded sky, a mountain, a city...)
So, advanced 3d games were possible on a limited, 16-bit console.
Disadvantages
Mode 7 works only on horizontal surfaces: no “roll” effects were possible (and that was a big limitation, for flight simulators), no heightmaps, no bumps or falls (so, a racing game could simulate a road, but not an off-road rally), and, even worse, no walls (so, maze games, or in-door environments could not use this technique).
Also, for pc games, the direct use of raster could cause an annoying flickering, if timing is not perfect.
Today
On modern hardware, with a dedicated 3d graphic processor, Mode 7 is obsolete: there is no point in emulating the hardware acceleration of an old console in software, if your hardware allows far better 3d features through OpenGL or Direct3D.
Anyway, Mode 7 still has some retro appeal, and it requires less memory than a true 3d rendering, so it is still used in some mini games (for example, in flash games, to reduce download time). Also, there are many examples for the Allegro library.
Emulating it in FreeBasic is possible, and really interesting:
	#include "fbgfx.bi"
 	sub Mode7(s As fb.Image Ptr, angle as single=0, scale as single=1, Factor as single=0,min as integer=0, max as integer=0, axis as integer=0)
 	dim MX As Single=cos(angle)/scale, MY As Single=sin(angle)/scale
 	dim iMX As Single=1/MX, iMY As Single=1/MY
 	dim iMX0 As Single=iMX, iMY0 As Single=iMY
 	Dim As Integer xs=s->width /2
 	Dim As Integer ys=s->height/2
 	dim as integer w,h
 	ScreenInfo w,h
 	if max=0 then max=h-1
 	Dim As Integer ox=w /2
 	Dim As Integer oy=axis
 	dim as integer ptr target=screenptr
 	target+=w*min 	min-=oy:max-=oy
 	Dim As Uinteger Ptr ps=cptr(Uinteger Ptr,s)+8
 	Dim As integer psl
 	Dim As Uinteger sp=(s->pitch Shr 2)
 	ImageInfo s,,,,,,psl
 	psl/=4 	psl-=8
 	screenlock
 	For ty As Integer = min to max
 		Dim As Double x2=xs+ (-ox*MX) + ty*MY
 		Dim As Double y2=ys+ (ox*MY) + ty*MX
     		For tx As Integer = 1 To w
 			*target=ps[cast(uinteger,cast (uinteger,x2) mod s->width +int(y2)*sp)mod psl]
 			x2+=MX:y2-=MY: target+=1
 		Next
 		iMX+=Factor*iMX0:iMY+=Factor*iMY0
 		MX=1/iMX:MY=1/iMY
 	Next
 	screenunlock
       	End sub
 	Screenres 800,600,32
 	dim As fb.Image Ptr Img
 	img=ImageCreate(50,90)
 	line img,(0,0)-(100,100),rgb(255,0,0),bf
 	Draw string img,(1,1),"abc"
 	circle img,(30,30),28
 	for i as double=0 to 360 step 10'.9 step .001
 		Mode7(img,i/57,.1,.1,200,,620)
 	sleep
 	next
 	end
Full Motion Video Games
In this kind of games, graphics and sounds are pre-recorded, and they are played according with your moves.
That technology was introduced in 1982 with laserdisc games (the first one was Dragon's lair): basically, the game was an interactive movie, and for every situation there was a victory scene and a death scene: if you made the right move, you saw the victory scene, otherwise, you saw the death scene, and lose a life.
These games were usually made for arcade machines, but there were also some console, like the Halcyon.
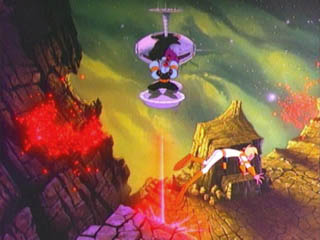
In 1991, also a 3D game was made: Hologram Time Traveler
http://www.youtube.com/watch?v=-lyTasMAYic
Of course, it was not based on true hologram: the 3D effect was only an optical illusion, gained by a curved mirror. Anyway, the term “hologram” was more appealing (expecially for a game that was based on laser technology).
Also, FMV games have been the first games that made use of real actors.
When laserdiscs were used, the video was analog: so, no CPU power was required at all, because there wasn't a digital decoding and rendering. With cd-rom, and DVDs, the movies was stored in a digital, compressed format, so the CPU had to uncompress and render it.
Advantages
The main advantage is the incredible graphics and sounds, without an expensive hardware. In '80s, a game console with Dragon's Lair looked like magic (remember that other games of the same age was, usually, for Atari 2600 or Commodore 64!), and the console processor was, actually, less powerful than a Commodore 64.
Also, these games were perfect for arcade machine: a single game session was usually very short (so, another coin was needed!), learning how to play was easy (you can't provide a game manual with an arcade machine), and the player had to see a lot of spectacular scenes.
Last but not least: copying a laserdisc was not easy, and only a lossy copy was possible, because it was an analogue support; so, piracy was not possible.
Disadvantages
Since every game scene has to be pre-recorded, there aren't many possible sequences: so, interactivity is very poor: usually, the game reduces to guess the correct sequence of moves, and repeat it; after a while, the game becomes very boring, and there is no fun in playing it again. This can be accepted on an arcade machine (because there is a turn-over of players), but not on a console or pc game.
Another problem is the cost: making a cartoon, or a movie, is not cheap, and for every scene, two or more sequences are required (the win sequence and the death sequence); and... where to store the movie? You need a very big support (in '80s, a laserdisc was used, but today? If you are going to distribute your game by web, the download size would be enormous)
Today
With some exceptions (like the flash game Dungeon Escape, or the port of Dragon's Lair and Space Ace to iPhone), FMV games are dead. Anyway, some traces of them are still in some movie DVDs (the “alternate endings”).
Also, in some games, there are pre-recorded scenes, for introduction, ends, and interludes; but the main game is made with other techniques.
In FreeBasic, a FMV game could be made with no troubles: anyway, there is no built-in command to play a video, so, unless you are going to write your own player, you'll have to use the API of your operating system:
For Windows
http://www.freebasic.net/forum/viewtopic.php?p=131058
For Linux
http://www.freebasic.net/forum/viewtopic.php?p=90137
Raster Interrupts
A raster interrupt is a computer interrupt signal that is used for display timing purposes. It is usually, though not always, generated by the system's graphics chip.
This signal can be used to work on screen memory only when the raster is not drawing it, avoiding flickering (using double buffers made this technique obsolete), or to change some screen parameter when the screen is being drawn.
This feature could be used in many ways: the most common case was split-screen: when you need to display two different images at the same moment (for example, the game screen and the instrument panel, as in The Last V8, or the point of view of two players, as in Pit Stop II, Spy vs spy, Ball Blazer...), you only need to switch from one page to another when the raster is at the middle of the screen: so, the raster will draw the first page on the top of the screen, and the second page on the bottom of the screen.
There are also other possibilities: for example, if hardware sprites were available, if a sprite had been already drawn by the raster, moving it below the raster would have caused the raster to draw it again (giving the opportunity to use more sprites than the hardware would have allowed).
Also, as explained above, in planar graphics, shifting the screen while the raster is drawing it allows a nice parallax effect; in chuncky graphics, scaling the image while the raster is drawing it allows mode 7 pseudo-3d.
Raster interrupts were widely used on the Commodore 64, to achieve many effects (split screens, but also the well known flickering lines, during tape loading).
The LOGO language, on Commodore 64, used it to display the text and the graphic page at the same time; on the Commodore 128, even in basic, a split screen was possible with a single command.
The best use of raster interrupts, anyway, was on the Amiga: in fact, it was even possible to change screen resolution, displaying two different screen modes on the same monitor at the same time (and the operating system allowed to use both of them in multitasking, and with the mouse you could move the screen, like a window).
On the PC, in California Games a sort of raster interrupt was used to extend graphic capabilities of the CGA: changing palette at the middle of the drawing, six colors (instead of four) could be used. Anyway, a perfect timing was required (since there wasn't a precise signal), and the trick worked only if used on a stock 4.77 MHz 8088. (Running it on a faster computer does not produce the effect, as the method the programmers used to switch palettes at predetermined locations is extremely sensitive to machine speed.). So, it'd never work on a multitasking machine, since its speed is not always the same.
Advantages
Acting directly on the raster drawn image, this trick allowed to work-around many graphic limitations (number of sprites, drawing on the border etc...). No more memory was required, and only a short amount of CPU time was used.
Disadvantages
A perfect timing was required: so, there should be no background processes, and usually the machine speed has to be known (and, if there are many compatible CPUs available, as in PC market, it could be a problem.
Also, it's possible to determine the scanline, but not the exact pixel: so, for example, it's possible to split the screen horizontally (when a given scanline is reached), but not vertically; even other raster effects suffer the same limits (that's why mode 7 pseudo-3d works for horizontal planes, but not for vertical ones)
Today
True raster interrupt is rarely used: it would not make sense on windowed applications, and even in full-screen mode, would create compatibility issues (since it might require a framerate not supported).
Also, the use of double buffers made it less useful.
Anyway, split screen can be easily achieved in FreeBasic, using the VIEW command:
	screenRes 800, 600, 8
  	view (0,0)-(800,300)
  	'First screen
 	for i as integer = 0 to 800 step 20
  		line (0,i) - (800, i)
  		line (i,0) - (i, 600)
  	next i
  	view (0,300)-(800,600)
  	'Second screen
 	for i as integer = 0 to 800 step 20
  		line (0,i) - (800, i+20),rnd(1)*255,bf
  	next i
  	line (0,0)-(800,600)
  	sleep
Even in 3D, many libraries offer a way to do split screen (in MiniB3D, for example, it can be done with CameraViewPort)