
Welcome to part two of the 3D tutorial. As promised, here you'll actually begin creating something! For this tutorial, I'm using Extreme 3D because it is fairly easy to use. You can, however, use any other 3D program (except for Bryce which works differently), since they all use exactly the same method. Some of the tools may be different, or may have different names, in other programs, but things should be the same.
Well, to it then! The first thing to know is that all 3D objects are created out of 2D objects. Just to go off to the side a bit, I'm sure you've all heard of 3D objects having a certain number of "polygons". Those polygons are triangles, and they make up everything. If you make a square box, each side will be made up of 2 triangles, put together so that they form a square. With triangles you can form any sort of object. However, 3D programs know that it would be incredibly difficult to go about making an entire object just out of triangles! So they have various other tools that let you make 2D objects into 3D ones. Lets take a look at them.
 Seems like a
lot of tools. But we'll only be concerned with the second set for now -
the 2D primitives. First of all, lets have a look at these. From the
pictures it is in fact pretty obvious what they are. Their names are
the Text tool, polyline tool, line tool, spline tool, arc tool, regular
polygon tool, rectangle, and circle tools. Clicking and holding down on
a tool (this is for extreme 3D only of course) will often expand and
give you more tools. For example clicking on the rectangle tool will
show a tool that draws squares.
Seems like a
lot of tools. But we'll only be concerned with the second set for now -
the 2D primitives. First of all, lets have a look at these. From the
pictures it is in fact pretty obvious what they are. Their names are
the Text tool, polyline tool, line tool, spline tool, arc tool, regular
polygon tool, rectangle, and circle tools. Clicking and holding down on
a tool (this is for extreme 3D only of course) will often expand and
give you more tools. For example clicking on the rectangle tool will
show a tool that draws squares.
 Here is an
example using all of these tools. First we can see the text tool. This
is fairly straightforward. You double click on the icon to select the
font and size, click on the screen, type what you want, then press
enter. You get from this some 2D text. Below that we see a polyline
tool. As you can see this is basically straight lines drawn all at once
to form a single object. To use this tool, you click on it, then click
on the screen to draw points. The first point will be joined to the
second with a line, the second to the third, and so on to form a shape.
This tool is very useful. Next are some lines. To use these, click,
drag to the endpoint, then let go - simple. On the right we see a
spline. Splines are a bit more difficult to work with - later on I'll
show you a little screenshot of what they look like. But for now, you
can see that they are what would give an objects a curved surface. On
the lower left, we see a circle, and then a rectangle. For these, you
click on the center point, then drag out to the dimensions you want,
then let go. The regular polygon tool is not seen so often in other 3D
programs. In E3D, you click on the tool, select how many sides, then
click on the screen and drag to determine how big it should be. Lastly
is the arc tool. For this one, you click on the center, click on a
point outside to determine the radius, then drag for how long the arc
should be.
Here is an
example using all of these tools. First we can see the text tool. This
is fairly straightforward. You double click on the icon to select the
font and size, click on the screen, type what you want, then press
enter. You get from this some 2D text. Below that we see a polyline
tool. As you can see this is basically straight lines drawn all at once
to form a single object. To use this tool, you click on it, then click
on the screen to draw points. The first point will be joined to the
second with a line, the second to the third, and so on to form a shape.
This tool is very useful. Next are some lines. To use these, click,
drag to the endpoint, then let go - simple. On the right we see a
spline. Splines are a bit more difficult to work with - later on I'll
show you a little screenshot of what they look like. But for now, you
can see that they are what would give an objects a curved surface. On
the lower left, we see a circle, and then a rectangle. For these, you
click on the center point, then drag out to the dimensions you want,
then let go. The regular polygon tool is not seen so often in other 3D
programs. In E3D, you click on the tool, select how many sides, then
click on the screen and drag to determine how big it should be. Lastly
is the arc tool. For this one, you click on the center, click on a
point outside to determine the radius, then drag for how long the arc
should be.
Phew! A lot of tools. That was a very quick and basic view of what each tool is that what it does. Time to get to some examples! Following are screenshots of how to use some of the tools.


Other than this, the tools are fairly straightforward. Now, these
are just 2D images. They are flat. We want to make them into 3D images.
To do this, we make use of the bottom set of tools. Of these, 3 are
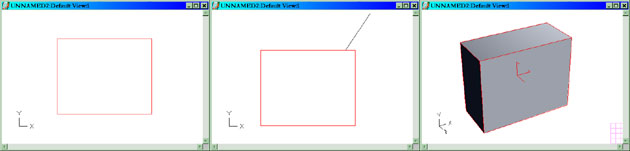
important.  In the
upper left is the extrude tool. This lets you take a 2D image (or
"profile") and stretch it out into a 3D image. If you take a square, it
will become a rectangle or cube. If you take a circle, it will become a
cylinder. In the middle right is the Lathe tool. This rotates a profile
around an axis. This also forms a 3D objects. For example, rotating a
rectangle around one of its sides will give a cylinder. Rotating it
around a point a little away from the side will get a cylinder with a
hole in it. More examples of this will follow. Lastly, in the bottom
right, is the skin tool. I won't be going into this at the moment, but
it is perhaps the most important of these tools.
In the
upper left is the extrude tool. This lets you take a 2D image (or
"profile") and stretch it out into a 3D image. If you take a square, it
will become a rectangle or cube. If you take a circle, it will become a
cylinder. In the middle right is the Lathe tool. This rotates a profile
around an axis. This also forms a 3D objects. For example, rotating a
rectangle around one of its sides will give a cylinder. Rotating it
around a point a little away from the side will get a cylinder with a
hole in it. More examples of this will follow. Lastly, in the bottom
right, is the skin tool. I won't be going into this at the moment, but
it is perhaps the most important of these tools.

These tools, combined with these objects, should be able to give you pretty much any shape and form you want. The last thing I'll cover is the skin tool. This one is the hardest to use, and its results are a bit unpredictable. The skin tool in other programs such as 3D Studio is also somewhat better than the one in Extreme 3D. 3DS even has a plugin especially designed for smoothing out such skins. But this example should give you the basic idea. For this example, we'll need to switch views a bit and learn about transformations. Switching views is simple. You click on the view menu, and choose a view! Right now, we've been working in front view. For the above example of lathing, the last frame was in "Three Quarters" view, to show the perspective.
Now, a skin is...a skin. It is a flat surface stretched around several 2D objects. If you take a skin of two squares, with one above the other, it will return a cube. Two circles with one above the other will return a cylinder. Here is an example, with explanation.
 First I started off in TOP
view and created a circle. I used top view because it makes sense - if
we're making a cylinder, the top will be a circle. In the next frame, I
switched to front view. I copied and pasted the circle and then moved
the two circles apart. Next, with the two circles selected, I clicked
on the Skin tool. A little dialog comes up asking us if we want to
"Create" or "Deselect". Create lets the program decide in what order to
skin the profiles. If we chose deselect, we could choose the order, if
we wanted to create an object with a certain skinning order. Most of
the time the program does it right. And there we go - a skin stretched
around two circles gives you a cylinder.
First I started off in TOP
view and created a circle. I used top view because it makes sense - if
we're making a cylinder, the top will be a circle. In the next frame, I
switched to front view. I copied and pasted the circle and then moved
the two circles apart. Next, with the two circles selected, I clicked
on the Skin tool. A little dialog comes up asking us if we want to
"Create" or "Deselect". Create lets the program decide in what order to
skin the profiles. If we chose deselect, we could choose the order, if
we wanted to create an object with a certain skinning order. Most of
the time the program does it right. And there we go - a skin stretched
around two circles gives you a cylinder.
Well, these are all the 2D and 3D tools necessary! It may not seem like it, but now you're ready to create almost anything. Before I go on to the final example though, I'll show you hwo to resize, rotate, and mirror objects. To mirror an object, 2D or 3D, you select the object, then click on the mirror tool. This is in the third set of tools on your toolbar - right underneath the paint bucket. You then draw a line around which you want the object to be mirrored (sort of like drawing a line for a lathe), and a copy of the object will appear flipped accross this line. Rotating and resizing involve the function keys. That is, F2,F3, and F4>. To resize an object, select the object, then hold down F2. Drag around the screen, and the object will be resized. Clicking and holding down on F3 and F4 will rotate the object around various axes.
On to the final tutorial. I'm going to take all of what you've learned and show you how you can use it to create a REAL shape (not these cylinders and cubes).
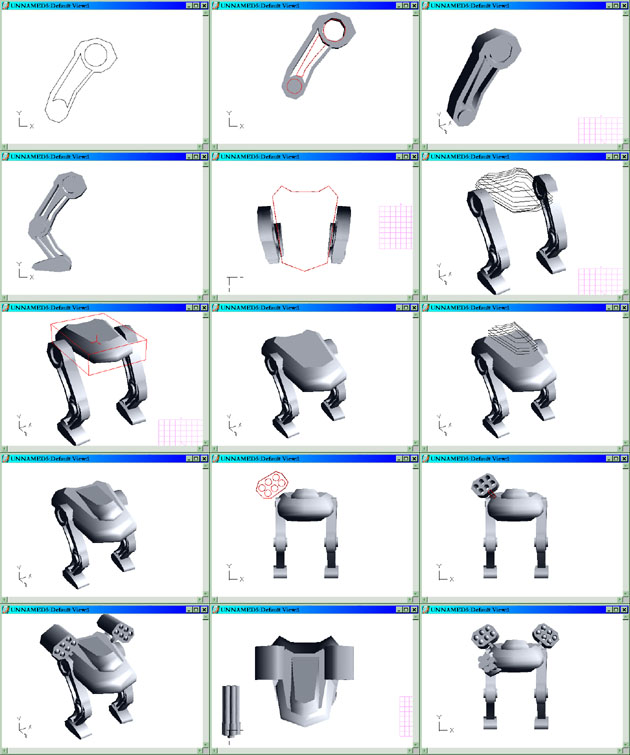
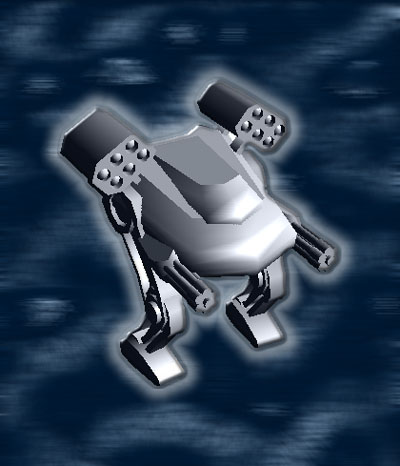
That's it for this chapter of the tutorial! In the next chapter, I'll cover a bit more 2D stuff, then go into materials, textures, and rendering your objects into final images.
Note:If you are actually trying this out on Extreme 3D, there is a little bug of sorts. When you make an object in a certain view, then switch to another view, you may not be able to see the object at all - it is far off the screen. You need to use the arrow keys to move it into your viewing area. This happens usually when making objects in top view and then switching to front view - the object is usually below the screen, and you must move it up.