
Rotations, the how's and why's...
I.
Introduction
I bet
you felt very annoyed by the fact that I only explained projection on my first
article right? Well, the series is primarily geared to coders who had no
experience in 3d coding and to advance one's knowledge regarding 3d in
general.
This time around, I will
be explaining to you 2d and 3d rotations. "2D rotation in a 3d article?!!! Are
you out of your mind?!!!" Hardly, in fact, 2d rotation is the basis of 3d
rotation as you will know later. But before I could discuss rotations to you,
let me start by some basic intermediate and trigonometric math. Don't worry,
this is not as hard as you might think. So prepare yourself for some street
math. ;*)
II. The polar coordinate
system
Up to this point, we have used the cartesian coordinate
system in 2d or in 3d. Coordinates in these systems are defined as either p(x,y)
or p(x,y,z).
In the polar coordinate system however, the ordered pair
is not represented by x or y but of r and angle originating from the origin or
the pole, which is the center of the coordinate system. Given an angle Theta and
a radius r the ordered pair would be written as:
p(r,theta).
r represents the distance from pole,
and theta is the measure of the angle from the positive
x-axis.
So in the
polar system, we only need the length(r), sometimes called the magnitude, and
the angle from the positive x-axis. Why discuss polar system when the monitor is
best suited for a cartesian system? The answer is that some things can be easily
done in the polar coordinate system. And one of those things is "rotation"
;*)
III. The basic trigonometric functions
and their relationship to
the Polar and Cartesian
systems...
There
are six basic trig functions. The sine, cosine, tangent,
secant, cosecant, and the cotangent. As of the
moment, we are interested in just 2, the SINE and
COSINE.

Say you
have the unit circle above(a unit circle is a circle having a radius of 1), with
an angle(theta) at 45 degrees. I already drew the right triangle for you labeled
as Y or O(Opposite side), X or A(adjacent side) and r or H(Hypoteneuse. In
Trigonometry, there is a mnemonic called the "SOH-CAH-TOA" which roughly
means:
SOH = Sin(Theta) = Opposite/Hypoteneuse
CAH
= Cos(Theta) = Adjacent/Hypoteneuse
TOA = Tan(Theta) =
Take a wild guess. :p
Translating it to x,y and r..
sin(theta)=y/r
cos(theta)=x/r
As I said we only need SIN
and COS for now.
Multiplying both sides by r...
r(Sin(Theta) = y/r)r
r(Cos(Theta) = x/r)r
=
r*(Sin(Theta) = y
r*(Cos(Theta) =
x
=
EQ.
1
x = r *
cos(Theta)
EQ.
1-1
y = r *
sin(Theta)
Since on a unit circle r = 1
then
x = 1
* cos(Theta)
y = 1 *
sin(Theta)
or
EQ.
2
x =
cos(Theta)
EQ.
2-1
y =
sin(Theta)
By now you
should already have realized that Sine has something to do with the y coordinate
and Cosine to the x coord. ;*)
Now
how do we convert from polar to cartesian? Easy, as long as you know the radius
and the angle(theta) just pluck the values to EQ's 1 and 1-1.
ie:
x = r *
cos(Theta)
y = r *
sin(Theta)
Pset(x,y)
Here's and example file:
PolRot.Bas
To change form polar to cartesian:
r = Sqr(x^2 +
y^2)
Theta = ATN(y/x);
x<>0
*These 2 would be useful later on but keep it on the sidelines for
now. ;*)
Before forget, all the other trig functions can be derived from
the SIN and COS function.
Tan(a) =
Sin(a)/Cos(a)
Sec(a) =
1/Cos(a)
Csc(a) =
1/Sin(a)
Cot(a) = 1/Tan(a) =
Cos(a)/Sin(a)
IV. Degrees and
Radians
Okay, this
is very important so listen closely. We, as students are used with the degree
measurement of angles. Probably because degrees are easy to visualize, so our
teachers and beginners math books use it. But it turns out that computer
languages, BASIC included, cannot directly accept degree measure in their built
in trig functions. Why? Frankly, I don't know. Maybe because radians is an exact
measure or the implementors just want to be cooler.
:*)
Now, since QB won't let you
pass degrees to their built-in trig functions, and radians is sometimes a pain
to implement(due to the fact that it's a small value), we have to use degree
measurement and converting it to radian measure before passing it to the
functions.
To convert:
1. Degrees to
Radians
Radians = Degrees*PI/180
2.
Radians to Degrees
Degrees =
Radians*180/PI
*PI
is a value of the circumference of a circle divided by its diameter. Its actual
value is 3.141593...
Fun fact: Pi is 180 degrees. Guess what 2*PI
is? :*)
Fun fact: You can easily calculate PI by
PI=ATN(1)*4
V. 2d
Rotation
Using the
polar system to rotate a point around the center is pretty easy. But how about
rotation from the point's coordinate itself? This is where our 2d coordinate
rotation comes from. Rotating from p(x,y) to p(x',y'):
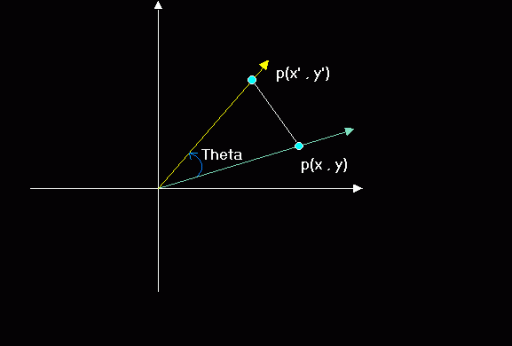
x' =
x*cos(Theta) - y*sin(Theta)
y' = y*cos(Theta) +
x*sin(Theta)
Where:
x
= original x coord
y = original y
coord
x' = rotated x coord
y' =
rotated y coord
But how
did those equations came about? Most articles just smack you into these
equations and never look back on how those came to be. I bet some of them
doesn't know how to derive it themselves. :*). And because I'm different, I will
teach you how they came to be. Moreso, you could impress your friends by your
geekiness when you tell them you know. :*)
V-a.
Proof on how the 2d rotation is derived.
Remember these
equations?
EQ.
1
x = r *
cos(Theta)
EQ. 1-1
y = r *
sin(Theta)
Yep they are the
Polar to Cartesian coordinate system conversion. :*)
We also need the
Angle addition identities
Legend:
P =
Phi
T = Theta
Cosine Identity:
EQ.
3
Cos(P+T)=
Cos(P)*Cos(T)-Sin(P)*Sin(T)
Sine Identity:
EQ.
3-1
Sin(P+T)=
Sin(P)*Cos(T)+Cos(P)*Sin(T)
Let (P+T) = Theta(Just one
angle)...
EQ. 1 becomes:
x = r *
cos(P+T)
EQ. 1-1
y = r *
sin(P+T)
Then by substitution from EQ 1 and 1-1
EQ. 1
becomes:
x' = r *
(Cos(P)*Cos(T)-Sin(P)*Sin(T))
EQ. 1-1 becomes:
y' = r *
(Sin(P)*Cos(T)+Cos(P)*Sin(T))
Distributing
r:
x' = r*Cos(P)*Cos(T) -
r*Sin(P)*Sin(T)
y' = r*Sin(P)*Cos(T) +
r*Cos(P)*Sin(T)
And looking back at EQ's 1 and 1-1:
Let P =
Theta...
x = r *
cos(P)
y = r * sin(P)
Then by
substitution:
x' = x * Cos(T)
- y * Sin(T)
y' = y * Cos(T) + x *
Sin(T)
And Viola!!! That's how you prove the 2d rotation formula.
;*)
Final equations:
Newx=oldx*Cos(Theta) - oldy*Sin(Theta)
Newy=oldy*Cos(Theta) +
oldx*Sin(Theta)
*Note: Actually, had I used EQ's 2 and 2-1, the proof would be much easier since
r is already removed. Though I believe that using r forces you to understand the
concept behind the proof. So as an exercise, why don't you try it yourself?
;*)
If you have understood all
the stuff that I have written form article 1 up to here, you might have already
guessed that our standard 2d rotation is THE SAME AS ROTATING FROM THE Z-AXIS.
If you did, good. If not, look again on this figure:
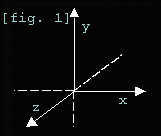
See,
rotating from the z-axis rotates your point on the XY plane. Here's the code
supplement which added rotations to our previous starfield. Don't get dizzy.
:*)
Proj-rot.Bas
VI. Let's go
3d!!!!
Remember
when I said that 3d rotation is almost like 2d rotation? Well, I'm not a man who
breaks my word. So let me begin by saying that since rotation on the z-axis
takes on the xy plane and rotation on the x-axis takes on the yz plane, where do
you think rotation on the y axis take place? Yes, the xz plane!.
:*)
Now doing these rotations are
pretty straightforward, all we have to do is smack the needed values on our 2d
rotation equation for each axis and we're good to go. One thing to remember
though is "TO USE THE OLD VALUES UNTIL THE NEW ONES ARE FOUND". Which
means for a full rotation on all the axes, do not directly put values until they
are fully rotated on the axis that they are rotated.
Here's the full 3d
rotation Equations:
*All values are floating point
numbers
'***Rotation on the Z-axis
NewY =
y*cos(Thetax) - z*sin(Thetax)
NewZ = z*cos(Thetax) + y*sin(Thetax)
y =
NewY
z = NewZ
'***Rotation on the Y-axis
NewZ = z*cos(Thetay) - x*sin(Thetay)
NewX = x*cos(Thetay) +
z*sin(Thetay)
x = NewX
'***Rotation on the Z-axis
NewX = x*cos(Thetaz) - y*sin(Thetaz)
NewY = y*cos(Thetaz) +
x*sin(Thetaz)
Rotatedx = NewX
Rotatedy =
NewY
Rotatedz = NewZ
Your rotated x/y/z are the points completely rotated over the x,y and z axes. I
had to save the rotated values at some point to make it work or our rotations
wouldn't look right. :*). Its also notable that "THE ORDER IN WHICH YOU
ROTATE FROM EACH AXIS IS VERY IMPORTANT". Rotating in z-x-y order would not
produce the same result as rotating in the x-y-z order. I'm using x-y-z because
of the alphabet. Actually, Kiwidog's rotation is in x-y-z order and since his
article started me with 3d, I'm writing this as a tribute to him. As they say,
"old habits die hard".:*)
Since, QB's implementation of the FPU(The Floating Point Unit) is really crap,
we could optimize this by using lookup tables or just calculating some constants
before the actual rotation equations.
ie.
QBcode:
cx! = COS(AngleX!)
sx! =
SIN(AngleX!)
cy! = COS(AngleY!)
sy!
= SIN(AngleY!)
cz! = COS(AngleZ!)
sz! = SIN(AngleZ!)
FOR i = 0 TO
Maxpoints
x! =
model(i).x
y! =
model(i).y
z! =
model(i).z
NewY! = (y! * cx!)
- (z! * sx!)
NewZ! = (z! * cx!) +
(y! * sx!)
y! =
NewY!
z! =
NewZ!
NewZ! = (z! * cy!) - (x! *
sy!)
NewX! = (x! * cy!) +
(z! * sy!)
x! =
NewX!
NewX! = (x! * cz!) - (y! *
sz!)
NewY! = (y! * cz!) +
(x! * sz!)
Next i
Doing this
would speed your render a lot. :*)
Here's an example file:
3drot.bas
Before I forget, to translate, subtract cam(x,y,z) AFTER rotation. Unless, you'd
want your rotations to be off-center. Think about when to use either. Heck, why
don't you try it to see the effects?
:*)
However, there's still a
faster way to rotate. Notice the amount of multiplication just to to do a full 3
axis rotation? Yep, 12 multiplies! It turns out that we can reduce this to just
9! But how do we do it? Either by using matrices or weeding out constants using
standard algebra. Both methods would work well and would roughly produce the
same result. Same nine multiplies, same amount of arithmetic. Though you could
directly translate the points using the 4th row of a 4*4 matrix, we can also do
it by subtracting our camera value from the rotated coordinate. And if you look
closely either the matrix or the algebra method would produce the same
constants. :*) *I will touch up on matrices after the texturemapping article so
don't worry. :*)
VII. From 12 to
9
There are other
articles discussing this type of optimization but sadly, the final 3*3 matrix
just does not rotate right. So if you want to derive a final 3*3 matrix yourself
from your own rotation order, you have to do it yourself.
:*)
BTW, the constants we will
derive after this is a 3*3 rotation matrix. We just didn't use the matrix way
but the algebra 101 way. :*)
So now let's begin the
headache.
Standard 12 mul rotation:
Let ox,oy,oz the old coords
Let nx,ny,nz the new rotated coords
cx = cos(anglex)
cy =
cos(angley)
cz = cos(anglez)
sx
= sin(anglex)
sy = sin(angley)
sz =
sin(anglez)
I'm
numbering the equations for easy referencing later so you won't get lost in the
mess.
******
1.
ny = oy*cx - oz*sx 'x axis
2. nz = oz*cx + oy*sx
oy =
ny
oz = nz
3. nz
= oz*cy - ox*sy 'y axis
4. nx = ox*cy + oz*sy
oy =
ny
oz = nz
5. nx
= ox*cz - oy*sz 'z axis
6. ny = oy*cz +
ox*sz
'''All points rotated ;*)
*****
*From 12 to
9 multiplies. We will simplify each axis equation starting from the x axis. Not
the numbers as they reference equations from our original 12 mul
rotation.
So...
Oz(2) =
Nz(2)
= Nz = oz*cx +
oy*sx
* I don't know if this would make sense to you but this
I'm trying to minimize the text for the actual math to be understandable.
;*)
****For X axis....
nx(4) =
ox*cy+oz*sy 'orig
nx(4) =
ox*cy+oz(2)*sy
*let's substitute nz(2) to oz
nx(4) = ox*cy+[oz*cx+oy*sx]*sy
*distribute sy inside
nz(2)
nx(4) = ox*cy+oz*cx*sy+oy*sx*sy
nx(5) =
ox*cz-oy*sz 'orig
*now substitute nx(4) and ny(1)
nx(5) =
[ox*cy+oz*cx*sy+oy*sx*sy]*cz
-[oy*cx-oz*sx]*sz
*distribute cz and sz
nx(5) =
ox*cy*cz+oz*cx*sy*cz+oy*sx*sy*cz
-[oy*cx*sz-oz*sx*sz]
*distribute the negative sign(-) and remove
parenthesis.
(note the change of signs)
nx(5)=
ox*cy*cz+oz*cx*sy*cz+oy*sx*sy*cz
-oy*cx*sz+oz*sx*sz
*use the commutative property of addition to
reorder the terms in x+y+z order.
nx(5)
=
ox*cy*cz
'X
+ oy*sx*sy*cz - oy*cx*sz
'y
+ oz*cx*sy*cz + oz*sx*sz
'Z
*factor out x,y and z
nx(5)
=
ox*[cy*cz]
'X
+ oy*[sx*sy*cz - cx*sz]
'y
+ oz*[cx*sy*cz + sx*sz]
'Z
*We already have precalculated the constants to use(inside
square brackets). Let's store 'em.
so...
xx =
cy*cz
xy = sx*sy*cz - cx*sz
xz =
cx*sy*cz + sx*sz
****For Y axis...
ny(6) = oy(1)*cz + ox(4)*sz
ny(6) = [oy*cx -
oz*sx]*cz
+{ox*cy+[oz*cx+oy*sx]*sy}*sz
*distribute cz and sy
ny(6) = oy*cx*cz -
oz*sx*cz
+[ox*cy+oz*cx*sy+oy*sx*sy]*sz
ny(6) = oy*cx*cz -
oz*sx*sy*cz
+ox*cy*sz +
oz*cx*sy*sz + oy*sx*sy*sz
*Rearrange in x,y,z order
ny(6) = ox*cy*sz
+oy*cx*cz + oy*sx*sy*sz
-oz*sx*cz
+ oz*cx*sy*sz
*Factor out x,y and z
ny(6) =
ox*cy*sz
+oy*cx*cz +
oy*sx*sy*sz
-oz*sx*cz +
oz*cx*sy*sz
ny(6) = ox*[cy*sz]
+oy*[cx*cz + sx*sy*sz]
-oz*[sx*cz
+ cx*sy*sz]
*oz has a (-) sign. Make sx*cz negative so that we
could use addition.
ny(6) =
ox*[cy*sz]
+oy*[cx*cz +
sx*sy*sz]
+oz*[-sx*cz +
cx*sy*sz]
'store...
yx =
cy*sz
yy = cx*cz + sx*sy*sz
yz =
-sx*cz + cx*sy*sz
****For Z axis...(easiest!!!!)
nz(3) = oz(2)*cy - ox*sy
*substitute nz(2)
nz(3) = [oz*cx + oy*sx]*cy - ox*sy
*distribute
nz(3) = oz*cx*cy + oy*sx*cy - ox*sy
nz(3) = - ox*sy + oy*sx*cy
+ oz*cx*cy
*make sy negative as to make ox positive
nz(3) = ox*[-sy] + oy*[sx*cy] + oz*[cx*cy]
zx =
-sy
zy = sx*cy
zz =
cx*cy
****Final Precalculated constants!!!!
****This
is our final 3*3 Matrix.
'X axis
xx =
cy*cz
xy = sx*sy*cz - cx*sz
xz = cx*sy*cz + sx*sz
'Y
axis
yx = cy*sz
yy = cx*cz + sx*sy*sz
yz =
-sx*cz + cx*sy*sz
'Z axis
zx =
-sy
zy = sx*cy
zz =
cx*cy
We smack the
above constants down our
original coord and we get the rotated
coord
without much hassle. Faster and
simpler too!!!
Final Equations!!!!(9
muls only)
nx = ox*xx + oy*xy +
oz*xz
ny = ox*yx + oy*yy + oz*yz
nz = ox*zx + oy*zy + oz*zz
Speed
increase may not be apparent if
you're just rotating a cube but try
to
rotate a 1000 polygon model and
you'll see how much speed difference
there
is. ;*)
Here's a sample file
benchmarking this against the standard 12 mul rotation.
3dBench.bas
You might want to see what's in store for you on the next article. So here is
just one(Two actually) little part of it. :*)
3dwire.bas
Texture.Bas
Lastly, don't limit yourself to just points, you can use sprites for better and
cooler effects. :*)
vecballs.bas
Get yourself a stretchsprite routine and you cam make some even cooler
stuff!!!
stretch.bas
From now on I'll be using the 3*3 matrix constants as opposed to the 12 mul
rotation so that our renders are a lot faster. And also because it will not only
be points that we will rotate later but VECTORS. :*) There is also a
better way to rotate than this. I'll take it up when we get to matrices.
:*)
Now go ahead and
code yourself a 3d rotator even if its just a cube. Because next time I'll be
discussing to you on how to generate 3d shapes the math way and I'll touch up on
polygons so that you can fill your models at runtime and impress your friends.
I'll also touch up on 2 more 3d coordinate systems. The SPHERICAL and
CYLINDRICAL coordinate systems. :*). So until next 'ish, Happy
Coding!!!
Credits:
Kiwidog for introducing me to the world of
3d
Plasma357 for SetVideoSeg
SCM for proofreading
Biskbart for the
tesselation algo
Relsoft 2003
vic_viperph@yahoo.com
Rel.betterwebber.com