QB Express
Issue #18 ~ January 29, 2006
"A magazine by the QB community, for the QB community!"
In This Issue
Contributors
- Pete (Editor)
- MystikShadows
- Xerol
- Mark Wilhelm
- Wallace
- Matt2Jones
- Adigun A. Polack
- Thrawn / MGD
- Rick Clark
- Rattrapmax6
- Syn9
- Moneo
- Eclipzer
- Nekrophidius
- Regular Columns
- Articles & Editorials
- Tutorials
From The Editor's Desk
Written by Pete
I didn't think we could do it. The last issue of QB Express came out a mere SIXTEEN days ago -- yet here we are, with another full-sized, excellent issue, made in only half the time it takes to put together a normal issue. The QB/FB community is amazing. How can an online community of only a few hundred people be *this* productive every month?
It's mind-boggling, even to me -- and I edit this magazine.
So, in celebration of a year-and-a-half's worth of QB Express issues, EVERYONE reading this issue, give yourself a pat on the back. I'm not kidding. Reach up and and literally pat yourself on the back for all the hard work. Right now. Do it! You deserve it.
Done? Good.
Now that you're done with that, go ahead and read the dang magazine!
Submit To QB Express
You all know the drill. This magazine can't exist without people SUBMITTING articles, editorials, tutorials, reviews, news and feedback. This is not just a solo effort by me... it's a group effort by people throughout the QB community. If you have anything to submit, or have time to write something, DO IT!
If you want to write about something, but can't think of a topic, or need inspiration, check out the "Official QB Express Article Requests" thread! There have been quite a few articles requested -- and even if none of them strikes your fancy, we can help you come up with something that you would like to write about. If you're interested in getting your own monthly column or just want to write an article or two, by all means, do it! Anything that is submitted will be included!
I also want feedback and letters to the editor regarding this magazine. I want suggestions and critiques. What do you like? What don't you like? What could be done better? Let me know!
All submissions and feedback can be sent to pberg1@gmail.com. You can also PM me on the Pete's QB Site or QBasic News message forums. If QB Express is going to continue to be so good, YOU need to contribute!
-Pete
Letters
Letter From MystikShadows
Wow, it took three more weeks, but man, what an issue this was. What good quality material it had. And what a wide variety of opinions people have over different situations. But QB Express is really just getting better and better and this issue is absolutely no exception.
What can I say, computer problems were never designed to help make things faster for anybody or they wouldn't be called problems, they'd be called upgrades. Sure some problems are quick to solve, others well they just take more time than others. From what I read about your problem, yeah...definitaly justifies the delay. Like we've been telling you on the forum, if it's late it's late, things happen and from what I've seen, we're very much more than willing to understand that.
The first thing that caught my eye, as I was reading, was the poll hehe. If it was still active I'd vote yes on that one too and I think I can safely guess who voted that one vote hehe. Hopefully a poll will exist this month (hint and friendly reminder hehe). But yes, I like to see the polls and how people respond to them. Quick and easy way to get an idea on what the cumminity is gearing towards. Not to mention that it's not definitaly a tradition for QB Express to have em, so it's too late to back down from the polls now hehe.
I think Lachie, when he reads this issue, will be writing an apology to Rattrapmax6 since his 2nd part of his tutorial is right there waiting for him to read it hehe. Late is definitaly better than never I always say. I think his 2nd part is much better than his first part. Much better detailed, clearer material, all in all an excellent job on his 2nd part of his series, I can't wait to read the 3rd part so Rattrapmax6, get busy hehe. But since Lachie can't be continuously online, he couldn't know, at the time, that Rattrapmax6 was going to publish his second part this issue, so it's understandable. I've been exchanging emails with mennonite over the last month, and it really amazes me how different people can have such different (and extreme almost) opinions about other people by reading what they read (what we all read) in this magazine. Of course, if they go just by the context of what was posted, they can probably arrive at very different opinions. I'm starting to wonder if an interview with him wouldn't be a good idea since he's the talk of the day. Like you did with Nek a couple issues back. To me, the debate, argument, difference of opinion, shouldn't really exist, not by what I know after a few emails with him, so perhaps with a chat like that, people can know more of what's going on. I think the readers are coming up with opinions without even having all the background knowlege and facts. They read what's in the magazine and stop right there, they don't try to look further than what they read and I believe that's the main reason why the opinions about mennonite differ so much. So, if he's willing, maybe a chat session with the right set of question will help put this subject to rest once and for all. What do you think? Me I just don't think there's enough information, in the last 2 issues, to form a complete and valid opinion.
I need to explain why my GUI series #5 didn't come out this issue. Whoever read my first 4 parts will notice that this was documenting the project (except for the last part) and as such it was pretty easy to spit out the first 4 parts of the series as fast as I did. From now on however, I will be coding then creating the article since this is what the series is all about, the experience of coding a GUI, what happens while I do it, what can change, how to adapt to a new feature basically my personal diary on the project itself. So no, it's definitaly not abandonned but because of all the coing involved (and the quality of code I need to keep throughout all the module to make the series the best learning experience it can be for all that read it (good comments, intelligent naming convention throughout each line of code, and the fact that I will be following the coding standards I established in the 3rd part of the series are all reasons why the series will slow down. If I throw something together just to have something to publish about the series, there goes the purpose of the series. So I ask people to have the patience and understanding to wait, it will be worth the wait. Like anyone else here, I do have other things to do that take up a good part of my time so I'll do my best. This project has two goals, to be a good gui program of course, but also to be an equally good learning series of articles and as such, I need to take whatever time it takes to make it as good, clear, easy to understand and follow for all parts of the series (the source code and the articles themselves), from start to end.
And now for the magazine (yes, I didn't even start yet hehe). First off, I'll talk about the newsbriefs :-). QB TOP 50, need I say more? That's one of the first site I've seen when I arrived in the community Back then there was some links broken, but I still, for some reason, always got back to that site to see what was there so the fact that it's back up, it's absolutely awesome news to me. It's back in my favorites and I'm glad about that. The news about the Code Post is another excellent news to. Like you said, we really should (all of us) post all the code we can and make The Code Post our central repository of source code. It would be fun to know that we can go there when we're looking for already made things.
I have to say I really enjoyed Nekrophidius' "NPC Bad Guys in the New Age". I agree with everything he said in there he makes some pretty powerful points about the development of the villains. To me, a villain should be, like he said, as commited to his evil quest as the hero is commited to his. The balance of Good and Evil should be obvious and as easy to understand on both sides of the medal. He's right on all his article and if people listen to his words, I think we'll be in for some pretty interesting games soon. I'm looking very forward to them too.
Also, I really like the technique Syn9's showed in "Tree Tutorial: Part 1 & 2" It's a way of coding that I could understand clearly an seems to be a great way to go about it too. Not to mention that I have yet to throw myself into 3D. but examples like his is really starting to play with my mind about the whole 3D thing hehe. Excellent work Syn9, If you had the time, I'd like to read a whole lot more about it.
Deleter answered one of my questions with his "Dynamic Arrays Inside A Type" tutorial. This is something that's not always obvious to understand, much less to explain it. But I'd like to say that I think he went about explaining it in a way that is clear enough for me. It's pretty obivous to follow his method and well, it's all around good work on his part. Like he said himself, it's finally something other than a rant and I think it's great work for a first official tutorial. Great work there too.
Do you see a pattern here? Shows what I think about the whole issue, everything is just so good in there. Matt2jones knows very well how much I like music tutorials of all kinds. This issue, it's The Awakened's turn to get a fan (don't worry, I won't stalk you hehe). But I absolutely loved his music tutorial here. I knew about the minor scale, I knew there was others too but I didn't know they had names, and I didn't know that each of them served to represent a type of feeling (although I did know that you could express any feeling in music just that part of the tutorial taught me alot. The rest of it just kept on teaching me more too. I hope to read many more from him as I feel I have alot to learn from him (and matt2jones too, keep on writing guys).
What's to say about Nick Verlinden's "Programming the Multiprocessing Core for QB 4.5". He managed to change a belief I had about QB for the longest time in one single article. The way he manages and controls his multi processing system is no less than outstanding. IT was a great article to read, well written and his code is intelligently written. The minding behind his way of doing things is great too. He says his source is a little crappy, I wonder what it would be like if it wasn't because I found his source quite undertandable just as it is. All around, if Nick's got more tricks like that up his sleeve, I'd love it if he could take the time to write them all as good as he did this one. Awesome work.
Finally we arrive at Torahteen's "Implementing Line of Sight in Qbasic Games" tutorial. I've seen these techniques used for example in Lurah's Tales from Argania Game Project. However I never totally paid attention to it specifically, I looked at the code lurah had, said "looks simple enough" and set it aside. Well now, after reading Torahteen's excellent tutorial I got his technique clear in my head now. Very well explained if I do say so myself. Pretty close to impressive considering Torahteen is 16. Great work to say the least..
In conclusion (yes there is a light at the end of the tunnel hehe) What's to say about QB Express. We've all been there since the start of it all. It's clear to see what's happening with QB Express, it's readers and contributors and the QMunity in general. Alot of people say that the freebasic streak is slowing down, I don't agree with that. I think what we are seeing is the result of the new windows of possibilities that freebasic brings to us we're not limited anymore in the type of game we can make nor are we limited in the size of project we can tackle with FreeBasic. Hence people evolved and are now tackling projects they never could tackle before. For such projects, people need more time to create them so yes, intervals between releases and new ideas becoming available is naturally longer. I'm not surprised to see this at all...and to me, there's still enough going on to fill out a QB Express issue quite easily. I wouldn't be the number one fan if QB Express was bad hehe. The contributors are awesome (myself included) articles are on very interesting subjects (and that just seems to grow better and better), articles are evolving as the community is evolving subjects vary much more, people are want more details about more complex aspects of programming. Everything is definitaly moving forward and QB Express is no exception to this evolution as we can all clearly see. I'm glad I arrived in the QMunity when I did, at the start of QB Express (what timing hehe). And of course with Mr. Berg at the helms of QB Express's success, it's no wonder QB Express is as awesome as it is.
MystikShadows
Stephane Richard
Great feedback as usual! You're quite the QB Express cheerleader, I have to say. :)
As for interviewing mennonite -- I don't think there is much of a need anymore, since I think our debate has concluded, and I published his final letter to the editor two issues ago. However, if he would like to say anything more, he can send me a letter to publish in the magazine, or request to be interviewed (and I'll gladly do it). I guess I don't see much of a point in re-opening the debate unless mennonite feels that it's still on-going.
Anyway, on another note, you should be happy to see that the poll is back this month...just below this letter!
-Pete
Have a letter for the editor? Send all your rants, raves, ideas, comments and questions to pberg1@gmail.com.
Express Poll
Every issue, QB Express holds a poll to see what QBers are thinking. The poll is located on the front page of Pete's QBasic Site, so that's where you go to vote. Make sure your voice is heard!
What was your favorite past QB magazine?
| Genre | Votes | Percent | Graph |
| BASIX Fanzine | 2 | 9% |  |
| QBasic: The Magazine | 7 | 30% | |
| QB Acclerator (QBXL) | 3 | 13% | |
| QB Chronicles | 0 | 0% | |
| QB Cult Magazine | 3 | 13% | |
| QB On Acid | 3 | 13% | |
| QB Times | 5 | 22% | |
| 23 Total Votes |
There have been a ton of other QB magazines in the past, all of them running for a brief, bright one or two or three year span, delivering tutorials, reviews, articles and news to attention-starved QB coders. But which one was really the best? That's what this poll set to find out.
The results? Well, Zkman's legendary QBasic: The Magazine came in first (very deservedly, I might add), and Nightwolf and Jorden Chamid's QB Times got second place on our poll. I was surprised to see the votes so evenly-spread across the rest of the magazines (sans Fling-master's underrated four-issue run of QB Chronicles). Both the old (BASIX Fanzine, which began in 1995) and the relatively new (QBXL, which had its last issue last summer) got about the same number of votes even though the majority of people currently in the QB community weren't around back in 1995 to read the original run of Basix Fanzine.
A lot of people asked "Why wasn't QB Express on this list?" -- and the answer is simply because I think it would dominate the vote, because it's fresh in everyone's mind and it's *our* poll, on *our* website...that wouldn't get a biased vote turnout (right...).
News Briefs
News from all around the QB community, about the latest games, site updates, program releases and more!
QB Site News
- Basic Network DEAD?
-
Earlier this month, Nekrophidius, owner/operator of The Basic Network replaced the title of the page with the word "DEAD" -- in response to the huge decline in posts their the last few months. The forum was very popular in the weeks surrounding the temporary shutdown of QBasic News this past summer, but since then it has gradually dropped in posts until it became a veritable ghost town by the turn of 2006. It took an entire week for anybody to respond to the name change -- which I suppose means that the change was probably appropriate. However, this post garnered some interest from the former Basic Network members. A few days and several more responses later, Negra suggested that the forum's name be switched to "STILL TWITCHING" -- and that's what the forum is now called.
So what will be the fate of TBN? Nek plans to leave it as it is as opposed to deleting the site due to disuse like he did last year: "Well, at least I'm not going to take it down this time...I'll leave it up." The site might end up like the troves of other QB forums with few (if any) posts...QBNZ, QB45, bad-logic, V Planet!, and many others -- but I suppose we can count on it to stick around for the next Qmunity crisis.
News Brief by Pete
Project News
- Syn9's Zero GTR is Amazing
-
Syn9's latest project, his futuristic racing game Zero GTR, is coming along beautifully. Early demos and early screenshots released this month are simply breathtaking:


This game is 3D, cel-shaded, extremely stylish, and written in BASIC -- (that's essentially the same language that Nibbles and Gorilla were made in, folks...Basic sure has come a looooong way).
Syn9 has also recently posted a phenomenal article on his dev log, about the making of Zero GTR and his other action game, called Zero Griffon. In this article, he explains how makes his track based on his spline engine, the track segment editor, designing the ships, collision detection -- and a whole lot more. The article also includes a downloadable source code demo. I suggest everyone read this; it's one of the most interesting articles I've read in the Qmunity in some time. It's no wonder that Syn9's hideout is the fourth most-visited site on the QB Top 50.
When Zero GTR and Zero Griffin are released, they will undoubtedly set a new benchmark for excellence in the FB community.
News Brief by Pete
- Cadisman Now Developed in FB!
-
Cadisman, the QBasic RPG by Bradley Lanham that I previewed in QB Express #15, and MystikShadows reviewed in Issue #17, will now work on your Windows XP machine -- that's right, it has been switched from QB / The Future Library to FreeBasic!
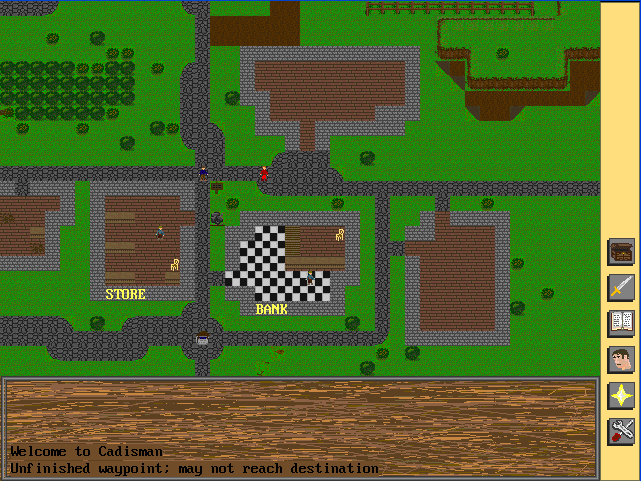
Here's some info from Bradley (also known as indeed005) about the process of switching Cadisman to FB:
"[Cadisman] has barely changed since I converted it to FB. It only took a day to convert 5 the modules Using wrapping functions and subs (and the OPTION nokeyword thing) made the task a whole lot easier. The hardest part was working out how to arrange the sprites memory into an array like in Future lib, FB-ide made replacing keywords a lot easier too. This is a credit to the incredible flexiblity of Freebasic." -- FreeBasic.net
If it was that easy to convert Cadisman to FB, then why don't we see more QB-to-FB ports? Get to work, readers!
More info on Cadisman can be found at the Cadisman official site.
News Brief by Pete
- AFLib2 Monthly Report
-
It's no news that AFLib2 is one of the most developed projects going around the QMunity. Many hours have went into it and you can easily tell just by looking at everything that it includes as far as functionality and features go. Well it definitaly seems that the hard work invested by Adigun A. Polack have definitaly paid.
I am happy to report that the programming part is now completed. And work on the documentation of everything is now officially started. Here is the run down of what's done (documentation wise) and what's left to do. IN Adigun's own words:
I already started the AFlib2 documentation some time back, and so far, I have already covered 100% of the Sprite Routines, and also, I am currently documenting the PP256 Font Routines, and I am getting pretty far on it. (And praise God that only He has *first* enabled, encouraged, and empowered me to do all of that there, too!!  =b ! ) On top of that, I have 51 pages in there so far, and we are nowhere even near finished yet!!! Because, I still got a whole lot of routines to document, including:
- Built-in 8x8 Font Routines
- Drawing Primitives Routines
- Screen Routines
- Scale2X/4X/8X Routines
- Sprite Collision Routines
- Screen Collision Routines
- Graphics Filter Routines
- ....and a whole lot more!!!
As you can see, it definitaly seems that AFLib2 is underway to being made available shortly. I don't know about you, but this is one library I can't wait to get my hands into and see what I can come up with.
News Brief by MystikShadows
- Deleter's New Isometric Engine
-
Deleter recently released a screenshot of a new isometric engine he's working on:

The 2D isometric engine has a mock-3D setup where the z variable specifies the height of an object... Deleter said "...it's fun to think about a game where you play a guy as tall as a building (king kong anyone? :) )."
The engine is going to be used for: 1) A mp deathmatch game, 2) A Diablo-like RPG, and possibly 3) A starcraft-like RTS. Also, the thought of a Sim City clone "did cross my mind" says Deleter.
But to top it all off, Deleter has just released a Maze Generator using the engine, called IsoMaze. It looks very cool:

I advise that you all check out this awesome -- and very promising -- iso engine.
News Brief by Pete
- Some Other Interesting Releases
-
Check this stuff out!
- FreeBasic Testing Version 0.16b. V1ctor released the new Testing version 0.16b of FreeBasic on January 21st. Hearing about the release, Agamemnus said: "Whoo, .16 soon! Glad to see things coming together. Eventually we might even get to FB 0.20!" To which Cha0s replied: "IMHO, fb is functional enough to already be 1.0, I sure as hell know if I was writing it, i'd have it at 1.0 or later by now, but v1c is just very modest." At which point, William Shakespeare piped in: "A rose by any other name would smell as sweet!" Whatever the version number, we all know that FreeBasic rocks!
- Yagl 0.0.3c for c/fb on windows. Marzec has been working feverishly on YAGL - Yet Another Game Libarary this past month -- just check the news section on his website, which has been updated just about every single day since its launch on January 10th. This screaming-fast graphics library has been getting a lot of acclaim in the past few weeks for its great performance. It's definitely worth checking out!
- Vocab Studier. Thrawn has released a program to help students study vocabulary words. You can get it at this link: Vocab_Studier.zip
- 3D Engine. Stonemonkey released a demo of a new FB 3D engine. Check it out here: soft3d_7.exe
- FB Graphics Library.Jofers whipped out the beginnings of a FB graphics library. According to Jofers, "...the basic idea is to make a multi-module static library for GUIs. No runtimes." Check out the original post for more info, or get it at this link: fbgui_test.exe
- NOGOSH. Patz of Patz QuickBasic Creations is working on NOGOSH - No Graphics Operating Shell, a text based operating shell written in QuickBASIC. You can find out about it at this post on Patz's recently-launched forum.
- Northern Light and Weather Demo. SSC of SmithcoSoft has released two cool programs this month: Northern Light, a text-based RPG and SSC's first-ever game; and a weather engine that features rain, snow and wind so far. Both of these programs are available on SmithcoSoft Creations, SSC's brand spankin' new website.
- ASCII Chart. Rick Clark posted Ascii Chart, a little utility program to display ascii chars and box styles at the FreeBasic.net forums. Useful!
- Yet Another Paddle Game. L_O_J released a beta version of something called Yet Another Paddle Game and is looking for testers. Worth a look.
- FBIde 0.4.4. VonGodric has released a new version of his FreeBasic IDE. Splendid!
- The Sword of Arisan. Jony_basic has announced an upcoming QB RPG called The Sword of Arisan. You can find more details about this game on the jony_basic website.
News Briefs by Pete
Competition News
- The Space Invaders Compo Results Are In
-
On December 26th 2005, a compo was initiated by Deleter, a sort of a duel between
Deleter and BlueKeyboard (a possible 3rd participant). The compo was originally
supposed to take 3 hours to create. After 15 hours, both BlueKeyboard and Deleter
made it to the finish line with, in Deleter's word: "two very different versions
of a space invader games".
There was alot of participation from the part of the community when the time came
to test and vote on the version of the game people prefered. After the dust of
the competition settled down, the results were:
BlueKeyboard     10 votes for 66% of the votes
Deleter           5 votes for 33% of the votes
For those of you who are interested you can read the details of the results in
this thread On QBasic
News Forums.
News Brief by MystikShadows
- 90-Minute Old-Skool FB Game Challenge
-
Adigun Azikiwe Polack has been running an exciting challenge on the QBasic News forums, which on December 15th, where coders compete to make the best old-school FreeBasic game that they can with just 90 minutes of coding time. Here's the info on the competition, straight from AAP himself:
Dearest all of you QB45/QB71/FB community,
Hello to all of you and welcome to my very first FB-only challenge!!!  !
!
Alright. Your drill for this one is to simply create a completed old-skool game in FreeBASIC in just 90 minutes or less using only these following rules:
1. You can use *any* library/libraries in FreeBASIC you want � such as GFXlib2, SDL, Allegro, BASS, FMOD, or whatever you�d like!
2. Your game must have a one- and/or a two-player feature, and no more than that.
(One player games are alright with me as well!)
3. Your game must be in 2D only, not 3D.
4. Your game must ESPECIALLY have some sort of old-skool flavor to it, like a Tetris clone, or a remake of an old arcade classic (think Centipede, Gradius, or even Pang!), or even an adaption of an ancient computer/console game (for instance, something like Super Mario Bros. or Giana Sisters!)  =b
=b
5. Text adventure games (like Zork) and adult-themed games are not allowed for this challenge. Sorry.
(However, all *other* text-based games are allowed as well!  )
)
6. You may enter this challenge as many times as you want, no entry limit!
Remember, your game must be completed in indeed 90 minutes or less from the moment you start your new game coding within FB from scratch.
As for your sprite/music creation for your game, you may take as long as you want, but you *only* get 90 minutes for the coding of your game alone (which includes piecing them all together in your code, too!).  !
!
Ok. The deadline for this challenge will now be on the exact same date as the forthcoming deadline for the Febrary 2006 issue of QB Express magazine.
Start your coding engines, everyone, and may the best FB old-skool game win!!!
So far, there have been three entries in this competiton: a Nibbles clone, a mine field game, and a long-jump game. Don't miss the fun -- enter this compo!
News Brief by Pete
- QBasic.com Programming Challenge -- With CASH Reward
-
This is a first from the QB community (as far as I can remember) -- a competition with a real cash reward! Mark Wilhelm, the webmaster of the new QBasic.com has started a QB programming competition where the winner will be awarded $25 from the revenue that is made through QBasic.com's Google Ads. Here are some details from the QBasic.com news page:
What do you do when you get too much of a good thing, like fruitcake? You dump it on someone else of course! :P
This month QBasic.com is hosting its first-ever programming contest! As far as I know no one else has done this, so we're making history here! The grand prize is $25 in cold, hard, virtual PayPal cash. Want to get in on the action? Here's how:
- Sign up on the forums.
- Make a demo or short game in QuickBasic that's no larger than 96kb, compiled and unarchived (unzipped/unrared/unwhatever). That means one file, unless you want to include a readme.
- Submit it to the filebase under the "Contest #1" catagory by 12:00pm Friday night, February 3rd, to be eligible for judging.
- Community judging begins Saturday morning (whenever I get up and make the poll), February 4th. Get all your friends to sign up and vote for your entry!
What are you waiting for?! Get coding! Stop reading this!
...Why are you still reading this?
Sure, it's only $25, but it's a heck of a lot more than the reward for most QB/FB competitions (an "award" image with your name on it...and pride...) I say: go for it!
News Brief by Pete
- SJ Zero's 48Hour Compo Results
-
Over New Year's, SJ Zero hosted another 48 hour programming competition at his QBXL.net message board. The object, as always, was to create the best possible FB game within a 48-hour time limit.
The entries were as follows:

Astroids 3D by Marzec (Uses YAGL)
And...

Behold -- Invasion! by SJ Zero
Voting was held for this competition, and the official result was a draw. Both games received three votes in the end. Congratulations to Marzec and SJ Zero for their valiant efforts!
News Brief by Pete
Email your news or news briefs to: pberg1@gmail.com!
Gallery
Written by Pete
Every issue QB Express features a preview and exciting new screenshots from an upcoming QB game. If you would like your game featured, send in some screenshots!
Black Satin

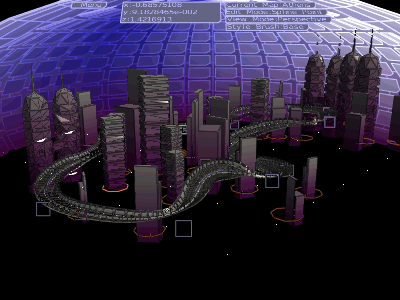
Black Satin is Nekrophidius's (aka Nodtveidt, adsorken, Nek, Dave, and many more) new female-only fighting game, coded in FreeBasic and using Marzec's new YAGL graphics library. "Black Satin is a fighting game not unlike other 2D fighting games, with one exception: all the characters are female and they're all 3D rendered rather than hand-drawn." The game features twelve scantily-clad women, each with her own fighting style, personality, and background story.
Take a look at some of the game's many characters:
 |
MONIKA
Full Name: Monika Law
Age: 26
Occupation: Policewoman
Nationality: United States
Fighting Style: Goju Kai Karate
Her last name sealed her fate from birth: she would grow up to be a cop. Monika grows tired of the lack of action on the part of all law enforcement agencies around the country in regards to the huge drug insurgence over the past 5 years. She turns in her badge and takes the law into her own hands against the Black Satin.
|
 |
LU LIN
Full Name: Lu Lin Hace-Ki
Age: 20
Occupation: Drifter
Nationality: Egypt
Fighting Style: Krav Maga
Lu Lin was born in Egypt but spent most of her life wandering throughout Israel and eventually came into favor with several members of its military. When a military strike against the Black Satin's heavily armed "Southern Cross" fails, Lu Lin decides to go on a suicide mission of her own to take down the leaders of the Black Satin directly.
|
 |
TINA
Full Name: Tina Nicoli
Age: 30
Occupation: Unknown
Nationality: Denmark
Fighting Style: Kenpo Karate
Tina spent most of her life training in the art of Kenpo to protect those closest to her if the need ever arose. The need arose when her mother was hit by a stray bullet during a firefight between local police and several members of the Black Satin. Tina vows to take them all down so no one else ever becomes an innocent victim of their lawlessness.
|
 |
DESIREE
Full Name: Unknown
Age: Unknown
Occupation: Unknown
Nationality: Great Britain
Fighting Style: Bojutsu
Desiree oversees all European operations of the Black Satin. She is a vicious, brutal woman who often acts before she thinks, leaving many people around her with nothing less than a severe headache. Her skill with her bo is masterful and she has no problems picking a fight with anyone who disagrees with her.
|
 |
SERAPHINE
Full Name: Unknown
Age: Unknown
Occupation: Unknown
Nationality: United States
Fighting Style: Hapkido/Naginata-jutsu
Seraphine grew up learning nothing but violence and death. She turned to the martial arts to help offset this terribly negative environment. When she became an adult, she was recruited by the Black Satin to oversee all North American operations due to her experience. While she does not always enjoy what she does, she believes that one day she'll be able to live in peace, and she believes that the only way that will come about is if the Black Satin is able to dominate the gloabl economy. Seraphine is a torn woman; she appears gentle but inside she burns with rage and anyone dumb enough to get in her way during one of her fits will be sliced to ribbons by her expertly-wielded Naginata blade.
|
|
For the full character list, check out: http://kurojusu.lostsocksoftware.com/characters.html |
It's pretty clear that Nek has put a lot of thought into this game, and has done a great job of designing and fleshing out the characters.
But what's the context, you ask? Here's a summary of Black Satin's overall premise:
"The Black Satin" is the name of an underground group of sadistic women who have been trying to build a profitable empire of illegal drugs and hair care products. Their ultimate intention is to assassinate all world leaders and cause the collapse of the global economy so they can rise to power.
In terms of actual coding, the game sounds like it is coming along quite well. The character select screen, versus screen, main menu and more are near completion, and the game engine is already coming along. Right now, Nekrophidius is getting the fundamentals of the fighting engine coded: "I got the generic FSM coded, but it's missing the animation and hitbox tables. Still got plenty of subfunctions to add to it though...so far I've only handled the required states, such as walking, jumping, and basic attacking."
Check out several Black Satin gameplay screenshots below:


And, for good measure, here's a promotional "poster" that Nek made a few years ago, when he first began this project. It's a little outdated, but it shows all of the main characters:

"The eight women in the foreground are the main player-characters (from left to right): Megan, Monika, Sindee, Kim, Lu Lin, Tina, Midarana, and Calamity. In the background: the woman with the staff is Desiree, the woman with the sword (who you can barely see) is Lae Jen, the woman turned facing the middle with the naginata is Seraphine, and the woman directly in the middle, towering over everyone else, is Kurojusu."
Excited yet? I thought so! (No, not that kind of excited, you pervert!)
You can look forward to playing Black Satin shortly. Nek promises a "Playable demo as soon as I get at least one character completed (which will probably be either Megan or Monika)." Until then, you can find out the latest details at the Black Satin Official Site, or in this thread at QBasic News, or this thread at Freebasic.net.
Have a program you'd like featured in the Gallery? Email me!
Review of YAGL - Yet Another Game Library
Written by Adigun Azikiwe Polack
Ok. Before we get started with this special review, I want to point out two things to all of you: 1) this is the first-ever original FB library review ever printed for QB Express, game-based or otherwise; and 2) since I am doing this type of review right here, I am gonna do this *quite* differently from what I would normally do in game reviews for this mag. Now, if we are ready, let�s do it!!!
In recent months, marzec has successfully unleashed his new game library called YAGL (which stands for �Yet Another Game Library�) and has brought it open into the spotlight for us all to see and experience! Thereafter, he took his original C++ version and made very accurate ports of it in FreeBASIC for use in both MS-Windows and Linux operating systems, and is already processing to be ported also to Visual C++ and even cygwin as well!!
The following was what happened when I have experienced YAGL for myself.
Right up front, even from the get-go of Z!re�s many excellent demos in this very library, YAGL is pretty fast and simply impressive, I must say!! Also, YAGL has many blitters for use with any graphics mode you select there in your programming using this lib, including scaling/rotation support, alphablending, color-keying, and native .BMP/PNG support that you can just truly sink your teeth into! Also, there is full keyboard/mouse/joystick support, as well as such wonderful OpenAL support for rich, immersive 3D sound and music to just suck you right into the real experience of what YAGL is all about!!
But, what REALLY blew me away in such pure awe was the serious fact that all the objects you create in this game library is being closely kept track of and even automatically closes them all up for you upon exiting your program, and that holds very true for the sound and graphics initializations, too!!! Look, I have worked for several months now on another game lib called AFlib2 - Aura Flow Library 2, and found out along the way that such wonderful optimizations in *any* FB game lib at all really makes the use of it more fun and ultimately so rewarding, and YAGL does such an outstanding job in this area, I believe!! No comparison here.
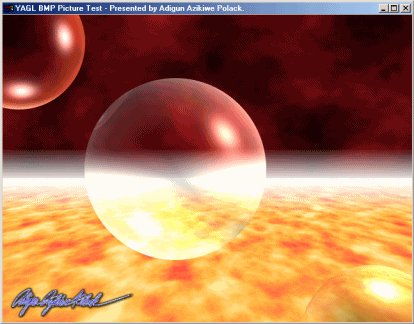
Ease of use? Better believe it, because it is all here for you in YAGL and then some! Man it is that good!! I mean, I just programmed in some simple source code for loading a .BMP file, and you can see it along with my own original created BMP-based picture right here! Now if you compile it using YAGL and FreeBASIC, then it will come out successful! In its own right, that is how *absolutely* impressed I am with this FB game lib by marzec himself.... for sure!!!
Also, another real valuable thing about YAGL is that you can even use OpenGL commands directly into this lib, plain and simple, so imagine the possibilities of mixing it up YAGL�s drawing primitives! Quite something, I will bet!!
At the time of this review, the version of YAGL tested was version 0.0.3b. You can pick up the very latest version of this lib beginning at http://goddess.selfip.com/yagl/.
Given all of the excellent features and great optimizations that marzec has put out on this game lib, he did such an awesome job on his work of YAGL - Yet Another Game Library, which joins the FB hall-of-fame as one of the best game libs in 2006!!!
T H E � F I N A L � V E R D I C T :
� 8.8 out of 10 �
Now that that is settled fair and square, let�s see some GREAT games made using YAGL here!! Until the next time, this is Adigun Azikiwe Polack, out!!! !
Visit the Official YAGL Site, or the AAP Official Projects Squad.
Regarding QBasic.com...
Written by Mark Wilhelm
Dear QBasic (and FreeBasic, in some respects) community,
As the owner and operator of QBasic.com, it�s my job to make sure the community approves of my actions, approves of how Qbasic.com develops and grows. I admit; I have been sadly deficient in performing this simple task.
Many members of the QBasic community have become very disillusioned and unhappy with QBasic.com�s progress. To them, QBasic.com is a symbol, an icon, the first thing you find when you search for QBasic, the first place you think of. If it has a bad image, we all have a bad image. Mallard started something that no one can stop; he had the foresight to create a brand-name haven. Mallard�s absence created an even more interesting predicament: everyone called QBasic.com their home and took pride in it, yet no one could completely claim it as their own! It forced cooperation and a sense of community upon the embryonic �QBasic Forum� and its denizens. Some crumbled under the pressure and left, others excelled and became prominent leaders, such as Mac and Pete (reader, if you belong here, forgive my lapse of judgment). Either way, �The QBasic Forum� still exists, a monument to all who have gone before me.
Buying QBasic.com has to be the most intelligent thing I�ve done all my life. It�s the first website I�ve owned that instantly attracted a following. It�s also happens to be the best investment I�ve made in my life: $20 fetched me a domain name tentatively appraised at more than $50,000! Unfortunately, QBasic.com hasn�t been a completely headache-free gig. Don�t think I took some odd satisfaction at instantly becoming the center of so much pressure, so much hope, so many opinions. I didn�t. Getting 20+ new messages each time you check your email is nerve-racking. Don�t believe me? Try it some time if you get the chance. Then think about how you�d feel if you thought you had an obligation to respond to each message on a case-by-case basis! If you sent me an email back when QBasic was still a black and white plain html page with three blue links on it and I didn�t respond, I apologize. All of the messages I managed to read were given consideration. I have to give credit where is credit is due:
To ASCII-World.com, for the inspiration for QBasic.com�s theme.
To Matthew, for letting me use his backup of QBasic.com for my mirror.
To Mac, for giving me a temporary home while I weighed my options.
To Mennonite, for giving me a ton of advice, most of which I ignored.
To my friends, TheMayor and %00, who reminded me that QB.com was for sale.
To everyone who emailed me; you all gave me great ideas and kept me going.
Once again, if I forgot anyone, I apologize.
As I was saying, many members of the QBasic community are disappointed with what I�ve done to QBasic.com. I�d like to give them all a chance a get their thoughts out. Come on, email me with your opinions and I�ll try to answer as many as possible in the next installment of QB Express! I wouldn�t mind making regular submissions. ;) Until then, time is cubic. ~Mark
Visit QBasic.com, or email m4rk.wilhelm@gmail.com!
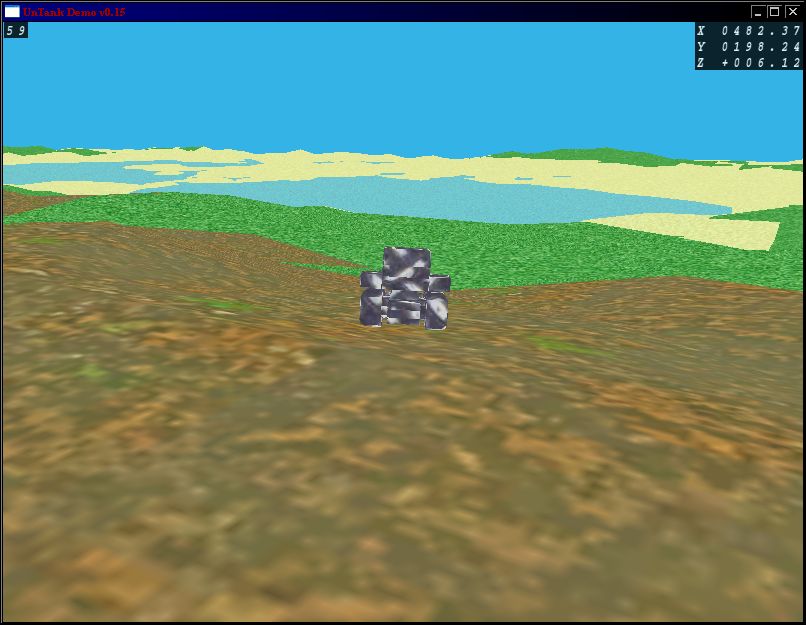
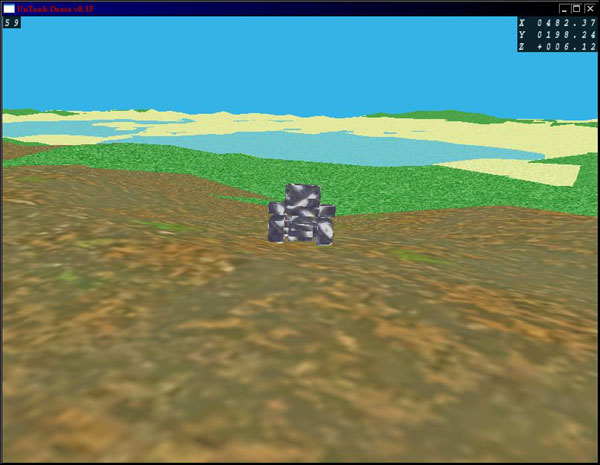
Untank Preview
Written by Xerol

UnTank is an online, fully 3d multiplayer tank battle game coded in FreeBasic using OpenGL and SDL_Net. As of the time of this writing (Tuesday, 24 January 2006) the game is in version 0.15b, with 0.16 probably out by the end of the week.
In the current demo all you can do is drive a weaponless tank around a landscape(which is generated by a seperate program included in the download) but getting to this point has been a journey in itself. The current set of revisions are intended to optimise the engine as much as possible, with texture mipmapping and selective rendering being new features in 0.15. These enhancements are just the start of what's going to be done over the next few days, and hopefully the game will be running at full framerate on older systems very soon. Already since the first version, the raw uncapped framerate in debug versions has increased 250%. The release framerate is currently capped at 60fps but will probably be one of the options you can set when the menus get put in.
Here is what's planned in upcoming future versions:
0.2x - Implement menu systems and tank piece selection*.
0.3x - Begin to implement network code.
0.4x - Fully adjustable in-game settings; test-battles should be possible by this point.
0.5x - In-game automatic updater(will also facilitate custom maps being used).
After that we'll just see where it goes. It'll probably be a few months before it gets released for online testing, but you can test the existing graphics engine right now: http://downloads.lggaming.com/untank0_15.zip.
Tank Customisation
Each tank is "constructed" from three pieces: Drive, Body, and Turret. To start with, there will be 4 types of each piece purchasable, and over time more will be added and unlockable. Each piece affects part of the tank's performance in battle - you can have a high-traction drive that doesn't move very quickly on any terrain but can climb mountains, or a very quick one that stalls as soon as it hits sand. Other possibilities include amphibious tanks. The Body's primary role is to hold armor - if the body gets destroyed, it's game over. The turret is where all of the weapons are stored, and you can equip up to three general weapons for use with any turret, plus one "special weapon" only usable with a specific turret. The possibilities for customisation are endless.
All of this is going fine, except for one thing: the network code. I've never done a project that requires this level of communication, and don't feel comfortable coding it alone. If anyone wants to help out with this in ANY way(not necessarily network code), shoot me an email at xerol@lggaming.com.
-Xerol
FREEBASIC [As in Free Speech AND Free Beer].
Written by Matt2Jones
I've been watching allot of firefly lately, cause my friend just threw me the box set, and I started thinking allot about the generic western/pirates of the carribian idea of freedom they based the show on... And it occured to me that that's what computers (programming, the internet, etc) present for me. The ability to realise your dreams.
I thought about writing a big essay on the aptly named freebasic.... But instead I translated the firefly themesong to my own ends... Yes, it is abit of a pisstake.
--[Firefly]--
Take my love, Take my land, Take me to where I cannot stand...
I don't care, I'm still free, you can't take the sky from me.
Take me out to the black, tell 'em I aint comming back,
Burn the land and boil the sea, you can't take the sky from me.
There's no place that I can't be, since I found Serenity
You can't take the sky from me.
---[FreeB]---
Take my love, take my 16bitfilesystems, take me to where my work is unstable...
I don't care, I'm still free, you can't take my language from me.
Take me out to the internet, tell them them I'm where they cannot get [at me]
Render my past into obsolete obscurity, but you can't take Freebasic from me...
There's nothing that's outta my reach, Since FB has been released.
You can't take the sky from me.
matt2jones.
Monthly Awards
Written by Pete
Every month, QB Express hands out two awards to recognize QB or FB coders and websites that have done exceptional work in the last month. They are not awarded for work done in the past, only for work that has been released since the last issue of the magazine. We will bring you these awards on a monthly basis to help give credit where credit is due.
Site of the Month
FreeBasic.net
http://www.freebasic.net
Webmaster: V1ctor
By now, everyone knows and loves FreeBasic.net, the home to FreeBasic and host of one of the best and most active forum communities around. Not only does this site provide us with V1ctor's masterpiece -- the FB compiler -- but it is also the best source of FB programming help, news and discussion anywhere on the Internet. Perhaps it's FreeBasic.net's "no fluff, just stuff" motto that makes it such a success. The forum doesn't have any of the "fluff" that fills up similar forums -- there are no avatars, signatures, colored or gigantic text, and the layout is a simple black/white/gray design. It's a community that's focused on getting things done...business and having legitimate, fruitful discussion instead of spam, flaming and other juvenile activities. Freebasic.net is a site where I've never seen a flame war or a childish argument, and it makes it very inviting and worthwhile.
Anyway, FreeBasic.net has been my backburner choice for "site of the month" ever since we started giving out awards last March. I've kept FreeBasic.net on reserve for a slow month when there's no other website that really sticks out for being downright excellent -- and now that one has rolled around, I finally have an opportunity to give V1ctor this much-deserverd award. Let's face it: FreeBasic.net has been consistently active and excellent ever since it launched, and just about any month is award-worthy. January of 2006 is no exception!
Programmer of the Month
Adigun Azikiwe Polack
http://dhost.hopto.org/aapproj
For those of you following Adigun Azikiwe Polack's spectacular FB graphics library, AFlib2 (Aura Flow Library 2), you know exactly why he is this month's Programmer of the Month. This library is absolutely spectacular! It is a natural extension of the original AfLib and RelLib, two great QuickBasic libs. Here's the official word from Adigun: "In the very grand tradition of the original QuickBASIC libraries AFlib and RelLib by Richard Eric M. Lope (Relsoft), this all-new incarnation in FreeBASIC delivers home many implementations based on them both, plus some phenomenal ALL-NEW functionality and special effects *never before seen* on either lib right there!!"

But I don't have to hype up this library to make you want to check it out. Just take a look at this gigantic page of screenshots demonstrating all of the lib's fantastic capabilities. It really speaks for itself.
For his great work on AFlib2 this month and in the months preceding this, Adigun Azikiwe Polack is the QB Express programmer of the month!
Have a suggestion for Programmer / Site of the Month? Email me!
Comics
By Rattrapmax6
Rattrapmax6 is back this month with another QBasic Horse Humor comic!
Tree Tutorial: Parts 3 and 4
Written by Syn9
Part 3: 'Branch Skeleton'
The Structure:
Before defining our classes and setting up variables for the tree information we should set up some limits on our output.
CONST MAX_NODES = 13, MAX_BRANCHES = 13, MAX_LEAVES = 5, MAX_SEGS = 3
MAX_NODES basically refers to the max number of segments along the branch. After defining this we will be able to determine how far along one branch another one occurs enabling us to determine how many nodes this new branch will have.
MAX_BRANCHES, MAX_LEAVES - how many branches and leaf planes our tree will have
MAX_SEGS defines how many segments the cylinder of the branches has. The higher the number, the round they will be.
Next we develop our types. For our Branch Type we'll need to keep track of each branches parent branch and node location on the parent branch. We will need to know how many nodes our branch has as well as the node information (location / angle).
In our Node type, we need to keep track of the node x/y/z location as well as the global node location is for this node. What this means is, if the max nodes is set to 13, and you're node 3 on a branch that's close to the end of another branch, on the global scale you're really node 12 because you're 12 nodes away from the base of the tree. This is important for determining how long node segments need to be as well as their diameter. We also have an array called plane. This stores a set of x/y/z coordinates that stick out perpendicular to the node segment. There will be one of these points circling each node point for each of the cylinder segments.
Lastly we have our nodeAngle type. This has an x/y/z angle for our branch. Yes we could use spherical coordinates also. >)
  type pointType
      x   as single
      y   as single
      z   as single
  end type

  TYPE nodeType
    x AS SINGLE
    y AS SINGLE
    z AS SINGLE
    globalNode    as integer
    plane(MAX_SEGS - 1) as pointType
  END TYPE

  TYPE nodeAngleType
    x AS SINGLE
    y AS SINGLE
    z AS SINGLE
  end type

  TYPE branchType
    nNodes  AS INTEGER
    nodes(MAX_NODES) as nodeType
    nodeAngle(MAX_NODES) as nodeAngleType
    root  as nodeType
  END TYPE
Styling:
These are some basic variables that we will be incorporating to help give us some control of the tree's look
  baseBranches = 1
  sag! = 10
  growth! = 0
  scale! = .5

  twistyness = 30

  trunkLength = 4
  twigLength = 1.5
  branchLengthInter! = (twigLength - trunkLength) / totalNodes


  trunkWidth = 1.4
  twigWidth = 0
  branchWidthInter! = (twigWidth - trunkWidth) / totalNodes
baseBranches determines how many trunks the tree will have.
sag! determines how much the branches want to curve downward. It is directly counteracted by growth! Due to the angle of curving being compounded each node a small value of growth is enough to make the branches resist curving and point more upwards.
scale! is a multiplier that is used to control how long the branches end up being. It is not necessary required.
twistyness is used to control how much the branches want to curve side to side not just downward.
branchLengthInter! and branchWidthInter! are used to produce a linear reduction in the branch width/length based on each node's global location
Basic Skeletal Node Generation
Loop for each of the branches and initialize the branch information
for branch = 0 to nBranches - 1
    for i = 0 to totalNodes - 1
        branches(branch).nodes(i).globalNode = 0
        branches(branch).nodeAngle(i).x = 0
        branches(branch).nodeAngle(i).y = 0
        branches(branch).nodeAngle(i).z = 0
        branches(branch).nodes(i).x = 0
        branches(branch).nodes(i).y = 0
        branches(branch).nodes(i).z = 0
        'branches(branch).nodes(i).connected = 0
    next
We're going to randomly select a parent location for our branch. When parentBranch is set to -1, the generator recognizes this as the branch sticking out of the base x/y/z location. If we have not created each of our trunks then we will create these first. This is accomplished by subtracting 1 from the # of baseBranches for each one that we've created. This way once baseBranches = 0 we're allowed to start creating sub-branches.
    do
        parentBranch = int(rnd * branch)
        if baseBranches > 0 then parentBranch = -1
During this loop we will set parentNode to the desired node. We initially set it to -1 that way if its > -1 we know that we were successful in finding a valid spot for our node.
If parentBranch is > -1 we're allowed to use a node from another branch as our starting point. We'll find a random node, set the branch's root x/y/z to the location of the node point on the parent. We align our branch to the same angle as the parent node and then have it point outward at a random y angle.
Here is where we set our globalNode value for the base node. We use globalNode to determine how many nodes this branch will have as well as the starting point for each of the branch's node's globalNode value.
        parentNode = -1
        if parentBranch > -1 then
            parentNode = int(rnd * branches(parentBranch).nNodes)
            branches(branch).root.x = branches(parentBranch).nodes(parentNode).x
            branches(branch).root.y = branches(parentBranch).nodes(parentNode).y
            branches(branch).root.z = branches(parentBranch).nodes(parentNode).z
            branches(branch).nodeAngle(0).x = branches(parentBranch).nodeAngle(parentNode).x
            branches(branch).nodeAngle(0).y = branches(parentBranch).nodeAngle(parentNode).y + rnd * 180 - 90
            branches(branch).nodeAngle(0).z = branches(parentBranch).nodeAngle(parentNode).z
            globalNode = branches(parentBranch).nodes(parentNode).globalNode
        else
            branches(branch).root.x = 0
            branches(branch).root.y = 0
            branches(branch).root.z = 0
            branches(branch).nodeAngle(0).x = 0
            branches(branch).nodeAngle(0).y = rnd * 360
            branches(branch).nodeAngle(0).z = 0
            globalNode = 0
            baseBranches = baseBranches - 1
        end if
        nNodes = totalNodes - globalNode
        branches(branch).nNodes = nNodes

        if nNodes > 0 and parentNode <> 0 then exit do
    loop
This next section of code is where the real math comes into play when determining how the branches curve and where the x/y/z location for each node will be at.
ox!, oy!, oz! are used to keep track of the previous node's location so that our new node is sticking out of it.
globalNode is incremented for each node and used for calculating how long the node is.
the sub rotpnt takes a vector x/y/z and rotates it by angles rx/ry/rz then spits out the final point in nx/ny/nz. We are using this to rotate a vector from pointing directly upwards to be pointing in the direction of the branch.
    ox! = branches(branch).root.x
    oy! = branches(branch).root.y
    oz! = branches(branch).root.z
    for node = 0 to nNodes - 1
        globalNode = globalNode + 1
        rx! = branches(branch).nodeAngle(node).x + rnd * twistyness - twistyness / 2
        ry! = branches(branch).nodeAngle(node).y + rnd * twistyness - twistyness / 2
        rz! = branches(branch).nodeAngle(node).z + rnd * twistyness - twistyness / 2
        rz! = rz! + rnd * sag! * rz! / 90 + sag! / 5
        rz! = rz! - rnd * growth! * rz! / 90 - growth! / 5
        rotpnt 0, (trunkLength + globalNode * branchLengthInter!) * scale!, 0, 0, 0, rz!, nx!, ny!, nz!
        rotpnt nx!, ny!, nz!, rx!, 0, 0, nx!, ny!, nz!
        rotpnt nx!, ny!, nz!, 0, ry!, 0, nx!, ny!, nz!
        branches(branch).nodes(node).x = ox! + nx!
        branches(branch).nodes(node).y = oy! + ny!
        branches(branch).nodes(node).z = oz! + nz!
        branches(branch).nodeAngle(node+1).x = rx!
        branches(branch).nodeAngle(node+1).y = ry!
        branches(branch).nodeAngle(node+1).z = rz!
        branches(branch).nodes(node).globalNode = globalNode
        ox! = branches(branch).nodes(node).x
        oy! = branches(branch).nodes(node).y
        oz! = branches(branch).nodes(node).z
    next
next
Displaying the skeleton
Here is some very basic code looping through each node on each base, drawing a line from the node x/y/z to the previous node's x/y/z. If the previous node is -1, we'll use the branch's root x/y/z location. Again we use getXY to convert the 3d coordinates to screen coordinates. This is placed in the main loop.
    for branch = 0 to nBranches - 1
        nNodes = branches(branch).nNodes
        for node = 0 to nNodes - 1
            x0! = branches(branch).nodes(node).x
            y0! = branches(branch).nodes(node).y
            z0! = branches(branch).nodes(node).z

            if node > 0 then
                x1! = branches(branch).nodes(node - 1).x
                y1! = branches(branch).nodes(node - 1).y
                z1! = branches(branch).nodes(node - 1).z
            else
                x1! = branches(branch).root.x
                y1! = branches(branch).root.y
                z1! = branches(branch).root.z
            end if

            getXY x0!, y0!, z0!, screenX0, screenY0
            getXY x1!, y1!, z1!, screenX1, screenY1

            line (screenX0, screenY0) - (screenX1, screenY1), 6

        next
    next

Here is the code for the basic skeleton: tree_basicSkeleton.bas
Creating the branch cylinders
In order to create the cylinders that follow the branch we will need to generate points perpendicular to each node and connect these to form planes parallel to each branch. First we use rotpnt to rotate a vector pointing forward in a circle around the y axis. Then we use rotpnt again to rotate the circle of points to the same direction as the branch. Originally our branch vector pointed straight up then was rotated to the direction of the branch, since we started with a vector pointing forward before rotating we'll have a new point that is perpendicular to the branch.
In our formula for the z vector we include some calculation to make the radius of the circle smaller as you get closer to the last node.
This code is added after ox!, oy!, oz! in the tree generation section:
	for p = 0 to MAX_SEGS - 1
            rotpnt 0, 0, (trunkWidth * cos(3.14159 / 2 * globalNode / totalNodes)) * scale!, 0, p * 360/MAX_SEGS, 0, nx!, ny!, nz!
            rotpnt nx!, ny!, nz!, 0, 0, rz!, nx!, ny!, nz!
            rotpnt nx!, ny!, nz!, rx!, 0, 0, nx!, ny!, nz!
            rotpnt nx!, ny!, nz!, 0, ry!, 0, nx!, ny!, nz!

            branches(branch).nodes(node).plane(p).x = ox! + nx!
            branches(branch).nodes(node).plane(p).y = oy! + ny!
            branches(branch).nodes(node).plane(p).z = oz! + nz!
        next
Next is the new display code to replace the original single lines
    for branch = 0 to nBranches - 1
        nNodes = branches(branch).nNodes
        for node = 0 to nNodes - 1
            for p = 0 to MAX_SEGS - 1
                n = p + 1
                if n = MAX_SEGS then n = 0
                nx! = branches(branch).nodes(node).plane(n).x
                ny! = branches(branch).nodes(node).plane(n).y
                nz! = branches(branch).nodes(node).plane(n).z
                getXY nx!, ny!, nz!, pnti(0,0), pnti(0,1)
                n = p
                nx! = branches(branch).nodes(node).plane(n).x
                ny! = branches(branch).nodes(node).plane(n).y
                nz! = branches(branch).nodes(node).plane(n).z
                getXY nx!, ny!, nz!, pnti(3,0), pnti(3,1)

                nn = node - 1
                if nn > -1 then
                    n = p + 1
                    if n = MAX_SEGS then n = 0
                    nx! = branches(branch).nodes(nn).plane(n).x
                    ny! = branches(branch).nodes(nn).plane(n).y
                    nz! = branches(branch).nodes(nn).plane(n).z
                    getXY nx!, ny!, nz!, pnti(1,0), pnti(1,1)
                    n = p
                    nx! = branches(branch).nodes(nn).plane(n).x
                    ny! = branches(branch).nodes(nn).plane(n).y
                    nz! = branches(branch).nodes(nn).plane(n).z
                    getXY nx!, ny!, nz!, pnti(2,0), pnti(2,1)
                    refs = 4
                else
                    nx! = branches(branch).root.x
                    ny! = branches(branch).root.y
                    nz! = branches(branch).root.z
                    getXY nx!, ny!, nz!, pnti(1,0), pnti(1,1)
                    refs = 3
                end if

                c = 6
                if refs = 3 then
                    line (pnti(0,0), pnti(0,1)) - (pnti(1,0), pnti(1,1)), c
                    line (pnti(0,0), pnti(0,1)) - (pnti(3,0), pnti(3,1)), c
                    line (pnti(1,0), pnti(1,1)) - (pnti(3,0), pnti(3,1)), c
                else
                    line (pnti(0,0), pnti(0,1)) - (pnti(1,0), pnti(1,1)), c
                    line (pnti(2,0), pnti(2,1)) - (pnti(1,0), pnti(1,1)), c
                    line (pnti(2,0), pnti(2,1)) - (pnti(3,0), pnti(3,1)), c
                    line (pnti(0,0), pnti(0,1)) - (pnti(3,0), pnti(3,1)), c
                end if
            next
        next
    next
First we grab 2 points on a plane perpendicular to our node. Next we get the same 2 points on the previous node for the bottom of the plane. If the previous node is the root we draw a cone instead of a cylinder to make the branch look like it's sticking inside the parent. refs holds the number of points on our polygon. Then at the end of the loop we render the polygon.
Here we have it. The finished tree skeleton. In the next section we'll look at making the leaf planes.

tree_finalSkeleton.bas
Part 4: 'Leaf Planes'
The theory
Our goal is to have a collection of planes that are always facing the camera that will hold our leaf texture. Basically all we need to know is where to place the center of the plane, and how large it should be. When it comes time to drawing the plane, setup a matrix that contains the opposite rotations of the camera, multiply the plane points by this matrix, then use GetXY to project the leaf plane coordinates to the screen.
To add some character to the trees the leaf planes are going to get larger when they are centered over a node the has multiple branches coming out of it to show a denser distribution of leaves in that area.
The Code
First is our leaf type. This holds the coordinates for the center of the leaf plane and a relative size for the plane.
type leafType
    x   as single
    y   as single
    z   as single
    size    as single
end type
Next we have a small addition to our node type. connected as integer. This will be used to keep track of the number of children a node has for determining leaf plane size. This is followed up by a small addition to the tree generation code where we add
branches(branch).nodes(node).connected = branches(branch).nodes(node).connected + 1
this increments the connected variable for the parent node in the event a leaf plane is generated here.
After the tree generation code we have the leaf plane generation code.
There is another do-loop sequence in this section. First we find a random branch and node on branch to attach to. Next we check to see if this point is in the upper half of the tree. Our last check is to make sure this node is not the location of any other leaf plane. Once we find a good location for our plane the loop is exited. Lastly we set the plane's location to the node coordinate and put a limit on the size of the plane.
for leaf = 0 to MAX_LEAVES
    try = 0
    do
        try = try + 1
        if try = 100 then exit do
        branch = int(rnd * nBranches)
        node = int(rnd * branches(branch).nNodes)
        globalNode = branches(branch).nodes(node).globalNode
        pass = 0
        if globalNode > MAX_NODES / 2 and globalNode < MAX_NODES - 1 then pass = 1
        for i = 0 to leaf - 1
            ff = 0
            if leaves(i).x = branches(branch).nodes(node).x then ff = ff + 1
            if leaves(i).y = branches(branch).nodes(node).y then ff = ff + 1
            if leaves(i).z = branches(branch).nodes(node).z then ff = ff + 1
            if ff = 3 then pass = 0
        next
        if pass = 1 then exit do

    loop

    leaves(leaf).x = branches(branch).nodes(node).x
    leaves(leaf).y = branches(branch).nodes(node).y
    leaves(leaf).z = branches(branch).nodes(node).z
    leaves(leaf).size = branches(branch).nodes(node).connected
    if leaves(leaf).size > 2 then leaves(leaf).size = 2
next
Displaying the Leaves
Here is the final part of the tutorial. This section of code was probably the most tricky to write and I didn't quite understand the technique until i spent some time working with opengl. For this area of the code we need to have a routine to push and pop our matrix so that we can perform new rotations on it without losing our original camera setup. These new routines are pushMatrix () and popMatrix ().
The theory is quite simple. You're rotating opposite the direction of the camera first so that when you use getXY and multiply the camera rotation against the points you effectively don't rotate them at all and you just get the 3d perspective applied to the points and receive the 2d screen coordinates.
pnt(0,0) = -.5
    pnt(0,1) = -.5
    pnt(1,0) = -.5
    pnt(1,1) = .5
    pnt(2,0) = .5
    pnt(2,1) = .5
    pnt(3,0) = .5
    pnt(3,1) = -.5

    for leaf = 0 to MAX_LEAVES
        pushMatrix
        mIdentity
        mRotate -xan!, xplane
        mRotate -yan!, yplane

        for p = 0 to 3
            x0! = pnt(p,0) * leaves(leaf).size * leafscale!
            y0! = pnt(p,1) * leaves(leaf).size * leafscale!
            z0! = 0
            pnt(p,2) = x0! * matrix(0) + y0! * matrix(3) + z0! * matrix(6) + leaves(leaf).x
            pnt(p,3) = x0! * matrix(1) + y0! * matrix(4) + z0! * matrix(7) + leaves(leaf).y
            pnt(p,4) = x0! * matrix(2) + y0! * matrix(5) + z0! * matrix(8) + leaves(leaf).z
        next
        popMatrix

        for p = 0 to 3
            getXY pnt(p,2), pnt(p,3), pnt(p,4), sx, sy
            pnt(p,5) = sx
            pnt(p,6) = sy
        next


        line (pnt(0,5), pnt(0,6)) - (pnt(1,5), pnt(1,6)), 2
        line (pnt(0,5), pnt(0,6)) - (pnt(3,5), pnt(3,6)), 2
        line (pnt(2,5), pnt(2,6)) - (pnt(1,5), pnt(1,6)), 2
        line (pnt(2,5), pnt(2,6)) - (pnt(3,5), pnt(3,6)), 2
    next
The pnt() array stores a set of x/y coordinates for our leaf square. This array will also store our screen coordinates for each point for drawing. The 2d coordinates are multiplied first by the size of the leaf plane which was dependant on the number of branches connected to the node. Next the point is multiplied by a scalar to control how large the planes end up being. I have this set to 3.5.
The plane points are rotated by the matrix and stored in a new section of the pnt array. We pop the matrix to restore our original camera matrix and use getXY to find the screen coordinates. Lastly we draw our plane.

tree_leaves.bas
That's all for our tree generator. In the last 2 sections we'll look at setting up an opengl scene and getting our tree to display properly inside it. If you have any questions about this tutorial, please drop me a line at syn9_at_dev9.net or leave a message on the forum at syn9.thingie.net and I'll get back to you as soon as I can.
Download a copy of this tutorial: TreeTutorialPt3-4.zip
Wallace Visual Editor Tutorial
Written by Wallace
Wallace Visual Editor
How many hours have each of us spent creating a user interface for an application that we have made? Including making drawing routines, a state machine, and a set of listeners I�ll bet that about half of the time making a good application is spent making all of this junk (in my experience even more, about three quarters.) For a large project that could amount to maybe five or even ten hours of coding, testing, and debugging. Now if there was a way to compress that down to about ten minutes imaging what we could accomplish.
That is why I wrote Wallace Visual Editor. It is a drag and drop tool that allows you to make a beautiful user interface in minutes. It will do everything for you, give you drawing routines, will write a state machine, make a listener for every object, and even comment the code for you.
A Visual Editor is a tool that most programmers have used at one point or another. Visual Studios is a popular one as well as Eclipse VE. They allow you to quickly select a portion of the screen with the mouse and turn that selected area into a Windows object as well as set flags and other aspects of the object. It is called a visual editor because you can see what your application is going to look like long before you even think about code. Most Visual Editors are for object oriented languages so it is easy to use the window once you created it. As far as I know there is one visual editor available for FreeBasic that allows you to use real Windows objects. I found this frustrating though, because who needs an application with nothing but buttons and checkboxes? Not me, I have to be able to display something.
The Windows objects act just like they are: objects. FreeBasic is a module based language. This gives us extreme difficulties when we try to display something on the windows created by visual edits such as EzeeGUI. Windows don�t use buffers; they use objects called �frames�. LINE and PSET don�t work on these frames. In order to display something on the window you would have to first put in on a buffer, then use a library from an OOP language to put it through a �wrapper� to convert it into a graphic configuration or graphics view which can then be put on the screen. Wallace Visual Editor ignores the frame and uses a normal Screenres command to make the window. All of your graphics commands will work.
Getting Started
If you downloaded Wallace VE when it first came out the first thing that you will want to do is to go to my website www.freewebs.com/wallacesoftware and grab a copy of Wallace VE 1.1. Don�t worry; if you have a project saved it will still work in WVE 1.1. Now run it and type in the size of the window that you want, if you bypass this step by pressing enter twice you will get a window of size 800x600.
Now let�s first make a File menu. Click on the Menu Button and you will see a prompt near where the menu will be asking you to give the menu a name. I type in �File� and press enter. You have to know ahead of time how many options there are going to be, I typed in 5 at the number command. Then I went through the prompts putting in 5 commands one at a time. I chose New, Open, Save, Save As, and Quit. It seemed like a pretty standard File menu. Here already WVE has done something cool for you. It has automatically coded the commands Open, Save As, and Quit. They will all do the appropriate action.
Now to make an object you need to select an area of the screen by clicking and dragging. A blue outline will show up so that you can see how big it is. Now all of the buttons light up.
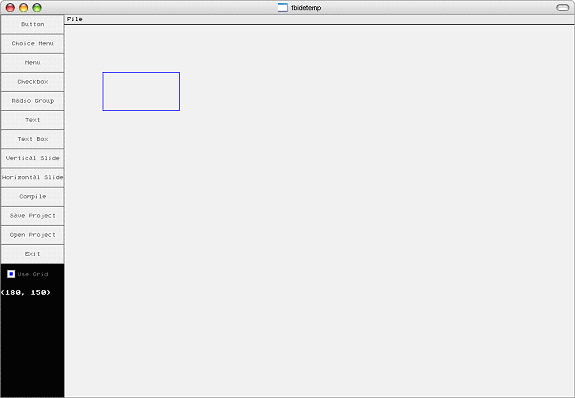
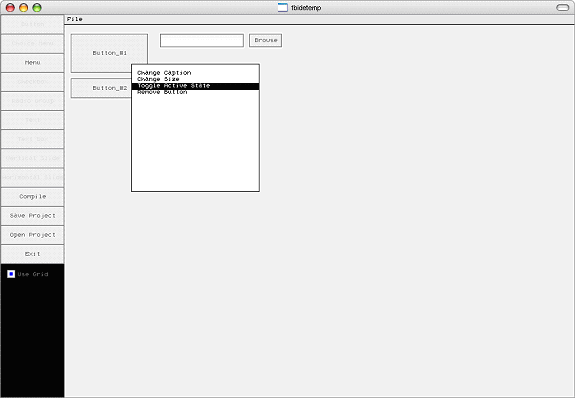
I think I�ll make this object a button. I select the Button button and give it the caption �Button #1.� Right away the button is shown on the screen. But I don�t like its position. So I click on the button and drag it to the top left corner underneath the File menu. I also decide to give it a companion; I made another button directly underneath it.
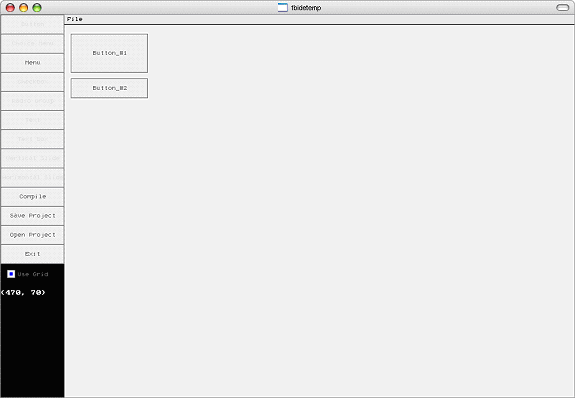
Notice that I decided to leave the Use Grid checkbox selected, this forces the object o snap to the neared 10 pixels, this makes it easier to make a nice neat workspace. Next to these buttons I make a textbox and another button labeled �Browse.� This does something else cool. The Browse button will automatically open an Open window and place the name of the selected file in the textbox next to it. I now decide that I don�t want the use to be able to press the big button at the moment, so I right click on it and a menu pops up and I select toggle active state.
So now I add a vertical slider bar with an upper bound of 100 and place text on top of it labeling it �WVE�s coolness, but there is a problem. Well two problems. For one the coolness slider is at zero and that can�t be right, but also you can�t see all of the text, I selected too small of an area for it.
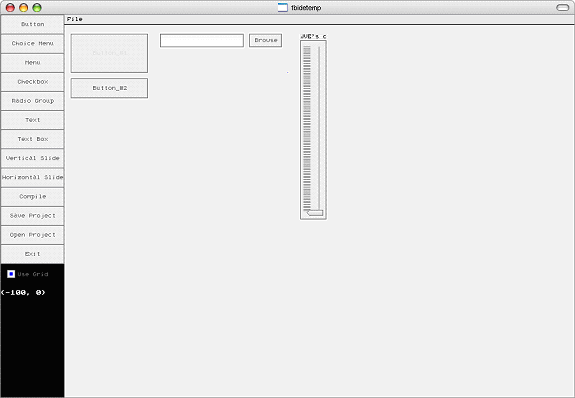
Not to worry, I right click on the slider bar and select the menu option �Change Position.� I type in the new position at 99. For the text I select �Move Cutoff Point� and use the arrow keys to change the place where the text gets cut off. I also centre the text and change its colour to a nice blue. Now I make some more miscellaneous objects and an Edit menu the same way that I make everything else.

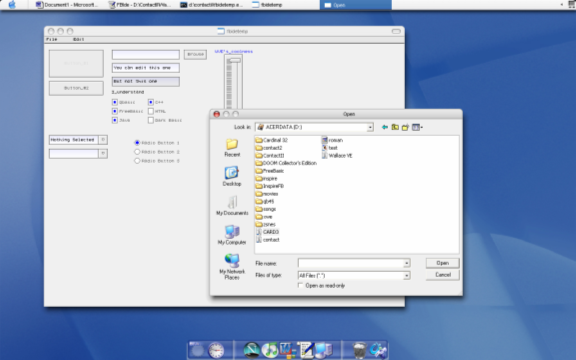
Now I hit the Compile button and open the file called WallaceVEcode.bas. If you don�t see that file then that means that you saved the project into a different folder and the code is located there as well. And Voila! Almost 1000 lines of code that I didn�t have to write. The whole thing took about 3 minutes to put together in Wallace VE.
Now you can run it, if you don�t see any text then you have to copy roman.fnt into the same folder as the source code. Here is the program running and I have selected File>Open and the open window has shown up as expected. Everything works, you can type text into the text boxes except for the inactive one, check and uncheck the checkboxes, move the slider, etc without me having to do any coding at all.
Download a copy of this tutorial: Wallace_Visual_Edito1.doc
TRUE/FALSE TESTING
Written by Moneo
Testing conditions or switches for TRUE or FALSE can be confusing, so first let's look at some QBasic/QuickBasic (QB) rules:
RULE #1: A boolean expression: any expression that evaluates as follows:
* to TRUE (nonzero)
* to FALSE (zero)
RULE #2: Conditional statements like IF, DO...LOOP, WHILE...WEND test a boolean expression and will execute, branch or loop based on whether the boolean expression is TRUE (nonzero) or FALSE (zero).
RULE #3: However, when a boolean expression is used as a value, assigned to a variable or output in any way, QB will convert the result, after evaluation, to TRUE (-1) or FALSE (0).
EXAMPLES:
x=2
if x then print "is true" .....Will print because x is TRUE (nonzero)
if x-2 then print "is true" ...Will not print because x-2 is FALSE (zero)
if x-5 then print "is true" ...Will print because x-5 is -3 is TRUE (nonzero)
result = (x=2) ................result will be -1 (TRUE) because x=2 is true
result = (x>0) ................result will be -1 (TRUE) because x>0 is true
result = (x<0) ................result will be 0 (FALSE) because x<0 is false
EXAMPLE OF TESTING A SWITCH WITH AN IF STATEMENT:
if switch then goto switchon
The boolean expression containing the variable "switch" is evaluated for zero or non-zero in accordance with Rule #2.
- If the result is non-zero, the condition is considered TRUE, and the goto takes place.
- If the result is zero, the condition is considered FALSE, and the goto does not take place.
Let me stress a point regarding the value of "switch". The above IF would do the goto under many nonzero circumstances, including:
- A value of -1
- A value of 1
The fact that the IF works for -1 or 1 tricks some people into thinking that either of these can always be considered as TRUE. It depends, see Rules #2 and #3 above.
EXAMPLE OF STRAIGHTLINE VERSUS TRICKY BOOLEAN CODE:
Here's a straightforward line of code. If the code is 1 then we want to increment count1 by 1.
if code=1 then count1=count1+1
A clever, but confusing alternative is:
count1 = count1 - (code1=1)
Here's how it works. The boolean expression (code1=1) is evaluated and the result is either TRUE (-1) or FALSE (0), in accordance with Rule #3.
- If it's TRUE (-1), count1 will be incremented because -(-1) is +1.
- If it's FALSE (0), count1 will not be incremented because -(0) is 0.
This kind of cleverness dates back to assembly language where IF-type conditional logic was avoided. With today's languages, you don't need to be so cute. You'll only be confusing yourself or the next programmer doing maintenance.
EXAMPLE OF OVER-SIMPLIFYING CODE WITH BOOLEAN EXPRESSIONS:
The following is the code I use to determine if a year is leap year. The resultant variable Isleap is set to TRUE (-1) or FALSE (0).
IsLeap = (Y MOD 4 = 0 AND Y MOD 100 <> 0) OR (Y MOD 400 = 0)
The logic is fairly straightforward following the standard definition of leap year which says:
If the year is evenly divisible by 4 and not divisible by 100,
or if the year is evenly divisible by 400,
then it is a leap year.
The code has two boolean expressions enclosed in quotes to comply with the definition. So, if either expression is true, it is a leap year.
Here's another implementation of the same logic which at first glance looks a little simpler.
Isleap = (Y MOD 4 = 0) - (Y MOD 100 = 0) + (Y MOD 400 = 0)
This code, which also works by the way, has three boolean expressions enclosed in quotes. Taking into account that TRUE is -1 and FALSE is 0, arithemetic is performed on the results of these expressions to produce a final TRUE/FALSE condition.
It took me a while to understand this code, and I tested it with a little program. I'll let you figure it out. Again, the second version of the code looks simpler, but I consider it more complicated. Like Albert Einstein said: "We have to make things simple, but not simpler."
RECOMMENDATIONS:
- Be aware of Rule #2 when writing conditional statements, that is, TRUE is nonzero and FALSE is zero.
- If you're going to use or assign the results of boolean expessions, remember that TRUE is -1 and FALSE is 0.
- If you're going to use switches, avoid using 1 for on, and 0 for off, even if that seems to make more sense to you. Use -1 for on, and 0 for off.
The recommended and more explicit way of handling switches is as follows:
CONST FALSE = 0
CONST TRUE  = NOT(FALSE) ..... this is equal to -1

if somecondition then switch is TRUE

if switch = TRUE then goto swon
if switch = FALSE then goto swoff

To flip a switch, turn it off if on, or turn it on if off:

switch = not(switch)
*****
Download a copy of this tutorial: TRUEFALS.TXT
OpenGL Picking Tutorial
Written by MGD
Introduction
Hi, MGD here with a tutorial for OpenGL picking. Ever make a 3D scene, but you want the user to be interactive with the 3D objects in it using the mouse, but just cant seem how to dectect what the user clicks? Well listen up! First, what is picking? Well, picking is the process of the user clicking on a 3D scene, the program processing which clickable geometry and/or OpenGL primative was clicked, then sending that "hit record" to the list of events to be processed later. You can do this 2 ways from what I know. Either way uses both the SDL and GLU libraries. Theres the coding way to do this where glu detects which primative was hit by storing the name assigned to the primative and some depth info to a hit list. But thats not the way we will be doing in this tutorial so forget everything I said about that. The way we will be focusing on is detecting which primative was hit by assigning a different color to each object and finding out which object was hit by detecting the pixel color where the scene was clicked. I like this way better because you can have more clickable objects than what the coding way would allow. The language for this tutorial will be FB, though it is easily ported to C.
Process
- SDL Detects that the user has clicked somewhere on the 3D scene
- Program passes mouse coordinates from SDL to our Picking Sub
- Picking sub renders scene again as it was when user clicked, except using no lighting, materials, and renders the scene with all clickable objects a different color and those that arn't clickable black
- GL gets the pixel RGB value of mouse coordinates
- Program checks that value to every object's "color code" that you rendered the scene with
- Sub sends the results to wherever or whatever you need them for
- You pop your matix, do not switch the buffers (so the user doesnt see it), load your identity and continue as usual
How we do it
First thing is that I will be explaining a few commands that we will need:
-SDL_MOUSEBUTTONDOWN
This is the value that the SDL_PollEvent function gives when the user has the mouse button down
-SDL_GetMouseState @X, @Y
This will give us the X and Y coordinate of the cursor position (Note: The Y axis is flipped, with the Y increasing from top to bottom, therefore we will need to flip it later)
-glDisable GL_DITHER
This will disable GL Dithering which can affect colors (It turns off the checkerboard patterns that some adapters use to make a color that it cant do as a solid 1...an example is checkering red and white to make pink, note: because of turning this off the adapter will make the color outputed the closest to the color that was specified, this is a problem when trying to read back the colors in the buffer...If you specify pink as a color for an object and the adapter can only output a red color then when you try to read it back it will read as red and not pink...to advoid this error make sure the monitor is in true color mode and 24-32 million colors are being used, if you cant then at the beginning of the program, output each color for your objects to the screen and read them back, then use those values that you read back as the values you check with later on)
-glEnable GL_DITHER
Guess :P
-glGetIntegerv GL_VIEWPORT, @viewport(0)
Gets info from the current viewport that we will need later on to read the pixels and will store them in the second parameter
-glReadPixles Cursor_X, Cursor_Y, width, height, GL_RGB, GL_UNSIGNED_BYTE, @pixel(0)
Get the pixel color from the X, Y position specified, at the width and height specified (Like a keyhole), in RBG format, with the UByte datatype into the pixel() (Our cursor position will be the X, Y coordinate and the width and height will be 1px*1px)
This Might Explain Better (Pictures are good):
Rendered Picking Buffer
|
Our Rendered Scene
|
So, ok...Now I know a bunch of GL commands, how do I put them together? Here's a workin example of all you need to know Picking Example.
Download a copy of this tutorial: Picking_Tut.html
A Closer Look at Managing Complexity
Program Size and Organization
Written by Rick Clark
A couple of issues back I wrote a brief, high-level article on managing program complexity. This is the first part of a two-part series where I will discuss in more detail some of those ideas on managing complexity.
What is Complexity?
First though, let me define complexity in relation to programming. A complex program is a program where a large number of program components and/or data are interacting with each other resulting in a number of different possible outcomes. In the paper, Software Complexity - An Alternative View [1], the authors put it very well:
According to Morowitz the complex systems share certain features like having a large number of elements, possessing high dimensionality and representing an extended space of possibilities. Such systems are hierarchies consisting of different levels each having its own principles, laws and structures.
From the very beginning, complexity has been a problem in developing software as Nancy G. Leveson has stated in her paper Software Engineering: A Look Back and A Path to the Future:
Thus the first fifty years may be characterized as our learning about the limits of our field, which are intimately bound up with the limits of complexity with which humans can cope. Our tools and techniques are used to assist us in dealing with this complexity, that is, to help make our systems intellectually manageable. We do this by imposing on the software development process the discipline that nature imposes on the hardware engineering process. We have been learning what types of discipline are necessary and how to best enforce them [2].
The reason that complexity is such an issue is because it can directly affect the reliability of a program [3]. A reliable program correctly accomplishes the task it was designed to do. An unreliable program has errors or bugs. It may be aggravating to buy a buggy game, but it is lethal to have a program glitch in an airliner. As the world becomes more automated, the need to manage complexity becomes more important.
However, it is a hard fact that complexity has been, as still is, the biggest problem in software development. We see the influence of complexity every time we must update a program because bugs have been discovered and (hopefully) corrected. The need to manage complexity has given rise to innumerable techniques, tools and even programming languages and yet it is a problem that has yet to be solved and, in my opinion, probably never will be solved. Not only is it a product of our limitation as human beings to comprehend the complete scope of possibilities in large, complex software systems, there is simply no mechanism that exists that can determine with absolute certainty that a complex program will function correctly [4].
This does not mean however, that we can�t mitigate the negative influence of complexity. If we can understand the source of complexity, we can then take measures to manage that complexity. While not a complete list, this series of articles will address two areas of software complexity.
- Program size and the number of interacting components. The complexity of a program increases proportionally (and possibly geometrically) as the number of interacting components increases [3].
- The amount of interacting information, or data, within a program. The problem here isn�t the data [4], a number is a number, rather it is how that number is represented and manipulated. If function B requires a number from function A, and function A passes an incorrect number or a number in the wrong format, function B will either fail or pass along the incorrect number to other components, creating a chain of failure within the program.
There are many other factors that relate to program complexity, but these two areas pose the greatest risk to the software developer. The rest of this article will discuss a strategy to address the first point above, program size.
It�s a Problem
Software programs are solutions to existing problems. A computer chess game is designed to solve the problem of having a competent player when there isn�t a human to play. A data entry program is designed to solve the problem of getting customer information into a database in the most efficient manner possible. An operating system is designed to solve the problem of interacting with a computer. The problem may be vital or recreational, but all software is designed to solve a particular problem.
Generally speaking, it is the problem or more specifically, the scope of the problem that defines the size of a program. There are of course exceptions to this rule, but that is why they are exceptions. In most cases, the size of a program should be proportional to the scope of a problem that needs to be solved. By scope, I mean all the steps that are required to implement a solution to the problem.
Every problem can be dissected into smaller, intermediate problems that when solved, will solve the larger problem. Some problems are small, and have little scope. For example, programmatically displaying an ascii chart is a small problem. Basically you can dissect this problem into generation of the ascii characters and displaying the ascii characters. A simple two or three-subroutine program will accomplish this. A data entry program has greater scope because it has more to do, and has a bigger list of intermediate problems that need to be solved.
To keep program size manageable, it is necessary to understand all (as best we can) the intermediate problems that need to be solved in order to solve the bigger problem. By identifying the intermediate problems, we can efficiently write code to produce a concise solution, reducing the amount code in the program and reducing its complexity. This means that the first step in writing a program is defining the problem. I like the general to specific methodology when analyzing a problem.
The first step is to write a general statement of the problem that needs to be solved. For example, let�s say that we want to write a dungeon-crawler. A general statement might be, �Write a program that simulates exploration of a random dungeon in the spirit of the classic game Rogue.�
Here we have the problem, �exploration of a random dungeon� and a limit on the solution �in the spirit of the classic game Rogue�. This defines the problem that needs to be solved, and sets the boundaries on the solution of the problem. Virtually every program designed to solve a problem, will have to do so within set boundaries. By including the boundaries within the problem definition, the refinement of the action steps becomes easier.
Although it may not appear so at first glance, the above general statement contains a lot of valuable information. First, the problem is one of simulation. A simulation is a model of a real or imaginary world or process. In this case we are simulating the exploration of a dungeon and the implied assumption is that within our simulation, the dungeon is a real place. This means we can add elements to our dungeon such as water, traps, secret rooms, ambient sounds, darkness and light. A dungeon is usually a scary place, filled with unknown monsters, hidden treasures and possibly an artifact that needs to be recovered. The dungeon also needs to have a random layout, as defined in our general statement, so we need to be able to change the layout each time the player plays the game. We also need some sort of mechanism to display the layout of the dungeon to the player.
Of course, to explore a dungeon we need one or more characters in the game. If the dungeon has monsters, and what dungeon doesn�t, then our character will have to have a way to deal with these monsters, which means weapons and ammo. If the character gets into a fight, there has to be some way to determine if the character wins or loses, so there has to be some sort of combat system. Of course, losing a fight means death, so the player has to have a stat system, some way to measure the vitality, and possibly skills of the player. The character may find treasure that will need to be managed so we will have to create an inventory system. We will also need a mechanism to display this information the player.
If there are monsters, then we need to ask ourselves how many different kinds of monsters exist in the dungeon, how smart they need to be and how tough they are to fight. The monsters will need to have stats, enough intelligence to roam about the dungeon and to attack the player, or interact with the player if they are friend rather than foe. If the monster uses weapons, it will need to have an inventory system so that the player can loot the carcass when the monster is dead.
The constraints also give an opportunity to add to our preliminary list of intermediate problems. Since this game is going to be in the spirit of the classic game Rogue, we will use ascii characters for the game display elements. This means will need to display both the dungeon and any vital information within the confines of an 80 by 25 or 80 by 50 screen. Since the ascii character set is limited to 255 characters, and not all are printable, we will need to decide what ascii characters are used for what objects. Color is also an option that can be used to help display information the player.
As you can see, the general statement is a springboard for defining the set of intermediate problems that need to be solved. By examining the general statement we have been able to create the start of a list of intermediate problems that will need to be solved. This is an iterative process that will ultimately define the scope of the problem and the scope of our solution. Once we have a starting list, then we must revisit each intermediate problem and see if we can dissect them into smaller pieces. Once that task is done, each new intermediate problem is then dissected again, until finally we reach a point where an intermediate problem cannot be subdivided further. This is the point where we can apply code to solve all of our little problems. However, don�t break out the editor just yet. We can simplify the coding process by looking at our list one more time.
Overlapping Problems
At this point we should have a list that has various groupings and within those groupings, problems that need to be solved. Now, look through those groupings and identify those problems that overlap groups. That is, we probably have problems that are the same or very similar in more than one group. These overlapping problems are prime candidates for generalized routines, and offer us a way to reduce code size by creating one routine for both problem groups, rather than writing code for two problems. The rule here is: if you do it twice (or more), write it once.
For example, we have decided in our dungeon crawler that both the player character and monsters will have inventory items. The player character can pick up any item dropped by a monster. Here we have three different entities that can �hold� an inventory item, the character, a monster and the floor of the dungeon.
Let�s assume that an inventory item is a type-def and that each entity has an array of type-defs that describe the inventory list for that entity. The character has an array that describes the inventory in his backpack, the monster has an array that describes what it is carrying in each hand and on his body, and the floor has an array that describes an inventory item at each location. We have three different problems, but we can write one routine to address all three problems. The following pseudo-code illustrates this concept.
SUB SwapInventoryItem(Inv1 as InvType, Inv2 as InvType)
�Write the swap code here
END SUB
�Monster drops an item
SwapInventoryItem MonsterInv(RightHand), FloorInv(2, 5)
�Player wants to pick up item
SwapInventoryItem PlayerBackpack(1), FloorInv(2, 5)
With one routine, we can handle moving inventory from one location to another, no matter the source and destination entities. Now, we look at the list again and ask ourselves, can we extend this even farther?
In order for the character to use an item, the character must equip an item. This means we are moving an inventory item from the backpack to the right-hand slot, for example. If an item is already in the right-hand slot, it must be moved to the backpack. Another case of swapping an inventory item, and our generalized swap routine will work just fine for this case. The player will need to drop an item to the floor if it becomes useless and so we have another case where we can use our general swap routine. By looking at the overlapping problems, this single routine has addressed several problems, and has reduced the code we need to write by a considerable amount.
Oops, I Forgot
Even the best program outlines will not cover every aspect of the code needed to implement a program solution. In all my years of professional programming, I have yet to see an initial design document completely describe a project. This is just another aspect of complexity.
When unanticipated problems arise, the first thing to do is to step away from the code. Do not write one line of additional code. Take this new problem and begin the analysis process, dissecting it into smaller problems, look for code overlap and fit it into the overall scheme of the program outline. By doing this immediately as the problem arises, it may be possible to fit the problem into existing code modules. Even if the problem requires new code, the analysis will enable us to mentally fit the problem into the overall strategy of our program solution. Knowing where to put a problem is as important as understanding the problem.
Code Organization
Complexity is a function of our inability to grasp the totality of a program as it grows in size. There are three simple, yet effective techniques to enable us to better visualize our program structure. The first is to use meaningful names for our program data and structure. Most modern programming languages allow more than 8 bytes of name space so using a subroutine name such as SwapInventoryItem is a lot more informative than SWI. You may remember what SWI is when you are coding it today, but will you remember a month from now?
The second technique is to break up the source code into meaningful sections. Most modern languages allow the use of Includes, different source files that when combined create one program. In our dungeon crawler we could break up the program into an inventory include, combat include, data definition include, and so on. By arranging code according to problem groups, we will know where to look when we must update or fix a section of code. It enables us to mentally get a handle on the code. Even if the programming language doesn�t have an Include command, you can still group code into sections within a single source file, and get many of the same benefits.
The third technique is as important as the others and yet is the most overlooked. Commented code. A simple one line comment on what a subroutine is doing will go along way toward reminding us what we were thinking when we wrote the code three months ago. It takes so little time to write a comment, yet will offer immense benefits when we must revisit code at a later date when our memory has been filled by other programs and other problems.
A Final Word
From the very beginning, complexity has been the bane of the programmer and for the near future at least, will continue to be so. However, we can manage that complexity, at least to a certain degree, and make our lives a bit easier. Having a clear picture of what we are trying to accomplish, reducing the size of a program and organizing our code will enable us to get a better grasp on our programming projects and make our programs much more reliable.
Reference
- Peter Kokol, Janez Brest, Viljem �umer, Software Complexity - An Alternative View,
http://lsd.uni-mb.si/metrics/articles/smc96/SMC96.html.
- Nancy G. Leveson, Software Engineering: A Look Back and A Path to the Future,
http://sunnyday.mit.edu/cacm.html.
- Edsger W. Dijkstra, The Humble Programmer,
http://www.cs.utexas.edu/~EWD/transcriptions/EWD03xx/EWD340.html.
- J.P. Lewis, Mathematical Limits to Software Estimation Supplementary Material,
http://www.idiom.com/~zilla/Work/Softestim/softestim.html.
Download a copy of this tutorial: Managing Complexity.rtf
MIDI Programming - A Complete Study
Part 1 - MIDI File Basics
Written by Stéphane Richard (Mystikshadows)
INTRODUCTION:
What are MIDI files exactly? We've all seen them at one point or another. These files have the .mid extension
and hold data to play music, on a computer, through a sound card's Sound Synthesis electronics. If the sound card
is of atleast good quality, MIDI files can play quite nicely. Not to mention that MIDI files hold
the most amount of music related information in the smallest size. This is often the
reason why they are used in games to hold musical sound tracks pertaining to the
game.
As we all know, FreeBASIC supports a library called FMOD which allows us to play MIDI files, however, this is not what this series is about. We will be going
beyond what FMOD allows in terms of MIDI files. This series is created for those of you wishing to know everything there
is to know about the MIDI standard, the file formats, how to create, save and load the MIDI file format in order to allow
the manipulation of it's contents at the byte level. With this knowledge, you'll understand enough about the MIDI files and
how to support them in your programs without the need of external libraries such as FMOD. I will use The Windows API directly
and detail everything you're likely to find in a MIDI for sound expression, tempo control and other MIDI related functionality
so you can have complete control over what you want to do with a MIDI File.
This first part of the series will cover some basic knowledge and concept about MIDI and MIDI files which will serve as background knowledge
to build on in the other parts of the series. So let's get started, we have alot of ground to cover. Basically, I'll be packing this first part
with as much information that you're gonna need in the next part of the series. This series is for anyone interested in creating specific MIDI
related applications whether it's simple tools, to full fledged software sequencers, to anything else that related to MIDI and Software Development.
To those of you I say: "You wanted the gory details, the how tos and the what not? Here they are!".
WHAT IS MIDI:
M.I.D.I. stands for (Musical Instrument Digital Interface) and is essentially a standard that was created when electronic music was first
created. When electronic music surfaced, back in the 70s, the need for two instruments to communicate quickly became apparent. Likewise, new instruments
were created and obviously a need for a certain standard so that instruments created by different manufacturers could communicate in a
networked environment so they could be controled from other instruments as easily as possible was also becoming
quite mandatory.
Therefore, shortly after that, a group of electronic musical instruments manufacturers grouped together and created what we know to day
as the MIDI Manufacturers' Association. Since their creation, the association has
been busy creating a standard means of communications among MIDI gear and Computers as well as allowing each manufacture to bring their own
brand of uniqueness through the use of system exclusive data. So far, the creation of this association has brought quite some great
advantages to the MIDI world.
Also, on typical MIDI gear (keyboard, sequencers, sound cards that support MIDI and the likes), a single MIDI port has
has 16 channels available to send and/or receive data from. Technically, all channels have the ability to send
and receive any type of data. However, it has been accepted as the norm that channel 10 be reserved for all drums and
percussion information. So, if you music is to have drums, you want to put those on channel 10 just to avoid problem with
the rest of your MIDI equipement which just might expect drums to be on channel 10.
THE MIDI STANDARDS:
Throughout the years, since the first MIDI standard was created, MIDI demands and needs have grown and somewhat changed
to accomodate the growing needs of electronic MIDI music and their manufacturers. So then, let's take a look at the four most wide
spread MIDI Standards.
- General MIDI Level 1:
This is the first Standard every created. In essence, this standard gave us the 128 instrument (called programs or patches) that
we all know today. It also gave is the 64 percussion patches that any MIDI file can have. Finally it gave us some standard set of
C.C.s (Continuous Controlers) that most MIDI programs offer today. In other words, anything MIDI you do today using any
software out there wouldn't be there without this first standard. This also defines Channel 10 for drums and percussions.
- General MIDI Level 2:
After a couple of years, synthesizer technology evolved quite alot, it wasn't too long after that that 128 sounds weren't enough to
answer the sound needs of today's musician. Some manufacturers of MIDI gear added their own twists and magic so to speak to offer more
sounds, more features into their equipement that answered these needs. A bit after that, the M.M.A. started the process of creating
the General MIDI Level 2 standard to accomodate for the new features since most manufacturers already added alot more than was available
in the G.M. level 1 standard. G.M. Level 2 adds such things as Bank Switching (to have different banks of sound patches), RPN (Registered
Parameter Number) to allow more control over the expressiveness of a sound and NRPN (Non Registered Parameter Numbers) to allow for the
manufacturers to add their own blend of special features. G.M. Level 2 is completely G.M. Level 1 compliant.
- Roland GS Standard:
Once the G.M. Level 2 was established, Roland created it's own brand of sub standards (especially in System Exclusive data) And NRPNs to be
implemented in all new MIDI gear from then on out. In essence, the Roland GS standard is G.M. Level 2 plus Roland specific
features and functionality. Since the Roland GS specification isn't obvious to come by. It's best to go for G.M. Level 2 atleast until Roland
makes the Roland GS standard publically available to everyone.
- Yamaha XG Standard:
Like Roland, Yamaha also created their own set of specific NRPN and Sysex features in order to give their MIDI gear their own blend of Yamaha
specific Features. Yamaha is very open in sharing their specifications with anyone willing to have them. As such they have made their
XG specifications available right here. Feel free to get this
to see exactly what XG implements from G.M. Level 2 and adds to it too.
THE MIDI FILE FORMAT:
MIDI Files basically are a file format standard that was created to offer a standard means of exchanging data between computers and midi gear as well
as between MIDI gear and MIDI gear. MIDI files typically have the .mid file extension. It holds information about the song to be played itself and information that controls the MIDI gear as the song is
being played. All and all, a MIDI starts off with a header chunk and then is followed by any amount of track chunks. Let's explain these in details.
- The Header Chunk:
As the name implies, the header chunk is of course at the beginning of the MIDI file. It is there to help describe the file in three ways. The Header Chunk always looks like this:
4D 54 68 64 00 00 00 06 ff ff nn nn dd dd
which should be broken down as such:
[4D 54 68 64] [00 00 00 06] [ff ff] [nn nn] [dd dd]
- The first four bytes [4D 54 68 64] are translated directly to "MThd".
- Right after are the four following bytes [00 00 00 06] and this will always be the same. It represents the four byte size of the header.
- Next we have 2 bytes [FF FF] which represent the file format. There are three such formats. They are:
- 0 => single-track
- 1 => multiple tracks, synchronous
- 2 => multiple tracks, asynchronous
Single track is fairly self-explanatory - one track only. Synchronous multiple
tracks means that the tracks will all be vertically synchronous, or in other
words, they all start at the same time, and so can represent different parts
in one song. Asynchronous multiple tracks do not necessarily start at the same
time, and can be completely asynchronous.
- The next two bytes [nn nn] is the number of tracks in the midi file.
- Finally, the last two bytes [dd dd] is the number of delta-time ticks per quarter note. In other words it's the
resolution (in time precision) that a note can be played at in a time span. More on this
later.
- The Track Chunk:
After the header chunk is the beginning of the track chunk information. Like the header chunk, the track has a header that can be read
as follows:
4D 54 72 6B xx xx xx xx
Which of course should be broken down as follows:
[4D 54 72 6B] [xx xx xx xx]
- The first four bytes [4D 54 72 6B], like the header chunk, represent "MTrk" and is a header for the track itself.
- The last four bytes [xx xx xx xx], represent the length of the track in bytes.
After these eight bytes is a series of MIDI events. These events are identical to the
actual data sent and received by MIDI ports on a synth with one addition. A
midi event is preceded by a delta-time. A delta time is the number of ticks
after which the midi event is to be executed. A MIDI event has a structure, let's review
that structure right now.
THE STRUCTURE OF A MIDI EVENT:
A MIDI event is really (in general) a set of 3 bytes that is interpreted in 4 pieces of information. And this is enough
to cover most of the possible MIDI messages you're likely to send to or receive from the MIDI port.
|
MIDI Event Byte Level Information
|
|
Name
|
Lenght And Range
|
Description
|
StatusByte
ChannelByte
DataByte1
DataByte2
|
[0-F]
[0-F]
[0-FF]
[0-FF]
|
Type of Midi message
MIDI Channel Number
First midi message data byte
Second midi message data byte
|
The status and channel Bytes are merged into one byte (00-FF) Because these messages have an MSB (Most Significant Byte) of 1 the command
statuses actually begin at 80 hexadecimal (128 and up to 255) The LSB (Least Significant Byte takes a value of 0-F Hexadecimal (0 to 15) to specify
which MIDI channel the command will be sent to.
A command message tells the MIDI gear to perform certain types of things like play
a note, change the volume, add effects, and other types of things. This table shows
the different command status and what they do.
| Status |
Expected Data |
Comments |
| 8x |
note, velocity |
Note off |
| 9x |
note, velocity |
Note on (velocity 0 = note off) |
| Ax |
note, value |
Polyphonic pressure |
| Bx |
controller, value |
Controller change |
| Cx |
program |
Program change |
| Dx |
value |
Channel pressure |
| Ex |
value (two bytes: LSB then MSB. many devices will accept only one byte which will
be interpreted as the MSB.) |
Pitch bend |
Now, any of these messages (note on notably) expect a note and a volume. Volume can be 0-7F hexadecimal (0-127). The note also has a
possible value of 0 to 127. The table below gives you the note values you can send.
|
MIDI Music Note Velocity Chart
|
|
Octave #
|
C
|
C#
|
D
|
D#
|
E
|
F
|
F#
|
G
|
G#
|
A
|
A#
|
B
|
|
0
|
0
|
1
|
2
|
3
|
4
|
5
|
6
|
7
|
8
|
9
|
10
|
11
|
|
1
|
12
|
13
|
14
|
15
|
16
|
17
|
18
|
19
|
20
|
21
|
22
|
23
|
|
2
|
24
|
25
|
26
|
27
|
28
|
29
|
30
|
31
|
32
|
33
|
34
|
35
|
|
3
|
36
|
37
|
38
|
39
|
40
|
41
|
42
|
43
|
44
|
45
|
46
|
47
|
|
4
|
48
|
49
|
50
|
51
|
52
|
53
|
54
|
55
|
56
|
57
|
58
|
59
|
|
5
|
60
|
61
|
62
|
63
|
64
|
65
|
66
|
67
|
68
|
69
|
70
|
71
|
|
6
|
72
|
73
|
74
|
75
|
76
|
77
|
78
|
79
|
80
|
81
|
82
|
83
|
|
7
|
84
|
85
|
86
|
87
|
88
|
89
|
90
|
91
|
92
|
93
|
94
|
95
|
|
8
|
96
|
97
|
98
|
99
|
100
|
101
|
102
|
103
|
104
|
105
|
106
|
107
|
|
9
|
108
|
109
|
110
|
111
|
112
|
113
|
114
|
115
|
116
|
117
|
118
|
119
|
|
10
|
120
|
121
|
122
|
123
|
124
|
125
|
126
|
127
|
|
When you are sending a controller command [Bx cc vv] it is useful to know which controller you are actually sending and what it does. As such, here is another table
that explains these controler numbers and what they are used for. This table shows some standardized controller numbers. Controller numbers 0 - 31 are continuous, MSB (most significant byte), numbers 32 - 63 are continuous, LSB (least significant byte), and 64 - 97 are switches.
| Name |
Hex |
Dec |
Comments |
| |
|
|
Controller numbers 00 - 1f [0 - 31 decimal] are continuous, LSB
(least significant byte) |
| Mod Wheel |
01 |
1 |
|
| Breath Controller |
02 |
2 |
|
| Foot Controller |
04 |
4 |
|
| Portamento Time |
05 |
5 |
|
| Data Entry MSB |
06 |
6 |
|
| Volume |
07 |
7 |
|
| Balance |
08 |
8 |
|
| Pan |
0A |
10 |
|
| Expression Controller |
0B |
11 |
|
| General Purpose 1 |
10 |
16 |
|
| General Purpose 2 |
11 |
17 |
|
| General Purpose 3 |
12 |
18 |
|
| General Purpose 4 |
13 |
19 |
|
| |
|
|
20 - 3f [32 - 63 decimal] are MSB (most significant byte) for
00 - 1f [0 - 31 decimal] |
| Sustain |
40 |
64 |
Momentary Switches |
| Portamento |
41 |
65 |
|
| Sustenuto |
42 |
66 |
|
| Soft Pedal |
43 |
67 |
|
| Hold 2 |
45 |
69 |
|
| General Purpose 5 |
50 |
80 |
|
| Temp Change (General Purpose 6) |
51 |
81 |
|
| General Purpose 6 |
51 |
81 |
|
| General Purpose 7 |
52 |
82 |
|
| General Purpose 8 |
53 |
83 |
|
| Ext Effects Depth |
5B |
91 |
|
| Tremelo Depth |
5C |
92 |
|
| Chorus Depth |
5D |
93 |
|
| Detune Depth (Celeste Depth) |
5E |
94 |
|
| Phaser Depth |
5F |
95 |
|
| Data Increment (Data Entry +1) |
60 |
96 |
|
| Data Decrement (Data Entry -1) |
61 |
97 |
|
| Non-Registered Param LSB |
62 |
98 |
|
| Non-Registered Param MSB |
63 |
99 |
|
| Registered Param LSB |
64 |
100 |
|
| Registered Param MSB |
65 |
101 |
|
| |
|
|
Channel mode message values |
| Reset All Controllers |
79 |
121 |
Val ?? |
| Local Control |
7A |
122 |
Val 0 = off, 7F (127) = on |
| All Notes Off |
7B |
123 |
Val must be 0 |
| Omni Mode Off |
7C |
124 |
Val must be 0 |
| Omni Mode On |
7D |
125 |
Val must be 0 |
| Mono Mode On |
7E |
126 |
Val = # of channels, or 0 if # channels equals # voices in receiver |
| Poly Mode On |
7F |
127 |
Val must be 0 |
So far, in all these tables, the events and commands had to be directed to a specific MIDI channel. There are eight commands that
do not apply to a specific MIDI channel but rather to the whole MIDI system in general. These are known
as System Messages. Note that any non-realtime status byte ends a System Exclusive message; F7 (EOX) is not required at the end of a SysEx message. Realtime status bytes may appear any time in the MIDI data stream, including in the middle of a System Exclusive (SysEx) message.
So then, here's a table to list these System Messages.
| Status |
Name |
Data |
| F0 |
System Exclusive |
data, then EOX or any status byte |
| F1 |
Time Code |
one byte |
| F2 |
Song Position Pointer |
two bytes: lsb msb |
| F3 |
Song Select |
one byte: song number 0 - 127 |
| F4 |
(undefined) |
|
| F5 |
(undefined) |
|
| F6 |
Tune Request |
no data |
| F7 |
EOX (End of System Exclusive) |
|
Finally, there are messages that like system messages do not apply to specific MIDI channels and basically
affect the playing of the song in general. these are called rightfully called realtime messages. Here's a
table with these messages, remember there is no data to supply to these commands.
| Status |
Comment |
| F8 |
Clock |
| F9 |
(undefined) |
| FA |
Start |
| FB |
Continue |
| FC |
Stop |
| FD |
(undefined) |
| FE |
Active Sensing |
| FF |
System Reset |
With all this information, you should now be better equipped to understand the contents of a MIDI file. There is, however, a very differrent type of information that can reside in a MIDI file. This type of information does not affect the song itself but rather
affects the hardware (sound card, keyboard, sound modules, drum machines and the likes) that the song will be played on. These are known as System Exclusive Messsage and this is what we'll be seeing right now.
ALL ABOUT SYSTEM EXCLUSIVE MESSAGES:
As I mentionned above, Different music gear manufacturers incorporate their own features into their equipment. The way they allow their equipment to be controlled is with the use
of a special set of messages that are known as system exclusive messages. The wide spread term for these messages are SysEx. There is no specific structure for a SysEx message
per se except that it has a beginning and an end. Here is the structure of the beginning of the SysEx message:
F0 XX nn... F7
Which can be read as:
[F0 XX] [nn...] [F7]
- [FF] is the command to indicate the start of a SysEx message.
- [XX] is a manufacturer ID (see here for a list of manufacturer IDs) to Identify the manufacturer. It will help to compare this against the MIDI gear to see if anything can actually process the message.
- [nn...] is a variable length list of bytes, it can be any lenght however, because of the speed of MIDI transmision they suggest keeping a block of SysEx to less than 64Kb to get acceptable response time.
- [F7] indicates the end of the SysEx message.
The contents of the SysEx message can be anything the MIDI gear can do. It can be a whole bunch of different things too that would be needed to set the keyboard into the right configuration to play the song for example. Could be asking the keyboard
to dump it's current SysEx setup so that it can be used later as another example. SysEx, in itself, becomes more than useful quite quickly when you really want to control, at the finest detail, the performance of a song
on a given MIDI gear.
There are four SysEx messages that are known as Universal SysEx Messages. This means that they do not apply to any specific manufacturer. Instead they server to help the whole MIDI system (or the computer) get information about
the MIDI gear that is connected to the MIDI system. Here are these Universal SysEx messages.
- General MIDI Enable:
Today, a majority of keyboard offer their own set exclusive sounds. Alot of them internally support G.M. sound patches and in order to gain access to those, you eed to
set the keyboard up to turn G.M. sound patches on. Here is the structure of this SysEx message.
0xF0  SysEx
0x7E  Non-Realtime
0x7F  The SysEx channel. Could be from 0x00 to 0x7F.
      Here we set it to "disregard channel".
0x09  Sub-ID -- GM System Enable/Disable
0xNN  Sub-ID2 -- NN=00 for disable, NN=01 for enable
0xF7  End of SysEx
- Master Volume:
This Universal SysEx message adjusts a device's master volume. Remember that in a multitimbral device,
the Volume controller messages are used to control the volumes of the individual Parts. So, we need some
message to control Master Volume. Here it is.
0xF0  SysEx
0x7F  Realtime
0x7F  The SysEx channel. Could be from 0x00 to 0x7F.
      Here we set it to "disregard channel".
0x04  Sub-ID -- Device Control
0x01  Sub-ID2 -- Master Volume
0xLL  Bits 0 to 6 of a 14-bit volume
0xMM  Bits 7 to 13 of a 14-bit volume
0xF7  End of SysEx
- Identity Request:
Sometimes, a piece of MIDI equipment might wish to know what other devices are connected to it. For
example, a Patch Editor software running on a computer may wish to know what devices are connected
to the computer's MIDI port, so that the software can configure itself to accept dumps from those devices.
The Identity Request Universal Sysex message can be sent by the Patch Editor software. When this message
is received by some device connected to the computer, that device will respond by sending an Identity Reply
Universal Sysex message back to the computer. The Patch Editor can then examine the information in the Identity
Reply message to determine what make and model device is connected to the computer. Each device that understands
the Identity Request will reply with its own Identity Reply message.
Here is the Identity Request message:
0xF0  SysEx
0x7E  Non-Realtime
0x7F  The SysEx channel. Could be from 0x00 to 0x7F.
      Here we set it to "disregard channel".
0x06  Sub-ID -- General Information
0x01  Sub-ID2 -- Identity Request
0xF7  End of SysEx
Here is the Identity Reply message:
0xF0  SysEx
0x7E  Non-Realtime
0x7F  The SysEx channel. Could be from 0x00 to 0x7F.
      Here we set it to "disregard channel".
0x06  Sub-ID -- General Information
0x02  Sub-ID2 -- Identity Reply
0xID  Manufacturer's ID
0xf1  The f1 and f2 bytes make up the family code. Each
0xf2  manufacturer assigns different family codes to his products.
0xp1  The p1 and p2 bytes make up the model number. Each
0xp2  manufacturer assigns different model numbers to his products.
0xv1  The v1, v2, v3 and v4 bytes make up the version number.
0xv2
0xv3
0xv4
0xF7  End of SysEx
- Sample Dump Standard:
Today, many keyboards offer sample based sound patches which means that to play a sound, they don't reply on oscilliators or other forms of sound synthesis
to play the sound. Instead they use a digitalization of a sound stored in their internal memory. In orer to gain access to these sample based sounds, the M.M.A.
created the SDS standard.
The SDS standard is a fairly complex system that doesn't simple use a message like the other three Universal SysEx. Instead it has different sets of commands
to get different types of information or send different types of information to the Sample Based MIDI gear. To find out what these
messages are you can read this to get the full details.
IN CONCLUSION:
Well I think I've packed enough information for a first part of a series. After you've digested this information there's no doubt in my mind that you'll
know alot more about MIDI files than you do now. This is really only the beginning. After you read this once, you should just consider this as a reference
to what lies ahead in the series. There's no need to remember every single piece of information (unless you really want to) as you can just refer to this page
whenever you like. There was alot of ground to cover and I think we did just that.
In the next part of the series, we'll start putting all this information to good use by creating a program that can read a MIDI file, parse it's contents and put them in a
structure we'll define in order to view them and manipulate them as we see fit. So brace yourself, there's plenty of coding up ahead in your future. As I mentioned, there's
alot of information here. If anything isn't quite clear, you might want to email me your questions and we'll see to it that all becomes as clear as it can be. Until next time. Happy reading, understanding and coding!.
MystikShadows
Stéphane Richard
mystikshadows@gmail.com
Download a copy of this tutorial: midifilespart1.html
Pointers in FreeBasic
Written by Eclipzer
Introduction to Pointers
One of the newest additions to the BASIC language (FreeBASIC) is pointers. Though powerful, programming with pointers is not a simple task. Pointers require a whole new level of understanding to be used effectively. Regardless of your programming experience, if you've never worked with pointers before, it's going to take some time to wrap your head around them.
What's a Pointer? A Trip Down Memory Lane
So what exactly is a pointer?! For simplicity, a pointer can be thought of as a variable, with the exception that, instead of holding data, it points to the data by holding the memory address of that data. Every piece of memory has a unique number associated with it. These numbers are refered to as memory addresses. Information can be stored at these addresses to be used at a later point in time. The key thing to understand is that, unlike a variable, where you only have access to the value of that variable, with a pointer you actually have access to where a value is stored in memory.
Creating a Pointer
You define a pointer exactly the same way you do a variable. The only difference is that you add POINTER or PTR to the end of your statement. Also a pointer's type must be excplicitly stated in its definition.
dim myPtr     as integer ptr     'use ptr suffix to define pointer
dim myPointer as integer pointer 'use pointer suffix to define pointer
It is important to understand that, unlike variables, a pointer's type does not affect the amount of memory it uses. This is because memory addresses are all the same size, and a pointer simply holds a memory address. Let's take a look:
dim myByte as byte    'define byte
dim myWord as integer 'define integer

print len(myByte) 'output size of byte (in bytes)
print len(myWord) 'output size of integer (in bytes)
In the above code, the size of a byte is in fact one byte, while the size of an integer is four bytes, exactly as we'd expect. Now for the pointers:
dim bytePtr as byte    ptr 'define byte pointer
dim wordPtr as integer ptr 'define integer pointer

print len(bytePtr) 'output size of byte pointer (in bytes)
print len(wordPtr) 'output size of integer pointer (in bytes)
It might be a little unexpected, but these two pointers are exactly the same size, even though one is a byte pointer and the other an integer pointer. So to reiterate, pointers hold memory addresses, which are all the same size, hence pointers always use the same amount of space, regardless of their type. This naturally begs the question, why must we explicitly state a pointer's type if it doesn't affect the space allocated to it? What exactly does the pointer's type do or mean? We'll tackle this soon, but first we need to understand a few more things.
Pointer Operators
In all honesty, a memory address doesn't do much for us in programming. It's when we can get a hold of the address of something specific in memory that pointers start to make a little more sense. To this end we introduce two new operators: the "address of" operator and the "contents of" operator.
The "address of" operator is denoted with the '@' symbol and is used to obtain a variable's memory address.
The "contents of" operator is denoted with the '*' symbol and is used to obtain the contents of a pointer.
dim myVar as integer     'define integer
dim myPtr as integer ptr 'define integer pointer

myVar = 512    'assign myVar a value
myPtr = @myVar 'obtain the memory address of myVar

print myVar  'print myVar
print @myVar 'print address of myVar

print *myPtr 'print contents of myPtr (myVar)
print myPtr  'print myPtr (address of myVar)
Notice that the output is identical. The first two lines are in terms of myVar, while the next two lines are in terms of myPtr. Let's review the two most important lines in the above code.
myPtr = @myVar
Remember myPtr is a pointer, meaning it holds a memory address. So, anything we assign myPtr must also be a memory address. We use the '@' symbol to obtain the memory address of myVar and then assign it to myPtr. So looking at the above line of code you should literally read "My pointer equals the address of my variable".
print *myPtr
Here we're displaying the contents of myPtr. Because we've set myPtr to point to myVar when we display the contents of myPtr we're really displaying myVar. It is important to understand that pointers only point to data, they do not contain it. Therefore if the data changes the contents of the pointer change as well.
dim myVar as integer
dim myPtr as integer ptr

myVar = 512    'assign myVar
myPtr = @myVar 'point to it

print " var =";myVar  'output myVar
print "*ptr =";*myPtr 'output contents of myPtr (myVar)
print " ptr = ";myPtr 'output myPtr (address of myVar)
print

myVar = 256 'change the value of myVar, indirectly changing the contents of myPtr

print " var =";myVar  'output myVar
print "*ptr =";*myPtr 'output contents of myPtr (myVar)
print " ptr = ";myPtr 'output myPtr (address of myVar)
print
Here, by simply changing the value of myVar we have indirectly changed the output of *myPtr. It is important to note that the value of myPtr remained unchanged, as it still contains the address of myVar. Well, if we can change the contents of myPtr just by changing the value of myVar, can we do the opposite? Change the value of myVar by simply changing the contents of myPtr? As it turns out, we can do this rather easily. We simply change the following line from the above code:
myVar = 256 'change the value of myVar, indirectly changing the contents of myPtr
to:
*myPtr = 256 'change the contents of myPtr, indirectly changing the value of myVar
As you can begin to see, this is where pointers derive a lot of their power, in the ability to change data indirectly without having to actually "contain" the data. They only need to "point" to it.
Pointer Arithmetic
The idea behind pointer arithmetic is that we can use a pointer as a starting point and then add or subtract from that pointer to access a new memory location. The syntax for this can be written one of two ways:
myPtr[offset]
or:
*(myPtr+offset)
In both instances, we are dealing with the value stored at the offset from myPtr. Now, you may be asking how big (in memory) is an offset. If we have the following:
value = *(myPtr+10)
are we talking 10bits from myPtr or 10bytes or 10 something else all together? Remember how we had to explicitly state a pointer's type when we defined it? This is where that comes into play. A pointer's type affects how many units of memory we move for each offset value.
dim myVar as integer     'create an integer in memory
dim myPtr as integer ptr 'define pointer

myPtr = @myVar 'point to our integer

print *(myPtr+10) 'output 10th integer from myPtr
print myPtr[10]   'same as above, using different syntax
Since our pointer is an integer pointer, we're moving 10 integers (40bytes) from myPtr to output whatever value is at that memory location. This brings up a VERY important point. Because we're using an offset from a pointer to access a new memory location, we must be certain to know what our new address is pointing at. If you start writing to memory that you havn't explicity allocated, it's almost guaranteed that you will crash your program. Hence, the preceeding code is poorly written, because even though our pointer points to myVar, the offset points to 10 integers away from myVar. Since we havn't explicitly allocated this memory, there is no way to be certain what it is we are pointing at. A better example would be:
dim myVar(10) as integer     'create 11 integers (0-10) in memory
dim myPtr     as integer ptr 'define pointer

myPtr = @myVar(5) 'point to 5th integer

myPtr[-1]=10  'set integer 5-1 (4) to 10
*(myPtr+1)=20 'set integer 5+1 (6) to 20

for i=0 to 10
  print "integer"+str$(i)+" =";myVar(i)
next
In this instance, by creating an array of integers, which are laid out consecutively in memory, we can safely use pointer arithmetic to access the other integers in the array. Notice, however, that myPtr doesn't point to the begining of the array, it points to the 5th integer. To address integers 0 to 4, we use a negative offset. A positive offset is used to address integers 6 to 10.
UDT Pointers
Pointers aren't limited to just the standard FreeBASIC data types. You can also define a pointer to point to a UDT (User Defined Type). To do this you simply use the name of the UDT for the type in the pointer definition.
type myUDT
  var1 as integer
  var2 as integer
  var3 as integer
end type

dim myType as myUDT     'create UDT in memory
dim myPtr  as myUDT ptr 'create a pointer of type myUDT

myPtr = @myType 'point to our UDT
Remember the pointer type just indicates how much memory the pointer can address at one time. So, we must first create our UDT in memory and then have our pointer point to it, before we can start using the pointer. Now that we have a pointer to our UDT, how do we access it's elements through the pointer? Your first thought might be to use the standard dot notation.
myPtr.var1 = value 'assign value to var1 using myPtr???
However, this is incorrect. The dot notation is only used for variables, not pointers. With a pointer we need to use the "->" symbol.
myPtr->var1 = value 'correct pointer notation to assign value to var1
It might seem odd, at first, to have two different symbols ("." and "->") which essentially do the same thing. With two symbols, though, we can quickly determine how we are accessing our information. The "->" symbol tells us immediately that we're working with a pointer. Otherwise we're working directly with a variable.
UDT Array Pointers
What happens if we have an array of a UDT?
type myUDT
  var1 as integer
  var2 as integer
  var3 as integer
end type

dim myType(10) as myUDT     'create 11 UDTs (0-10) in memory
dim myPtras myUDT ptr 'create a pointer of type myUDT

myPtr = @myType(0) 'point to first UDT
How do we access the UDT elements for a given array element? If we follow what we know, we might assume:
myPtr[offset]->var1 = value 'assign value to var1 of array element offset through myPtr???
However, in this case we use a "." instead of the standard "->" symbol.
myPtr[offset].var1 = value 'correct pointer notation to assign value to var1 of array element offset
We can do this because the brackets indicate that we're working with a pointer. If we were working directly with the array we would use parenthesis instead. It's important to note that the brackets aren't needed if we're already pointing to the array element we want to modify.
myPtr = @myType(0)    'point to element 0
myPtr[5].var1 = value 'assign value to var1 of 5th element

myPtr = @myType(5)    'point to element 5
myPtr->var1 = value   'assign value to var1 of 5th element
Both of these code blocks produce the same result.
Conclusion
As you can see, pointers introduce a whole new way of programming. Though this introduction should give you enough information to start using pointers on your own, there are still many advanced techniques to be learned. But that is for another article. Hopefully, you've enjoyed this article. Until next time!
-Eclipzer
Review
The following is a quick review of the material covered in this article. Think of it as a reference sheet.
Define a pointer using either the POINTER or PTR keyword.
dim myPtr     as myType ptr
dim myPointer as myType pointer
Use the '@' and "*" operators to obtain the address of a variable or the contents of a pointer.
myPtr = @myVar 'obtain address of variable using '@' operator
myVar = *myPtr 'obtain contents of pointer using '*' operator
Use pointer arithmetic to obtain the contents of a memory location from a pointer.
value = myPtr[offset]   'obtain contents at offset from myPtr (array style)
value = *(myPtr+offset) 'obtain contents at offset from myPtr (pointer style)
Use the "->" symbol to access the elements of a UDT (user-defined type) with a pointer.
value = myPtr->element 'access UDT element using the "->" symbol
Use brackets with dot notation (".") to access UDT elements of an array.
value = myPtr[offset].element 'access UDT element of an array
Download a copy of this tutorial: fb_pointers.html
Final Word
Well, that's it for another scrumpdiddlyumptious issue of QB Express. Hope you enjoyed it!
Submissions for next issue are due on: Saturday, February 18th. You can email all of your stuff to: pberg1@gmail.com
As always, we need reviews, tutorials, articles, letters to the editor, previews of upcoming programs, stuff to feature in the gallery, NEWS BRIEFS, and anything else you'd like to publish. We're a community-based magazine, so anything that's submitted will be published. Get writing!
Until next time...END.
-Pete
Copyright © Pete Berg and contributors, 2006. All rights reserverd.
This design is based loosely on St.ndard Bea.er by Altherac.